
Installation Guide


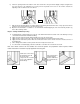

k) Check the spacing between the bottom of the door and sill. The sweep should be slightly compressed against the
top of the sill riser. If an adjustment is necessary remove the plastic screw covers on the sill riser and turn the
adjusting screws clockwise to raise the sill riser.
l) Nail through the brickmould into the wall sheathing using #10d galvanized finish nails evenly spaced around the
perimeter of the unit. A minimum of 12 nails must be used.
m) Open the unit and install a second #8 x 3” screw behind the weatherstripping at each of the fastening locations (3)
in the strike and hinge frame.
Step #3 – Sealing and Weatherproofing
a) Install aluminum or vinyl flashing across the top of the brickmould header. Seal both ends of the flashing to the top
of the brickmould and to the wall with caulking.
b) Apply a bead of caulk around the brickmould where it meets the exterior wall.
c) Apply a bead of caulk on the inside edge of the brickmould where the brickmould meets the frame.
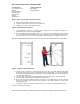
d) Apply a bead of caulk at the junction where the sill meets the frame on the exterior side of the unit out to the face of
the brickmould.
e) On a sidelight unit caulk the exterior junction where the mull post meets the sill.
f) If a sill extender is installed apply a bead of caulk at the seam where the extender meets the sill.
Note: 100% silicone sealant is the most durable, but it cannot be painted. Use polyurethane sealant if painted. Follow
sealant manufacture’s instructions for proper application and curing time.
2k
Caulk at the corner where
the aluminum of the sill
meets the frame
components. Do not caulk
on top of the adjustable
threshold cap.
If the sill extender is
installed, apply a
bead of caulk where
the extender meets
the sill.
3d 3e 3f