
Operating and Installation instructions


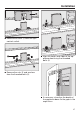


Table Of Contents
- Contents
- IMPORTANT SAFETY INSTRUCTIONS
- Caring for the environment
- Installation
- Installation location
- Installation notes
- Installation dimensions
- Installing the wine conditioning unit
- Before starting...
- Tools required
- Aligning the installation niche
- Checking the installation niche
- Before installation
- Preparing the installation niche
- Pushing the wine conditioning unit into the niche
- Aligning the wine storage unit
- Securing the wine conditioning unit in the niche
- Securing the toe-kick board and cover
- Aligning the appliance door
- Limiting the opening angle of the appliance door
- Electrical connection
- Saving energy
- Guide to the appliance
- Accessories
- Before first use
- Switching the wine conditioning unit on and off
- Selecting additional settings
- The ideal temperature and humidity
- Door alarm
- Storing wine bottles
- Automatic defrosting
- Cleaning and care
- Frequently Asked Questions
- Causes of noises
- Customer Service
- Declaration of conformity
- Copyrights and licenses

Installation
*INSTALLATION*
32
Tip: Secure the power cord to prevent it
becoming caught: tie a piece of string
to the middle of the cord and as the
wine storage unit is being pushed into
the niche, pull the cord forward under-
neath the wine storage unit.
Push the wine storage unit carefully
into the installation niche.
If the wine storage unit cannot be
pushed into the niche because the
floor is uneven, for example, unscrew
the rear feet slightly (see “Installation
– Aligning the wine storage unit”) and
push the wine storage unit into the
niche.
Remove the edge protection from
the adjacent cabinet fronts.
Aligning the wine storage unit
Align the wine storage unit with adja-
cent cabinet fronts as described be-
low.
The adjustable feet at the front and
back of the appliance can all be ad-
justed from the front of the appliance.
Risk of damage due to incorrect
feet adjustment.
You may damage the adjustable feet
if you use a cordless screwdriver.
Always adjust the front and rear feet
by hand.