User Guide Lenovo Slim 7i (16″, 7) and Lenovo Slim 7 (16″, 7)
Read this first Before using this documentation and the product it supports, ensure that you read and understand the following: • Generic Safety and Compliance Notices • Safety and Warranty Guide • Setup Guide First Edition (April 2022) © Copyright Lenovo 2022. LIMITED AND RESTRICTED RIGHTS NOTICE: If data or software is delivered pursuant to a General Services Administration “GSA” contract, use, reproduction, or disclosure is subject to restrictions set forth in Contract No. GS35F-05925.
Contents About this guide . . . . . . . . . . . . . iii Chapter 1. Meet your computer . . . . . 1 Front . . . . . . . . . . . . . . . . . . Base . . . . . . . . . . . . . . . . . . Left . . . . . . . . . . . . . . . . . . Right . . . . . . . . . . . . . . . . . . Features and specifications . . . . . . . . . Statement on USB transfer rate . . . . . . Operating environment . . . . . . . . . Avoid constant body contact with specific hot sections . . . . . . . . . . . . . . . Laser safety for the ToF sensor .
ii User Guide
About this guide • This guide applies to Lenovo product model(s) listed below. Illustrations in this guide may look slightly different from your product model. Model name Machine type (MT) Lenovo Slim 7 16IAH7 82VB Lenovo Slim 7 16ARH7 82UX • For further compliance information, refer to the Generic Safety and Compliance Notices at https:// pcsupport.lenovo.com/docs/generic_notices. • This guide may contain information about accessories, features, and software that are not available on all models.
iv User Guide
Chapter 1. Meet your computer Front 1. Microphones Capture or record sound and voice. 2. Infrared LED Emit infrared light for face authentication. 3. Camera • Capture still and moving images for taking photos, recording videos, and video chatting. • Capture your face images for face authentication. Note: Use Windows Hello to enroll your face for face authentication. 4. Camera light If the light is on, the camera is in use. 5.
Base 1. Wireless antennas Send and receive radio waves for the built-in wireless LAN (local area network) and Bluetooth module. Note: The antennas are not visible from the outside of the computer. 2. Numeric keypad To enable or disable the numeric keypad, press the Num Lock key. 3. Touchpad Perform finger touch and all the functions of a traditional mouse. Note: The touchpad also supports multi-touch function. 4. Keyboard Enter characters and interact with programs.
Left 1. Power connector Connect to power with the included power cord and ac power adapter. Note: Power connector varies by model. It may be either a rectangular or a USB-C connector. If the power connector is a physical USB-C connector, it is used primarily for power input. It does not support DisplayPort Alt Mode nor does it support SuperSpeed USB data transfer. Use the other USB-C connector (4) for those purposes. 2. Charging light Indicate whether the computer is connected to ac power.
Right 1. Speaker Produces sound. 2. Novo button hole Press the Novo button to open the Novo Button menu. From the menu, you can choose to open the UEFI/BIOS setup utility, the Boot menu, or the Windows startup options screen. 3. SD card slot Insert an SD card or a MultiMediaCard (MMC) into the slot for data transfer or storage. 4. USB (3.2 Gen 1) Type-A connector Connect a USB-compatible device, such as a USB keyboard, a USB mouse, a USB storage device, or a USB printer. 5. USB (3.
Features and specifications Dimensions • Width: 356.8 mm (14.05 inches) • Depth: 247.4 mm (9.74 inches) • Thickness – Thinnest: 17.4 mm (0.68 inches) – Thickest: 19.9 mm (0.78 inches) ac power adapter • With a USB-C plug – Input: 100 V ac–240 V ac, 50 Hz–60 Hz – Maximum output: 20 V dc, 5 A – Maximum power: 100 W • With a dedicated rectangular plug – Input: 100 V ac–240 V ac, 50 Hz–60 Hz – Output: 20 V dc, 6.
Connectors and slots • Combo audio jack • USB Type-A connector × 2 (one connector with Always-On function) • USB-C connector (with the icon) * – Power input up to 100 W using the included power adapter – Power output up to 5 V and 3 A – USB data transfer rate up to 480 Mbps for USB 2.0 • USB-C connector (between the HDMI connector and the combo audio jack) – Power input Note: The maximum theoretical input power through this connector is 100 W.
Operating environment Maximum altitude (without pressurization) 3048 m (10 000 ft) Temperature • At altitudes up to 2438 m (8000 ft) – Operating: 5°C to 35°C (41°F to 95°F) – Storage: 5°C to 43°C (41°F to 109°F) • At altitudes above 2438 m (8000 ft) – Maximum temperature when operating under the unpressurized condition: 31.3°C (88°F) Note: When you charge the battery, its temperature must be no lower than 10°C (50°F).
8 User Guide
Chapter 2. Get started with your computer Work with Windows The following table contains Windows frequently used settings. You can learn the basics and start working with Windows right away. To configure settings, type the corresponding keywords in the Windows search box and select the best match. Follow the on-screen instructions to customize settings. Table 1.
Windows help information If the on-screen instructions cannot solve your problem, refer to the following to get the online Windows help information. • Type Get Help or Tips in the Windows search box and then press Enter. When the app opens, type the problem description and select the matched result. • Visit Microsoft support Web site: https://support.microsoft.com. Enter what you are looking for in the search box and get search results.
Interact with your computer Keyboard hotkeys Some keys on the keyboard are printed with icons. These keys are called hotkeys and can be pressed alone or in combination with the Fn key to open certain apps or change certain settings quickly. The functions of the hotkeys are symbolized by the icons printed on them. Hotkey Function Mute/Unmute sound. Decrease/Increase system volume. Mute/Unmute the microphone. Increase/Decrease screen brightness. Switch display devices. Turn airplane mode on and off.
Note: Hotkeys that do not share keys with function keys are not affected by the hotkey mode setting. They should always be used with the Fn key. The FnLock switch The FnLock switch also controls how the hotkeys (or function keys) are used. The switch is turned on and off by using the Fn + ESC key combination. The FnLock switch and the hotkey mode (a UEFI/BIOS setting) are linked. Changes made in a place are reflected in the other. The following table shows the relationship between the two settings.
Touch operation Used for Opening the context menu Tap, hold and lift Zooming out Pinch Zooming in Spread Opening the widgets panel Swipe in from the left edge Opening the notification center Swipe in from the right edge The Windows operating system also supports 3- and 4-finger gestures on the screen and the touchpad. You can set them up in Settings ➙ Bluetooth & devices. Chapter 2.
14 User Guide
Chapter 3. Explore your computer Customize intelligent features in Lenovo Vantage You can enable or disable and customize many intelligent features in Lenovo Vantage. Step 1. Open Lenovo Vantage. Step 2. Select Devices ➙ Smart assist. Step 3. Change settings that control the various intelligent features. Eye care mode Eye care mode intelligently adjusts the color temperature of the screen to filter blue light, which can effectively reduce damage to the eyes, thus protecting the eyes.
Check the battery status The battery status icon or is in the Windows notification area. You can check the battery status, view the current power plan, and access battery settings quickly. Click the battery status icon to display the percentage of battery power remaining and change the power mode. A warning message is displayed when the battery is low. Charge the battery When the remaining battery power is low, charge your battery by connecting your computer to ac power.
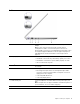
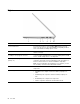
For models with two USB-C connectors, the included ac power adapter features a USB-C plug. You can plug the included ac power adapter into either of the USB-C connectors. Figure 1. Models with two USB-C connectors For models with a single USB-C connector, the included ac power adapter features a rectangular plug. Plug it into the rectangular power connector on your computer.
Table 3. Lenovo USB-C chargers and corresponding power-supplying capabilities Lenovo USB-C charger Capability 100 W (20 V, 5 A) Capable of charging the computer 45 W (20 V, 2.25 A) 65 W (20 V, 3.25 A) Capable of charging the computer in sleep, hibernation, or powered-off state Note: For models with a dedicated rectangular power connector, the USB-C connector is not designed as the primary power input port.
Change settings in UEFI/BIOS setup utility This section introduces what is UEFI/BIOS and the operations you can perform in its setup utility. What is UEFI/BIOS setup utility UEFI/BIOS is the first program that runs when a computer starts. UEFI/BIOS initializes hardware components and loads the operating system and other programs. Your computer may include a setup program (setup utility) with which you can change certain UEFI/BIOS settings. Open the UEFI/BIOS setup utility Step 1.
Set passwords in UEFI/BIOS setup utility This section introduces the types of passwords that you can set in the UEFI (Unified Extensible Firmware Interface) or BIOS (Basic Input/Output System) setup utility. Password types You can set various types of passwords in the UEFI/BIOS setup utility. Password type Pre-requisite Usage Administrator password No You must enter it to start the setup utility. User password The administrator password must be set.
Step 4. In the Enter New Password text box, enter the new password. Step 5. In the Confirm New Password text box, enter the new password again. Note: If you want to remove the password, press Enter in both text boxes without entering any character. Step 6. Select Exit ➙ Exit Saving Changes. If you remove the administrator password, the user password is also removed. Set user password You must set the administrator password before you can set the user password.
Step 4. Select Exit ➙ Exit Saving Changes. If the hard disk password is set, you must provide the correct password to start the operating system. Change or remove hard disk password Step 1. Open the UEFI/BIOS setup utility. Step 2. Select Security. Step 3. Change or remove the hard disk password. To change or remove master password, select Change Master Password and press Enter. Note: If you remove the master hard disk password, the user hard disk password is also removed.
Chapter 4. Help and support Frequently asked questions How do I partition my storage drive? Refer to https://support.lenovo.com/solutions/ht503851 What should I do if my computer stops responding. Press and hold the power button until the computer turns off. Then restart the computer. 1. Carefully unplug the ac power adapter and turn off the computer immediately. The more quickly you stop the current from passing through the computer the more likely you will reduce damage from short circuits.
Resources How to access? Use Lenovo Vantage or Lenovo PC Manager to: • Download and install the latest drivers and firmware. • Configure hardware settings Use Windows Search. • Diagnose computer hardware problems. • Check the computer warranty status. Product documentation: • Generic Safety and Compliance Notices 1. Go to https://support.lenovo.com. • Safety and Warranty Guide 2. Detect your computer or select computer model manually. • Setup Guide • This User Guide 3.
CRUs for your product model The table below lists the CRUs and CRU types that are defined for your product model. Part Self-service CRU Power cord X ac power adapter X Optional-service CRU Notes: • CRU replacement instruction is provided in one or more of the following publications and are available from Lenovo at any time upon your request.
Services available during the warranty period • Problem determination - Trained personnel are available to assist you with determining if you have a hardware problem and deciding what action is necessary to fix the problem. • Lenovo hardware repair - If the problem is determined to be caused by Lenovo hardware under warranty, trained service personnel are available to provide the applicable level of service.
Appendix A. Notices and trademarks Notices Lenovo may not offer the products, services, or features discussed in this document in all countries. Consult your local Lenovo representative for information on the products and services currently available in your area. Any reference to a Lenovo product, program, or service is not intended to state or imply that only that Lenovo product, program, or service may be used.
Any performance data contained herein was determined in a controlled environment. Therefore, the result obtained in other operating environments may vary significantly. Some measurements may have been made on development-level systems and there is no guarantee that these measurements will be the same on generally available systems. Furthermore, some measurements may have been estimated through extrapolation. Actual results may vary.