Getting started KRVBECE {En} Before applying the power Units ars designed for operation as folios. China AC220¥ only SOHO CONCUBINE engross AT 110-120/ 220/ Z0-200Y switchable * AC voltage selection switch Tho AC voltage selector switch on the radar panel i 58t 10 the voltage AC voltage salts that prevails in the area 1o which the unit is shied. Before connecting the power cord to your AC outlast, make sure that the setting position of this switch matches your e voltage.
KAVBEOD (Fn) Caution : Read the pages marked A carefully to ensure see operation. Rotting started Before applying tha pow 2 A\ Safety precautions .. .2 . Unpacking .2 e flmmll features. 4 | lames and functions of parts § ; System connections § .6 Connecting the antennas . FM SPACE switch Connecting audit components Connecting dives components Conn acting the system control Connecting the speakers . Connecting the repeater How to use the remote control Memes and functions of keys...
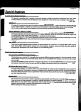
This accelerate is provided with a verity of surround mads to bring you maximum enjoyment from your video software, Select a surround mods according 1o Your equipment or the software you are going to play. Enjoy! DOLBY e The Dolby AC-3 mode fetch you enjoy LD software marked BESTSELLER] oy o/l a5 the input of other Dolby format digital signals, in digital surround. By providing up o 5.
Names and functions of parts BAND indicators. SPACER indicators VISUAL FiX indicator © REMOTE POWER key Usa 10 switch the prows ON/STANDBY ‘wham the MAIN POWER i3 turned ON, © Tone Control knobs © Numeric keys © STANDBY indicator © AC-3 indicator Lights when an AC-3 format senna\ is being played back, © OVER LEVEL indicator ~{Z Lights wham the label of the signal being PGt is to0 high, © DSP LOGIC key Use o tum on, Or Switch, the DSP LOGIC mode. © AUTO/PRO LOGIC key ~ ties switch, the DOLBY SURROUND mode.
System connections Make connections as shown blow. Do not connect the power cord 26 a wale outlet until all connections are completed. Antenna terminal connections © Push lever. @ insert cord. © Return lever. : eeo L ooh loop antenna AM outdoor antenna i The supplied loco antenna is for use indoors.
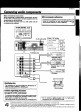
Connecting audio components Marks connections as shown below. " When connecting the related system components, be sure Microcomputer malfunction 10 also refer to the instruction manuals supplied with the " unionist < erroneous display even 1o & wall outlet until all though il connections have been made properly, tests the contentions st “plump" W 4 microcomputer deferring to “In case of difficulty .
connecting vi component Make connections as shown below. ; Wuhan connecting the related system components, be sure to also refer to the instruction manuals supplied with the | components you ars connecting. i Do not connect the power cord to a wail outlet until ali connections are completed. Video deck 8 or video camera i Conan ct components capable of outputting DOLE AC-3 format digital signals.
Connecting the speakers O tip contingent. IMPEDANCE SELECTOR switch for front speakers. {560 Dow) © Loosen. Instar, © Recurs, @T Center Speaker O@ . ®0 {80180} ‘e Neva short circuit the + and speaker cords if the left and right speakers are connected inversely or the speaker nods are connected with reversed polarity, the ‘scud will be unnatural with ambiguous acoustic imaging. Ba sure 10 connect the speakers correctly. #To emphasize deep bass sounds, connect a sub-woofer as desired.
How to use the remote control KRVG900 tEn) “This remote control has 3 operating modes; the function of sate key changes accordingly. Graphical User interface (GUI} Lets you operate the receiver {and related components) by moving a hand that appears on the screen of your monitor TV. KEN WOOD M08 ...nccnsnerscascssrnsornnrnnns This mode lets you operate the receiver, and other KEN WOOD source components, fiche cassette decks and CD players, using this remote control.
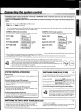
KRVBEOR fEn] Operating distance Turn on the receiver. Nonvoter sensor Set the input selector to the component you want to control. Use a component control selection key to select the component you want to central. toted RL-ROS03 inbreed ray system a Refer to the "Remote control key operation table” and press the koy corresponding to the aeration you desire. : wiener pressing keys in succession, press each key firmly and be sure 10 wait at east 1 second before pressing the next key.
Using the 0SD (On Screen Display) KFVGI00 (Ent This receiver incorporates an on screen display (0SD) feature to provide information in fare easy to read characters end to simplify operation. GSD lats you carry out three types of operations using the remote control's GUI {graphical user interface) mode, But first, lets see what kind of screen OSD provides, Switching to the GUI {Graphical User Interface) mode Turn on the components you want to use. Activate the GUI mode.
KAVSA0D (B R «ovs or controls seaweed in this operation. ‘ Operating in GUI mode On-scream operation in GUI mode consists of moving the band shaped pointer icon to defect tams from the screen. Fiat of ail, lets try moving the pointer freely and selecting an item. Activate the GU mode. #The remote control switches 1o the on-screen aspiration made. #lf no mans are displayed on screen, GUI mads is activated. ¥ 2 many is displayed, GUI made is canceled.
Convenient items for on-screen operation Convenient and often used items are displays at 1he bottom of the screen for you to use 83 necessary. i an item cannot be used with 8 certain menu, twill not be displaced. Displays the next Me Nu. quasar the MIDNIGHT mode for Displays the SOUND MENU. Dolby AC3 surround ~[35 Returns 10 the MAIN MENU. Adjusts the dimmer | Displays the previous menu. Displays the SET UP menu. ~{3] Screen menu structure Barlow is & genres! towline of the screen menu structure.
Preparing for playback (SeT up) Uss the SET UP menu to create an ideal AV operating environment by matching the system control functions to your components. The SET UP menu arranges for proper control of other KEN WOOD components and systems, as well as video equipment from other manufacturers. Preparations #Turk on your monitor TV, Sot the SYSTEM CONTROL Set the KEN WOOD system control. For details regarding SYSTEM CONTROL, see ‘Connecting the stern control. © Choose a SYSTEM CONTROL nude.
Setting up the 1R REMOTE CONTROL Ba fore operating idea components using cremate control supplied with this receiver, you need to input the setup aced that corresponds 1o the 1R remote control of the component you want to control © Look up the setup cods for the component you want to control . Use the *Setup Code Chart' to look up the setup code after determining the maker and the remote control capabilities of the component you wish to control.
DUBROVNIK () © Mentor the commands for the receiver. Typeset the receiver's input selector to the source you want to play. This setting also turns on the receiver {when the MAIN POWER key set 16 the ON position} The INPUT changes as folios: nobs ~» CD TAP ETA {deck TAIPEI {deck VIDEO -~ VIDEO ~ YV ~» CABLE -+ none Select VIDEO, if you connect a single cassette sack, select “TAPE 1B" when selecting the TAPE 1 input.
I e o contorts use in this operation. Surround set up To obtain the most possible enjoyment from the receiver's various surround mods, be sure to compete the surround set up | ‘as shown below. Speaker placement. Front speakers :Pisces 10 the front left and right of the listening position. Front speakers are required for alf surround modes., Center speaker: Place front and center. This speaker stabilizes the sound image Canter speaker and helps recreate sound motion.
What's delay time? Thea sound you hear is composed of sound that comes 10 your ass directly from the sound sours {direct sound), and sound that is reflected off the walls, floor, and ceiling of your room elected sound). Reflected sounds arrive at your ears Sightly later then the ultrasounds. Delay time is tha radiance in arrival tme between the. defect sound and the refracted sound. This receiver sets the appropriate delay time automatically when you put the speaker distance. Enter i .
Preparations e Tor a0 the power to the related components, #56t the MAIN POWER key 1o the ON position. s power am FOND Tha indicator for the speakers you want 1o 1se shooed be it Start playback from the selected source. Adjust the volume. Increase volume ABOVEBOARD En) +Sound from the speakers connected to the SPEAKERS A terminals on the rear pane. BON :Sound from the speakers connected to the SPEAKERS 8 terminals on the rear panel.
Adjusts low Adjusts bi Frequencies frequencies KEVEN {6n) Shifts sound image 1o the right o w St ifs sours mage o the deft Emphasizing deep bass (LOUDNESS) LOUDNESS lets you emphasize the sound of deep bass when fastening at o volumes. ol Crass again to return to previous sound.
LINE STRAIGHT playback Use this function for high quality playback of CO's fetch. © Select 2 playback source. m/@ € Cross the LINE STRAIGHT key. TAPE 2 MOTOR) 4 STRAIGHT € Start playback . apt B SECTOR «Tone controls do not work during LINE STRAIGHT playback. e Grassing any of the keys related to surround playback will cancel LINE STRAIGHT playback. #You can also select LINE STRAIGHT from the on-screen display {SOUND MENU #URINE STRAIGHT playback cannot be used when using only digital inputs.
Recording I revs o controls used in this operation. ji Recording a music source lin © Select the sours you want to record. Detect 8 source attar than TAPE 1 © Sat the cassette deck to record. iy @ Start playback, then stet recording. Dubbing tapes (TAPE 2 —~ TAPE 1) © Cross TAPE Lights Set the input selector 1o & source other than TAPE 1, @ Start playback from TAPE 2, then start recording on TAPE 1. #You can lase select TAPE 2{MONITOR] using on-screen operation MAIN MENDEL.
Keys of controls used in his operation The following steps show how to record playback from VIDEO onto the video deck connected s VIDEO. For details regarding operation of the video components, refer to the operating instructions supplied with the components, i s cent the component rant 3 Com 6 6! ont you want to record. #Connect the Source you want 10 record to the VIDEO terminates.
Listening to radio broadcasts This section shows you how to receive radio broadcasts. You can preset up to 40 stations, which can then be received with the touch of a single button. Tuning radio stations B Select 8 broadcast band, Set the input to tuner. okl Select a tuning method. Select a station. For higher v‘m/\ aquamarines 2° For dower frequencies Q‘(} V00 (Ent Keys of contrails used in this operation. The input sources change as fallows: @) TUNER (Frequency display} 1 THE LMD Frequency stipple P 89.
Tuning radio g radio stations by frequency (DIRECT tuning) | Set the input to tuner. @ Enter the frequency. — Keys or corrals used in this operation. The input sources change as follows: @ TUNER (Frequency display} @ TRIPE 13 Frequency display 8 M S Each press switches the band as follows: Leather “EME* i disciple Press the numeric keys in the following order: * AM 10 kHz/FM 100kHz tuning space Canada, etc.j AM 810 kHz, prods AM 1280 kHz, prods FM 90 MHz, press. FM 102.5 MHz, press * FM SPACE switch.
ABSCOND (En) Preparations uneven tithe station wanton store. ~(Z harass the RECEIVER key on the remote 10 activate the receiver mods. I ey contortionist used in this operation. Presetting radio stations © Press the MEMORY key white engraving the station. MEMORY Proceed to step @ within 5 seconds {you wait finger than Seconds, repast spat @) § Enter a prevent amber [1-405. Press tha numeric keys in the following order: For ™6", press [8] For 20", press replaced by the nee one. 5 SOC.
Ambiance effects This receiver incorporates 4 different sound modes to st you enjoy surround sound with a wide varlet of program sources. The Dolby AC-3 and Daley Pro Logic surround sound let you enjoy theater-like surround affects when you pay Dolby AC-3 and Dolby Pro Logic program sources (like Discernible. Dolby 3 Stereo creates a panoramic frontal sound field while keeping dialog onscreen.
KAVIH00 (En) DSP Logic DSP Magic transforms your listening room anti either & SMALL or LARGE movie theater by using DSP to add delay and reverberation 1o signals processed by the Dolby Pro Logic surround decoder. These modes are most effective with Dolby Pro Logic program sources, but can also create & convincing theater-like atmosphere from a {non-Dolby) stereo signal.® The EFFECT revel lats you adjust the “presence” of the theater according to your preference.
Playing back with surround sound DOLBY AC-3 can be used when playing LD software hoes ring the DS Sm mm] ark and DOLBY AC-3 format digital broadcasts DOLBY PRO LOGIC and DOLBY 3 STEREO can be used’ o e | mark. MAKARIOS (Er) ‘when paying video or LD software bearing the LOGISTIC can be suds with sny source. Be sure to complete "Surround set up" before using any of these surround modes. (25 Preparations #Tum ON related complainants. e Complete “Surround set up'.
KRVB0D (En) To select a DSP LOGIC mode Grassing the blue triangle {displayed when DSP LOGIC is turned ont in the DSP LOGIC icon on the SOUND MENU, displays the D8P CONTROL screen. Set the DSP LOGIC mode and EFFECT LEVEL as you desire. =y DSP LOGIC mode setting LARGE : Simulates the presence of a large movie theater. SMALL : Simulates the presence of a relatively smaller movie theater, EFFECT LEVEL setting Lets you choose from three different effect levels.
Remote controlling video components OBSERVED En) Refer to the following table for the type of remote control operations available for aah video component. Sch key on the tabla operates the selected component as shown in the respective column. {The set up code for sec complainant must be antlered beforehand. “Conn acting the repeater” -1 How to operate video components “System sat up” I Turn on the receiver.
TV Set up codes Maker, Maker Set up codes A-MARK 018 v 045,054,195, 198,200,232,295 IBEX o7 LOGIN 031 ADMIRAL 108 LUX MAN 473 ADVENTURER 081 X1 062,089,163,189,171,183 AXC a1 MAGNATE 045,061,068,111,201 AKA 245,113 MAJESTIC 31 AARON 231 MANTRA 045,089 184,188 SATSUMA 232 192 MEGATON 218,180,093 019,195 ME! 20 are EXTREME 031,071,121,165,169,183 MGA 034,045,185,170,393 ARCHER 018 MIDLAND AUDIOVISUAL 218,185 MINUTE [ CORBEL a4 MITSUBISHI! 034,113,165,170,193 BELL & HOWELL 931,168 MOTOROLA 070,108 BRADFORD 5 M
Satellite Set up codes KRVEA00 it was purchased. Notes for using cable television or satellite broadcast reception equipment Please note that the input selector and the components which can be used with this receiver vary discerning to the region in which TV/CABLE: Lets you input signals from a TV or cable TV receiver and enter TV or cable TV set up codes. TV/SAT: Lets you input signals from a TV or satellite receiver ang enter TV or satellite receiver set up codes.
KABOOM fEn) The following chart shows all the menus that can ba dispirited in the OSD mode. Use this chart as s reference ta determine th position of the current menu when using the GUI control mode, The numbers processing the menu names correspond to numbers in “Screen menu structure”. ~8 O MAIN MENU Switches to the aeration menu for the respective component. (48] Switches ta the SOUND MENU. L Switches to the SET UP men.
Operation menus & Thai cons have the same functions a5 the keys on the receiver, elect "B when operating a single cassettes deck. KFVBS0D Selecting PONG or VIDEO 3 from the main menu only switches the INPUT. 3. The operation screens are displayed i black and white when video signals are being input 1o the TV. 4.Same of the contents displayed may vary according 1o the operation mode. @ 1.
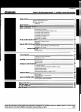
Specifications (For U.S.A. and Canada) Rated power output during STEREO operation 120 watts per channel minimum RMS, both channels driven, at 8Q from kiz with no more then 0.03 % total harmonies fated power output during SURROUND operation Front 105 watts per channel minimum RMS, both chants divan, at 8 £i, kHz with no more than 0.7 % tote harmonic distortion. Conner 105 minimum RMS at 80, kHz with no more than 0.7 % total harmonic distortion.