COMPACT HI-FI COMPONENT SYSTEM C-BX3 INSTRUCTION MANUAL Glass inside GVT0349-001A [E] © 2012 JVC KENWOOD Corporation EN_C-BX3[E]f.
Warnings, Cautions and Others ¤ CAUTION The button in any position does not disconnect the mains line. Disconnect the mains plug to shut the power off completely (the STANDBY lamp goes off). The MAINS plug or an appliance coupler is used as the disconnect device, the disconnect device shall remain readily operable. • When the System is on standby, the STANDBY lamp lights red. • When the System is turned on, the STANDBY lamp goes off. The power can be remote controlled.
CONTENTS Declaration of Conformity with regard to the EMC Directive 2004/108/EC Manufacturer: JVC KENWOOD Corporation 3-12, Moriyacho, Kanagawa-ku, Yokohama-shi, Kanagawa, 221-0022, Japan EU Representative's: Kenwood Electronics Europe BV Amsterdamseweg 37, 1422 AC UITHOORN, The Netherlands Information on Disposal of Old Electrical and Electronic Equipment and Batteries (applicable for EU countries that have adopted separate waste collection systems) Products and batteries with the symbol (crossed-out wheel
Introduction Auto power save function When no operation is done in certain situations for 29 minutes, the unit turns off automatically. This function is on at the initial setting. For details, refer to “Operations.” In this manual, the remote control buttons are used for explaining the operations unless mentioned otherwise. However, if the System has the same or similar button names, they can also be used for the operations.
Getting started • Since the System may deteriorate in quality, become damaged or get its paint peeled off, be careful about the following: – DO NOT wipe it forcefully. – DO NOT wipe it with thinners, benzines or other organic solvents including disinfectants. – DO NOT apply any volatile substances such as insecticides to it. – DO NOT allow any rubber or plastic to remain in contact with it for a long time.
Getting started (continued) About measures to prevent falling down and toppling over • Be sure to take measures to prevent falling down and toppling over due to earthquakes (for both the system and the device placed on the system). • The effectiveness of measures to prevent falling down and toppling over may be decreased depending on the strength of the wall. In such cases, reinforce the measures appropriately.
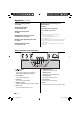
Setting the video output Using the core filter To reduce interference, be sure to attach the provided core filters to the power cord and the external component cord. Run the cable through the core filter, and wind it firmly once inside. Close the core filter until it clicks shut. (You can wind the cords together.) Core filter (large) RCA pin plug cord (to SUBWOOFER PRE-OUT terminal) Audio cord (to ANALOG IN terminal) While the source is selected to IPOD and iPod is not connected to the unit...
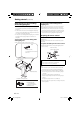
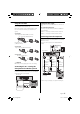
Getting started (continued) Operations Connecting the DC power cord Rear of the unit Wood pin Side columns Wood pin Stand base Basic operation To a wall outlet Turning on/off the power AC adaptor (supplied) Press 1 Insert the DC power cord into the hole on the center of the stand base. 2 Lace the DC power cord into the groove at the bottom of the stand base. Then, stick the supplied adhesive tapes at the recommended positions (as illustrated below) to hold the power cord. Bottom of stand base .
When one of the situations occurs... The APS indicator is shown for 1 second every 1 minute and starts flashing 30 seconds before the System turns off. ⁄ The change in the bass and treble sound level of the speakers differ depending on the incoming signal of the input source. Selecting the input source Press one of the input buttons (DIGITAL1, DIGITAL2, ANALOG) to select the input source.
Operations (continued) Pausing/resuming playback Press iPod 6. Skipping forward/back Press and hold ¢ or 4. Skipping to the next track Press ¢. Skipping back to the previous track Press 4 twice or more repeatedly. Returning to the beginning of the track Press 4 once. Putting iPod in sleep mode Press and hold iPod 6. Displaying a menu/Returning to the previous menu Press MENU. Selecting an item on the menu Press UP or DOWN, then press SELECT.
Troubleshooting If you have a problem with this System, check this list for a possible solution before calling for service. Specifications Output Power : 30 W + 30 W RMS (1 kHz, 10% T.H.D., 4 Ω) Audio section Power Power does not come on. = The power cord is not inserted securely. Plug it in securely. The unit suddenly turns off. = Auto power save function is on. Refer to “Activating/deactivating APS (Auto Power Save)” in “Basic operation.
• is a trademark of SRS Labs, Inc. • StudioSound HD technology is incorporated under license from SRS Labs, Inc. • SSHD: StudioSound HD by SRS Labs, Inc. SRS StudioSound HD™ provides an immersive and engaging surround sound experience, while maintaining steady volume and delivering rich bass and clear dialog. • TVOL: TruVolume by SRS Labs, Inc.