Bluetooth Tower Speaker User’s Guide for Model No.
Safety Instructions & Warnings CAUTION RISK OF ELECTRIC SHOCK DO NOT OPEN ATTENTION RISQUE D' ÉLECTROCUTION NE PAS OUVRIR Warning: To reduce the risk of electric shock, do not remove cover (or back). No user-serviceable parts inside. Refer servicing to qualified service personnel. The exclamation point within an equilateral triangle is intended to alert the user to the presence of important operating and maintenance (servicing) instructions in the literature accompanying the appliance.
Safety Instructions & Warnings Additional Warnings and Precautions • • • • • • • • • CAUTION: TO PREVENT ELECTRIC SHOCK, MATCH WIDE BLADE OF PLUG TO WIDE SLOT, FULLY INSERT. Avis: AFIN DE PRÉVENIR LES CHOCS ÉLÉCTRIQUES, FAITES CORRESPONDRE LA FICHE BLANCHE DE LA PRISE À LA FENTE LARGE, INSÉREZ TOTALEMENT. WARNING: To reduce the risk of fire or electric shock, do not expose this apparatus to rain, moisture, dripping, or splashing.
Table of Contents Unboxing Your HD Tower Speaker ���������������������������������������������������������������������������������������������������������������������������������������������������5 Features & Specifications Includes Setup ���������������������������������������������������������������������������������������������������������������������������������������������������������������������������������������������������������5 Power Remote Battery Attaching the Stand Orientation ��������������
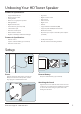
Unboxing Your HD Tower Speaker Features & Specifications • Supports Bluetooth v2.1 • EQ presets • Wireless range: 33 feet • Digital volume control • Pairing button • Bass controls • Built-in 4 x 3" high power speakers • Treble controls • LED light effects • Digital clock • Digital FM radio (PLL) • Remote • Station memory presets (20 FM) • Supports Enhanced Data Rate (EDR) • 3.
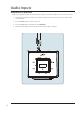
Orientation Speaker Controls & Inputs LED Display Line In RCA Audio Input Pair Bluetooth Power Clock Set/ Play/Pause Skip/Search/ Tune -/+ Source Volume -/+ Speakers (x4) 6
Remote Layout Power Press to turn the unit on or off. Mute Press to mute the volume. FM Scan Press to begin scanning and saving FM radio frequencies. Source Press to cycle between Aux, Bluetooth, Line in, and FM radio. Recall Press to cycle through saved radio stations. Tune -/+/ Skip In FM mode, press to adjust frequency of the FM radio. In Bluetooth mode, press to skip a track. Clock Set With the unit off, press to begin setting the clock, then use the Tun -/+ buttons to set the time.
Audio Inputs Using the Stereo RCA Inputs When connecting two products using an RCA Cable, match the colored ports with the same colored connection. 1. 8 Connect the RCA Cable to the RCA Stereo Inputs located on the back of the unit, and to the audio outputs on the television. 2. Press the Power button to power on the unit. 3. Press the Source button repeatedly to enter AUX Mode. 4. Audio played through the television will now be heard through the speakers.
Using the Line In 3.5 mm audio input cable not included. 1. Plug one end of a 3.5 mm audio input cable into the Line In on the unit, and plug the other end of the cable into the audio output/headphone output on an MP3 Player or other audio source. 2. Press the Power button to power the unit on. 3. Press the Source button repeatedly to enter Line In Mode. 4. Audio played through the connected device will now be heard through the speakers.
Bluetooth & Radio Pairing a Bluetooth Device for the First Time 1. Power on the unit by pressing the Power button. 2. Press the Source button on the remote to switch to Bluetooth Mode, indicated by a slowly flashing indicator on the display. 3. Press the Pair button on the top of the unit. The pairing indicator will flash quickly. When pairing, remain within 3 feet of the unit. 4. Using the native controls on your Bluetooth device, select the ITB124 in your Bluetooth settings to pair.
Clock Setting the Clock 1. With the unit powered off, press and hold the Clock Set button (or press the Clock Set button on the remote). 2. The hour will begin to flash. 3. Press the Tun -/+ buttons to adjust the hour. 4. Press the Clock Set button. 5. The minute will begin to flash. 6. Press the Tun-/+ buttons to adjust the minute. 7. Press the Clock Set button again to finish setting the time.
Company Information Contact Information Website: www.gpx.com Email Support: prodinfo@dpiinc.com Email Parts: partsinfo@dpiinc.com Phone Support: 1-888-999-4215 Warranty For Warranty Information and the most up-to-date version of this User’s Guide, go to: www.gpx.com International Support To download this User’s Guide in English, Spanish, and French, or to get answers to frequently asked questions, visit the support section at: www.gpx.