63702001GB.
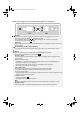
63702001GB.fm Page 5 Friday, September 8, 2006 6:51 PM PRODUCT DESCRIPTION Freezer Compartment S. Automatic ice maker T. Grids U. Bottom basket (on some models) V. Top basket W. Ice cube bucket X. Freezer inner door insert Y. Freezer inner door tray Z. Top inside light (and bottom inside light on some models) Refrigerator compartment A. Inside light B. Middle light (on some models) C. Adjustable shelf D. Drawer lid E. Drawer (on some models) F. Crisper G. Crisper adjustment H. Meat drawer I.
63702001GB.fm Page 6 Friday, September 8, 2006 6:51 PM BEFORE USING THE APPLIANCE • Your new appliance is designed exclusively for domestic use. To get the most from your new appliance, carefully read the user handbook which contains a description of the appliance and useful tips for storing food. Keep this handbook for future consultation. 1. After unpacking, make sure that the appliance is undamaged and that the door closes perfectly tight.
63702001GB.fm Page 7 Friday, September 8, 2006 6:51 PM PRECAUTIONS AND GENERAL RECOMMENDATIONS • During installation, make sure the appliance does not damage the power cable. • Make sure that the appliance is not near a heat source.. • To ensure adequate ventilation, leave a space on both sides and above the appliance and follow the installation instructions. • Keep the appliance ventilation openings free. • Power cable modification or replacement must only be carried out by qualified personnel.
63702001GB.fm Page 8 Friday, September 8, 2006 6:51 PM INSTALLATION • • • • • • • • • Make sure that your refrigerator is not near a heat source. Install it in a dry and well-ventilated place. To ensure proper ventilation leave a 1 cm space on both sides and above the refrigerator. Clean the inside of the refrigerator before using it. Leave the refrigerator (without moving it) for at least one hour before connecting it to the power outlet.
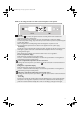
3702001GB.fm Page 9 Friday, September 8, 2006 6:51 PM Guide to the refrigerator/freezer and ice/water dispenser control panel Stand-By When button is pressed, the appliance switches to standby. This function deactivates the refrigerator and freezer compartments. When the standby function is activated, two green dots will appear on both of the displays. To restore the previous setting, carry out the same procedure until the previous temperatures appear on both of the displays.
63702001GB.fm Page 10 Friday, September 8, 2006 6:51 PM Guide to the refrigerator/freezer and ice/water dispenser control panel Vacation This function turns off the refrigerator compartment if you are going away for some time. It is activated by pressing the button which lights up yellow. The T° disappears from the display and a green dot appears. To reactivate the refrigerator compartment, press the button again.
63702001GB.fm Page 11 Friday, September 8, 2006 6:51 PM Guide to the refrigerator/freezer and ice/water dispenser control panel Freezer/Refrigerator Door Open Alarm The refrigerator or freezer door symbol (or both) blinks (green LED), the acoustic alarm sounds and the red LED lights up. The alarm is activated when: • One or both doors are left open for more than 2 minutes. If the door is not closed, the acoustic alarm will sound again after two minutes.
63702001GB.fm Page 12 Friday, September 8, 2006 6:51 PM Guide to the refrigerator/freezer and ice/water dispenser control panel Water filter indicator light function (if present) The water filter indicator light indicates when to change the water filter cartridge. When the light changes from green to yellow, this means that it is almost time to change the water filter cartridge (90% of the filter life has been used).
63702001GB.fm Page 13 Friday, September 8, 2006 6:51 PM Crisper moisture control • The control can be adjusted to any position between the minimum and maximum setting . • In position , moist air is removed from the crisper for better preservation of fruit and vegetables with peel. , the moist air is kept inside the crisper for • In position better preservation of leafy vegetables. Removing the freezer compartment baskets • Slide the basket out as far as it comes.
63702001GB.fm Page 14 Friday, September 8, 2006 6:51 PM USE OF THE ICE AND WATER DISPENSER (ON SOME MODELS) The freezer has an ice cube and crushed ice dispenser. When the appliance is switched on, the ice maker is activated and set to the “Ice cube” function whose symbol lights up yellow. For crushed ice, press the corresponding button until the symbol lights up. The button controls are designed for easy use and cleaning. To dispense ice: 1. Press the button for the required type of ice. 2.
63702001GB.fm Page 15 Friday, September 8, 2006 6:51 PM USE OF THE ICE AND WATER DISPENSER LIGHT AND DISPENSER LOCK (ON SOME MODELS) The dispenser area has a night light. The light can be turned on and off by pressing the button located in the middle of the panel. The ice dispenser can be turned off for easy cleaning or to prevent accidental use by children or pets. To switch the dispenser off, press the button until the symbols go off. To switch the dispenser on again, repeat the operation.
63702001GB.fm Page 16 Friday, September 8, 2006 6:51 PM NOTE: Do not turn the ice maker on until it is connected to the water supply. • It is normal for ice cubes to stick together at the corners. However, they can be separated easily. • The ice maker will not work until the freezer compartment is cold enough to make ice. This can take overnight. • Good water quality is important for good ice quality. Water softener chemicals such as salt can damage the ice maker and lead to poor quality ice.
63702001GB.fm Page 17 Friday, September 8, 2006 6:51 PM MAINTENANCE AND CLEANING Before any cleaning or maintenance operation, unplug the appliance from the mains or disconnect the electrical power supply. Periodically clean the appliance with a cloth and a solution of lukewarm water and neutral detergent specifically for refrigerator interiors. Never use detergents or abrasives. Never clean refrigerator parts with flammable fluids. The fumes can create a fire hazard or explosion.
63702001GB.fm Page 18 Friday, September 8, 2006 6:51 PM PRECAUTIONS IN CASE OF “VACATION” Short vacation There is no need to disconnect the appliance from the power supply if you will be away for less than three weeks. Use up perishable food, freeze other food. If your appliance has an automatic ice maker: 1. Turn it off. 2. Shut off the water supply to the automatic ice maker. 3. Empty the ice bucket. Long vacation Remove all the food if you are going away for three weeks or more.
63702001GB.fm Page 19 Friday, September 8, 2006 6:51 PM Before contacting After-sales Service.... Performance problems often result from little things you can find and fix yourself without tools of any kind.
63702001GB.fm Page 20 Friday, September 8, 2006 6:51 PM ASSISTANCE GUARANTEE 12 Months Parts and Labour Guarantee: Your appliance has the benefit of our manufacturer’s guarantee, which covers the cost of breakdown repairs for twelve months from the date of purchase. This gives you the reassurance that if, within that time, your appliance is proven to be defective because of either workmanship or materials, we will, at our discretion, either repair or replace the appliance at no cost to you.
63702001GB.fm Page 21 Friday, September 8, 2006 6:51 PM WATER FILTRATION AND MONITORING SYSTEM (ON SOME MODELS) The water filter indicator light The water filter indicator light indicates when to change the water filter cartridge. It is located on the control panel. When the light changes from green to yellow, this means that it is almost time to change the water filter cartridge (90% of the filter life has been used).
63702001GB.fm Page 22 Friday, September 8, 2006 6:51 PM ELECTRICAL CONNECTION 1) For Great Britain only Warning - this appliance must be earthed Fuse replacement If the mains lead of this appliance is fitted with a BS 1363A 13amp fused plug, to change a fuse in this type of plug use an A.S.T.A. approved fuse to BS 1362 type and proceed as follows: 1. Remove the fuse cover (A) and fuse (B). 2. Fit replacement 13A fuse into fuse cover. 3. Refit both into plug.