COOKER HOOD USER HANDBOOK FOR INSTALLATION AND OPERATION MODEL HTU30
Your new Cooker Hood Using your new Cooker Hood is very simple. Nevertheless, to get the best results it is important that you read this handbook thoroughly before installing and using your appliance for the first time. Electrical Requirements Any permanent electrical installation must comply with the latest I.E.E. Regulations and local electricity company regulations. For your own safety, this should be undertaken by a qualified electrician eg.
Contents Page Electrical Requirements Get to know your Cooker Hood Installing your Cooker Hood Installation Mounting Height Thermal cut-out Mounting beneath Cabinets Operating your Cooker Hood The Controls Do’s and Don’ts Caring for your Cooker Hood Filters and their Replacement Cleaning How to Replace the Light Troubleshooting Key Contacts 2 4 5-7 8 9-10 11 Back Cover Appliance manufactured in EU.
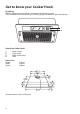
Get to know your Cooker Hood. Unpacking Before installation, ensure that you have removed all packing pieces. Care should be taken that the fixing kit, ducting spigot and literature pack are retained.
Installing your Cooker Hood This Cooker Hood is guaranteed and will give lasting service. The guarantee is only applicable if the hood has been installed in accordance with the installation instructions detailed in this book. The manufacturer disclaims all liability for any damage or injury caused as a result of not following the instructions contained in the following text. SAFETY WARNINGS: THIS COOKER HOOD IS DESIGNED FOR DOMESTIC USE ONLY. connection (Fig. 1 ).
Installing your Cooker Hood NOTE: The hood is more efficient in the exhaust mode, therefore this position should be selected during the warmer months of the year when no heating is being used. When the room is being heated, if the recirculation position is selected heat will not be wasted. MOUNTING Mounting Height: When installed above an electric cooking appliance the minimum distance between the surface of the hob elements and the lower grille of the cooker hood must be 650mm.
Installing your Cooker Hood Fixing the Cooker Hood After having adjusted the hood for the version required, it may be installed. - This appliance is designed for fitting in a cabinet or some other support. - The opening to be made on the bottom of the wall hung cabinet must correspond with the measurements shown in fig. 2. To fix the hood proceed as follows: 1. Remove the grille using the release clips (fig. 3). 2. Fit the hood into the opening. 3.
Operating your Cooker Hood The Controls Make sure that the Cooker Hood is wired in and the power supply is switched on. Fan Speed Your Cooker Hood has three speeds to give you the correct extraction level to suit your cooking conditions. Position 1 should be selected when simmering or when using only one pan. Position 2 should be selected for normal cooking up to four pans. Position 3 should be selected when frying or cooking food with strong odours. Simply slide the selector to the required setting.
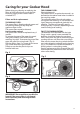
Caring for your Cooker Hood Before doing any cleaning or replacing the filters or light bulb, always ensure that the electricity supply to the Cooker Hood is switched ‘OFF’. Filters and their replacement: THE GREASE FILTER The grease filter is fitted to absorb grease and dust during cooking to help keep the appliance clean inside. The grease filter cannot be cleaned. It must not be washed. The grease filter should be replaced every 2 months.
Caring for your Cooker Hood Cleaning: Before doing any cleaning or replacing the filters or light bulb always check that the electricity supply to the hood is switched off. For your own safety and in the interest of hygiene your Cooker Hood needs to be kept clean. A build up of grease or fat from cooking could cause a fire hazard. Never use excessive amounts of water when cleaning, particularly around the control panel area.
Troubleshooting. First, don’t panic! There may be nothing wrong at all. Look for your problem below, then check the things we suggest. More often than not, this will give you the answer to your problem, and you’ll be able to carry on without having to telephone your Service Office. It is not working! Are you using a plug and socket? - Check that the plug is firmly pushed in. - Check the power supply, by plugging in another appliance.
Key Contacts Service Hotpoint has the largest appliance manufacturer’s service team in Europe, trained specialists directly employed by us to ensure your complete confidence. Repair Service UK: 08709 066 066 Republic of Ireland: 1850 302 200 You will be asked for the following information:Name, address and postcode.