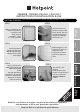
FREEZER - MODELS RZA36G.1-RZA36P.1 INSTRUCTIONS FOR INSTALLATION & USE GETTING STARTED: STEP 1 To ensure that your freezer runs reliably and efficiently follow these steps. STEP 2 STEP 4 STEP 6 Your freezer is now working. If after 24 hours your freezer is not operating as you want, refer to the TROUBLESHOOTING section. TROUBLESHOOTING Plug in and switch on. Allow the freezer to cool before placing food inside. The high temperature light will stay on until the freezer has cooled down.
For Your Safety For your safety, read the following advice: The freezer cooling system contains a small amount of gas which is environmentally friendly but flammable. To avoid any risk :● SAFETY & INSTALLATION ● ● ● ● ● Install the freezer following the installation instructions and ensure that ventilation openings are kept clear of obstruction. Take care when installing or moving the freezer to avoid damaging the pipes on the rear.
Installation 30mm (11/4 inch) Location & Air Circulation Locate your freezer away from sources of heat e.g. Cookers, Radiators, Direct Sunlight as extreme temperature will affect its performance. Allow a minimum 30mm (11/4 inch) between the top of the freezer and the underside of the worktop. SAFETY & INSTALLATION Providing you follow the recommended ventilation requirements you will :● Prolong the life of the freezer. ● Minimise the risk of condensation on the outside of the freezer.
Installation Levelling: Level the freezer when it is in its final location by adjusting the front feet, until firm contact is made with the floor. This will stop rocking or vibration and keep the door aligned which helps the freezer run reliably and efficiently. SAFETY & INSTALLATION Before plugging in and switching on, leave the freezer standing in its final location for at least 15 minutes to allow it to settle.
Installation Electrical Supply WARNING: This appliance must be earthed. The freezer must be positioned so that the plug is accessible after installation. SAFETY & INSTALLATION Fuses Your appliance comes fitted with a plug and a 13A fuse. If you need to replace the fuse, only use those rated at 13A and ASTA approved to BS1362. Changing the Plug Cut off and dispose of the supplied plug if it does not fit your socket.
Controls Controlling the Temperature of the Freezer Compartment The control wheel on the front of the worktop adjusts the internal freezer temperature. Your food should be maintained at -18˚C or colder for long term storage. The setting of the control wheel will depend on the location of the freezer, the room temperature and how often the door is opened. The normal set point (marked by a 3 and N on the dial) is usually suitable.
Controls Indicator Lights CONTROLS Green Mains Light The green mains light will stay on as long as the electricity supply is not interrupted. Red High Temperature Warning Light The red temperature warning light will come on when the freezer is first switched on or when the temperature inside the compartment rises above the correct storage temperature. Check the TROUBLESHOOTING section before calling for advice.
Useful Advice Frozen food storage capacity 33kg Maximum freezing capacity in 24 hours 15kg Maximum conservation time from failure 18 hours Making the best use of your Freezer Note : Always use the handle provided to open the freezer door. To ensure that your freezer operates as efficiently as possible : ● Follow food packaging “best before/use by” instructions or your suppliers advice on a suitable maximum storage time. ● Keep foods tightly covered to retain moisture and prevent flavour/odour transference.
Useful Advice USEFUL ADVICE Storing Food in a Freezer ● ● Freeze and store either fresh food or long term commercially frozen foods. Generally speaking long term storage means up to 3 months but this can vary, so always follow your supplier’s recommendations otherwise refer to the pictorial guide on the door liner (see below). ● Place frozen food in the freezer compartment as soon as possible after buying it. Liquid-filled bottles or sealed fizzy drinks must not be stored in freezer, as they may burst.
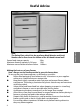
Useful Advice Advice on Using Freezer Drawers This freezer can be used with or without the drawers. However, the bottom drawer needs to remain in position at all times (to maintain the correct storage temperature). It is generally more convenient to use the drawers but if a lot of food is to be stored the drawers can be taken out and food placed directly onto the grids. Ensure that packets/containers of food are thoroughly dry before placing onto the grids. The storage drawers can be easily removed.
Defrosting Defrosting Regular use of your appliance causes ice to gradually build up on internal surfaces increasing the running costs of your appliance. When the ice is between 3-5mm (1/4 inch) Hotpoint recommend ‘fully defrosting your freezer’. Fully defrosting your freezer. WARNING: Switch off the electricity supply and pull out the mains plug. 1. 2. 3. 4. 5. Remove frozen food, wrap or cover and store in a cool place. Remove the storage drawers A defrost tube is stored in the floor of the freezer.
Cleaning Cleaning WARNING: Switch off electrical supply and pull out mains plug before cleaning. Interior 1. Remove food and wrap or cover to keep it frozen. 2. Remove drawers from each compartment and wash in warm water and washing up liquid using a soft cloth, dry thoroughly. Note : It is important to ensure that cleaned baskets are thoroughly dried before refitting to the freezer compartment. 3. 4.
Maintenance You will need a selection of small hand tools, screwdrivers, spanners etc. to carry out this procedure. Our Service Department can arrange for an Engineer to do the conversion for you but a charge will be made. Door Reversal CLEANING & MAINTENANCE WARNING: Switch off electrical supply and pull out the mains plug. Remove loose items/fittings from inside the fridge and place food into insulated containers whilst carrying out this operation. 1. Open the door as wide as possible.
Troubleshooting IS THE FREEZER WORKING AS YOU WANT? Have you read through the instruction book ? If you still have a problem, before calling our service organisation see if any of the tips below help. The appliance will not work 1. Check plug is firmly positioned in the socket outlet and the power supply is switched on. 2. Check power supply with another appliance. 3. Check fuse/circuit breaker. 4. Check the door is closed properly. The appliance is making a lot of noise 1.
Troubleshooting TROUBLESHOOTING OPERATING SOUNDS OF A FRIDGE FREEZER These are the normal types of sound that your freezer will make. ● The motor (compressor) makes a buzzing or humming sound when it is running. This can be louder when it first switches on. This sound will reduce over the first few months. ● Gases flowing through the pipes can produce gurgling, bubbling, roaring or humming noises. ● The temperature control can make a clicking noise when it turns the motor on and off.
Guarantee GB 12 Months Parts and Labour Guarantee Your appliance has the benefit of our manufacturer’s guarantee, which covers the cost of breakdown repairs for twelve months from the date of purchase. This gives you the reassurance that if, within that time, your appliance is proven to be defective because of either workmanship or materials, we will, at our discretion, either repair or replace the appliance at no cost to you.
195113368.00 . After Sales Service 03/2013 No one is better placed to care for your Hotpoint appliance during the course of its working life than us the manufacturer. Essential Contact Information Hotpoint Service We are the largest service team in Europe offering you access to 400 skilled telephone advisors and 1000 fully qualified engineers on call to ensure you receive fast, reliable, local service. UK: 08448 24 24 24 Republic of Ireland: 0818 313 413 www.hotpointservice.co.
195113368.