
Installation guide


Installation Instructions
PLACEMENT OF THE MOUNTING PLATE
REMOVING THE MICROWAVE
OVEN FROM THE CARTON/
REMOVING THE MOUNTING PLATE
[]Remove tile installation instructions, filter, glass
tray the exhaust adaptor and the small hardware
bag,. Do not remoxe tile Stxrofoam I)r°tecting, tile
front of tile o_,en.
[]Fold back all 4 carton flaps full) against carton
sides, Then carefifll) roll the oxen and carton oxer
onto the top side, The oxen should be restino, _ in
tile Stx rofoam.
Styrofoam
[]Pull tile carton up and off tile oven.
[] Remove and properly discard plastic bags.
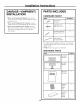
_..._MM Screws
0unting Plate
_ Remove tile 2 screws from tile bottom mounting
plate. Remoxe tile mounting plate and set aside.
This plate will be used with the rear wall template
for mo/mting. REPLACE THE SCREWS,
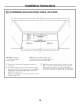
I-_ FINDING THE WALL STUDS
i
]Find tile studs, using one of tile following
methods:
i i
Wall
Studs
A. Stud finder--a magnetic device that
locates nails.
OR
B. Use a hammer to tap lightly across tile
motmting sm'face to find a solid sotmd.
This will indicate a stud location.
_}_ Afier the find the bvlocating stud(s),
center
probing tile wall with a small nail to find tile edges
of tile stud. Then place a mark half\vav between
the edges. The center of any a(!jacent studs should
be 16" or 24" fl'om this mark.
_Draw a line down the center of the studs,
THE MICROWAVE MUST BE CONNECTED TO
AT LE&ST ONE WALL STUD,
8