RVM1535 Over the Range Microwave Oven Owner's Manual [] 2 5 m [] m Helpful Information Mm_awave Temps' m ff Something Goes Wrong Berate Ya_ _?AIFor Se_'v_e _ Back Cave€ Write themodel andserial numbershere: Model# Serial# Find dmse numt)ers on a label inside the o\_.'_:,. For a Spanish version of this manual, visit our Website at Hotpoint com. Para consultar una versi6n en espafiol de este manual de instrucciones, visite nuestro sitio de intemet Botpoint.com.
READ ALL SAA_2TY INFORMATION BEFORE USING -_ WARNING! For yoursafety,the information in this manual mustbe followed tominimize the risk of fire or explosion, electric shock,or toprevent property damage,personal injury or loss of life.
I!1 • Read This microwave oven is UL listed for installation over electric and gas ranges. This microwave oven is not approved or tested for marine use. and specific tollow the "Precamions to • I)o not operate this at)l)liance if it has a A\oid Possible Exl)osure to Excessive Microwave damaged power cord or plug, if it is not working Energy" t)rot)erly damaged on 1)_,ge 2. • This _,ppli_m(e grom_(le(t. to protmrly outlet.
READ ALL SAPETY INFORMATION BEFORE USING ®Do not store Otltdoors. this appliance ill ®Do not use this prod/let near water ill a wet * 'Ib reduce I_)r exktl//ple, I)ktSeilleilt, near a swilnming pool, near a sink or ill sinlilar locations. o Keep power cord awa} flx)nl heated surli_ces. ®Do not iinmerse i)ower co_xl or pl/lg in wate_: the tile risk of fire o\en c;t\il\,: -- Do not overtook I_)od.
I!1 SPECIAL NOTF S ABOUT MICRO WAVING Arcing is tile lnicrowm term lot sparks o_en. Arcing o The metal (if tile ill tile su(h poultr} rinnned as tMst-ties, pins or golddishes, in tile • Recycled l)robe in bllt act like nli(rowaw. ten/pel:ature illiCrowave to lood edges HI/tCIlI/HS), ,, Metal, wall.
SPECIAL N07 2S ABOUF MICRO WAVING SAFETYFACT ®Axoid heating bab} Iood o Do not overcook SUPERHEATED WATER in glass jars, ev(n with tile lid off. Make s/ire all l)otatoes. dehvdrate Liquids, such as water, inlmlt tire, ca/lsing coffee or tea, are able to toDd is thoroughly cooked. Stir toDd to (tist_Jt)/lte tile heat the boiling pohlt without Be careflll to pr('_ent appearing to be boiling. scalding Iorinula be overheated beyond Visible bubbling or boiling to your exenl\,.
I!1 M_&e sure /Ise(l ill all cookware VO/IF I/lit ()veil is sift(able inicrowa_ing. If tile dish lot Most casseroles, cooking measuring cups, is labeled in tile inoisture Sllauering. Be sm:e to vent wrap no[ (ookhlg, salt' make lor sure ill it is hot use recycled paper products. paper towels, Recycled napkhls nl m, cause Paper containing nylon |ilaments ., dish tl_ o\_'ll _re SttFe leSl: |/o_h teStlilg meueuring I_l_('_ • il_ 1|1_' dish mid .
SPECIAL N07 2S ABOUF MICRO WAVING o Use Ibil only as directed in * Plastic cookware this nlanu_d. When using loll in the ink rowa_e cookwar_ oven, us(fill, keep the li)il at least 1" awm from the sides of the o_en. Plastic designed microw_ lor cooking E_en sate plastic toleram 11( used m_ty solien or chin: if l_eriods of o_ ercooking.
I'.1 GR0 UNDING INS TR {7(;770NS/ Offl TONAI KII S This appliance is e(tuiplled hnproper use of the grounding plug can result in a risk of electric shock. This appliance g-rom/de(t. an electlJcal Inust be Ill tile event of short circuit, gTounding reduces tile risk of elecirie shock 1)_ t)roviding all escape wire /_)r the electric current. _,ire with a remove plug. The l)lug t)rong ouilei into installed an and g_xmn(ted.
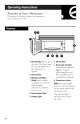
I Door Handle. Ptfll In open the door. TI'Le door be securely the latched l//icl'()w_{_c mlxst {br 1o 2 Door Latches. 3 Window with Metal Shield. S_rc,..*_, vdlc,ws (()()king to bc vi('wcd while keetfi_g nficrowaves COll[il/ed in the oven. 4 Touch Control Panel 5 Coo/aop Light. 6 Grease Filter. 7 Removable Turntable. Tm:nmblc must mid support bc in t::)la(e when Ilsing The turntable removed the oven. may be for cleaning. 8 Convenience Guide.
The Controls on Your Microwave Oven (Th_vugq_oulthis ma_u_d, fi,alur(_5_lnd a/)/)eam_c_ ma) v_l_3 ./i_n_z)our modeL) Youcan microwave @ by time, temperature or with the convenience features, A Time Features TimeCooking Press Enter TIME COOKI & II (Press once or twice) _\mo/mt of (ookillg TIME DEFROST MINUTE COOK(Press 1-6) \mount of defi'osting time. Stare immediat_+d POWERLEVEL Power lexel 1-I O. ADD 30 SEC. St_ii_'tsJllllll_!(lJ_it(31v! time.
Convenience Features Press Enter Option POPCORN St_'tl:tS il/_l_le(tJatelv! l_lor'e/less BEVERAGE Stal:ts serving siz(! servillg size il//l_lediatelv! REHEAT (S_'e Reheat AUTO DEFROST Food weight (',uide) til_ll_!
X_irial)le power lexels add tlexibilitx' to mi(rowave (ookin(, po/_we_ )(me1 levels The on the microwave (a. lie SlllTf_tce /lI/ils }t range. /lllClXlWa_e energy and gives you Each power perceni of level 7 is 30% ' need toed []('r_' well|(| (lid S()lll(" are el/lSeS levels: (ook 1)('ti)re ('Nail entering doue DEFROST over. Most t!le I_att!re time ior TIME C()otL TIME High 10 Fish. bacon. :'cg-ctables. boiling liquids.
7 me Features ® ® Time Cook I Time Cook II Mlows I,ets ?,o_ _hm_ge you to microwave Power level 10 (High) at_tom_ically may change po_'er 1_vels automatically ti)r any time up to 99 miracles and 99 seconds. cookil_g. do it: }tere's during how to is se_, bm you it lot illore I Press TIME C()()K. 2 En|er lhe tirsl _:ook lime, [lexibility. 3 Change _lk)ll Ill_l}' during check door r( S/lille open tile door Time Cook to the Iood. Close the and press cooking.
Cooking Guide for Time Cook I & II NOTE."Usepower level High (10)unlessotherwise noted. Vegetable Amount Time Comments Asparagus (fi'esh spears) ] lb. 6 to 9 rain., Med-Itigh (7) In 1V2-qt. oblong glass baking >lace 1/4 cup water. (frozen lO-oz, pa(kage 5 to 7 mi_,. h++1-qt. (asserole. ] lb. (ut 9to In 1 V>qt. casserole, Spears) dish, Beans (li'esh green) ill ]lalf 11 mitt. place 1/2 (ttt> water. (l¥ozen green) ]O-oz. package 6 to 8 mi13.
Cooking Vegetable Guide for 71me Cook I & II Amount Time Comments ] O-oz. 5 to 7 alia. h/ l-qt. wilier. 3 to 4 rain. h/2-qt, oblong glass baking dish, place corn. If corn is in husk, use no water; Corn (frozen kernel, t)a(kage casserole, place 2 tal/lesl)oons Corn on the cob (lresh ] u.) ,3 ears )er e_lr if (orn has been water. Rearrange (li'ozen) ear >' u) 6 ears 5 to 6 rain. 3 to 4 rain. )er ear husked, add l/4 cu 11 a/ler half of time. Place in 2-qt.
Time Features Allows you to (teflx)st t_)r the Defrosting length • Foods frozen of time vou select. See the l)e/i'osting ti_)r suggested Power ®®® (bride times. the package. set, bm you may change t)a(kages this /ood tlexil)ilit'_. quickly t)o_'r @ the iiH/e. Ito_vve_; more/i'e(tuent attention than usual. Power deti'osted h'\el Rotate 10 cuts the • Foods or stir/ood Convenience Features.) all(t break at)art pieces/or even deti'osting. than oI/e a/ier detir)sting.
Defrosting Guide Food Time Comments Breads, Cakes Bread, buns or rolls ! ] piece, Sweetrolls _approx, 12 oz.. 1 rain. 3 u, ", rain. Fish and Seafood Fillets, frozen ( 1 lb.. Shelffish, smallpieces (1 11)3 6 u, _ n,in, 5 to 7 rain. Plate blo(k break u t) a/ier in (a.sserole. "I'm_n over mid half the lime. Fruit Plastic pouch--1 (lO-oz. to2 :4 u, _ rain. package J Meat Bacon (1 lb..
Time Features This is a quick way to set The cooking time for 1-6 minutes. changed Press one of the Minme counting Cook pads (/i'om t_)r ] to 6 minutes 1 to 6) of cooking level at t)ower For example, 2 1)ad/i)r cooking power down. POWER enter level can be as time is Press I ,EX_2I _and 1-10. 10. 1)tess tile 2 minutes of time. You can use this feature two ways: • It will add 30 se(onds to • It (an _r_t_ the ea(h |ilIle time t)ressed.
Convenience Features 0 How to Use the Popcorn How to Adjust the Popcorn Feature Program to Provide a Shorter I Follow or Louger Cook Time package instructions,/_sing Time Cook if the package less than 3.0 ounces (Jesstime) Imore timer Use only with prepackageo microwave popcorn weighing 3.0to 3.5 ounces. larger than Place is or 3.5 ounces. the package of th_ center of the l/licrow_l\e. [)Ol)COr_l 2 Press oxell in POPCORN.
The Reheal/(_amre rcheals 3 Press serxil tgs el mm_y prexiously cooked toods. ®®® food be changed or added after the oven starts. Press type 1-7 R)r nmnber pad 2 or 3. oue sevviu g (see Reheat Guide the NOTE:Theserving size may I Pre.ss 1_21 IEA']'. 2 Select 2 or 3 t() ( hange set\ ing size. belo\_). The serving size for food THe oxen type 7 cannot be changed. slarls immediawk. Reheat Guide I Pasta Coxer plasti( wrap. 2 Meats and casseroles Coxer wiIh lid or xeHted plasti( wrap.
Convenience Features The or Beverage ] 2 o/|n(e selT_,ill_s Press t_E_21_\(;E. oven starts immediateh. The The serving size is at alltomaticallv set 4 ounces, but can be b} tat)t)ing BE'_2RAGE to select 8 or 12 omlces. 22 of l,e,era e. (hanged Drhlks fl_ature heated with the Beverage feature very hot. container Remove the with care.
@ Auto I)efl:ost sets tile deti'osting and ltower even levels !f the weight of 1hod is stated i!_t pounds and o/l(ices_ the Oil(ICeS lnust be converted to tenths to give results ltouhry and fish weighing Conversion Guide times defl:osting meats, ®®® ®®® automatically tot utt to six p(mnds. (A) of a pound. Weight of Food in Ounces There is a handy guide located on the inside fi'ont of [he oveIl.
Other Features Your Model To remind May Have you that you have food in tile oven, tile owm will display "END" and beep once a l//iI/[lte until YOUeither open the ovell 0oo1" of plPeSS CI ,EAR!( )FE Press to enter day or to check day while the time of file time microwaving. I P_:ess CI,()CK. 2 Enter 3 Press ®®® 24 time of da_. START or CI,()CK.
To turn the off, press (lock at>out three Delay Start ® G®® ram+my om'_ @ 0 tor "[k) redist)lay the allows _x)tt to to delta 3 Select any combination of Auto or Time or Time Cook cooking up to 24 hours. I Press DEI.+\Y STAR'E q Press 2 Enter the time you The want the o_en to start. be disl)layed. automatically (Be sure clock time clo(k, ret)e_tt. se(onds. set the ii/icrow_tve G dist)lay and hold the mi(rowa_e shows of d_ly'.) the corre(t S'E+\gI'.
Other Features Your Model May Have Tinier (In!Off operates as a lninute tinier and can be G ®®® ® used at any time, even when tile o_en is operating. To use tile timer as a lninute timer when tile ()Veil is not To use the oven timer while tile is operating: I Press TIMER 2 Enter tile tin/e to count (IN/lIFE you want down. 3 Wait 5 se< onds. The operating: timer will start (ounting I Press TIMER (IN!lIFE d oVVrll automati( 2 Enter the time you want to count down. When 3 Press ST\RT/
\l_OIl t)allel II/aV Io lotk die t)FeVel/t liliCl?OWaVe a_(idenmllT_ b'v (hildren. froH/ CO]lirol controls, the 1)_'il/_ started "Ik) lock or mflock or used press CI,ILAR!()FF/or three seconds. tile and hold about When die control panel "I ()C" will be displayed.
Other Features Your Model [[IYH May Have ])Yeas tO the light on or off. is ell you ma? SllYI_l(e ii When ",(!Ill once other vapors from surface cooking and cools internal parts in the microwave oven. the tile microw_t_ e is on, th( vent Iml will a/m)nlaticallv f_/l/; I Press The vent fan removes steam and op(rale tile Vent liw high Fan pad lhn Sliced.
Microwave Term Terms Definition Arcing Ar(ing is the IlIi(FOVQI_,e |el'Ill caLised 1)',: • metal or foil touching • foil that is not foF st)arks ill the oxell. Areillg is the side of the oven. molded to/ood (upturned edges aci like antennas).
Care and Cleaning _\I/ oe(>tsi()ll_tl wiping NOTE: Be certain the power thoro/lgh with a solution of is off before cleaning any baking soda and water keeps the insid( fl:esh. part of this oven. Walls, Floor, Inside Window, Removable Turntable and Metal and Plastic Parts on Turntable Support the Door Some "Ib prevent spatters removed towel; (:all be wiih a paper ()tilers a damp ma} cloth. grea.s} spatters cloth, then damp cloth.
Care and Cleaning Ill CleanSteel, Metallic _se We recmnmend against using cleaners with atmnonia or alcohol, as they can damage the appearance of the microwave oven. ff you choose to use a common household cleaner, first apply the cleaner directly to a clean cloth, then wipe the soiled area. Clean tile outside microwave of tile with a sueisx cloth. Rinse and Wipe tile window with a dam]') then dry. clean ch)th. Else a clean, lightly then not with a damp Dr}. thoroughl}. cloth.
Light Bulb Re[dacement I To replace (liscolllle( the main iI 40-wattincandescent breaker bulb (WB36X10003), tile llull), first t the 3 Be sure ut l)()wer l/elbre fils_ or circuit panel or lmll gently tile screw ti'oI// After breaking tile adhesive seal, remove the bull) I)v tile plug. 2 Remove tile ll/fll) is cool removing. 4 Replace light cox_r and h)wer the co'_ ( r. turning. tile bull). Close tile light co_er and secure tile co'_ r with tile screw.
The Exhaust Charcoal Filter 3nsome moaels, Feature The vent t_m has a metal reusable grease Models ba(k filter. that il/[o re(ir(ulaw the air reel//also use a (har( oal filwr. Reusable Grease Filter The metal grease traps For this reason, by leeds must AIM_\YS be ill place when the hood is used. fiher released on the cooktop. t)reveHts 01/ cookto the damaging Ill+.' It also ilames/t'om l) leeds the inside l//icrow_l_ left side.
The Exhaust Feature If the model to tile is not x(nted outsid(, the be r( circulated disposable air will through charcoal that helt/s r(move and odors. The a filter charcoal should be replaced it is noticeably discolored smoke 6-12 on hood It)l" the charcoal filter, discomlect power the main fi_se or circuit ! ii breaker panel or pull the plug. (usually To install m_ a new filter, plasti( relllove and other the fl:ont backing out tile top.
Before You Call For Service Problem Possible Cause Oven will not start A fuse in your may be blown Floor of the oven is warm. even when the oven has not been used circuit breaker Power surge. What to Do home or the Ret)la(e ft_se or reset (ir(uit breaker. tripped. Unt)lug die Hlicrow_ive it 1)a(k ill ovell_ theH plug Plug not fully inserted into wall outlet. Make sm:e the 3-prong plug (m the oxen is tully inserted into wall outlet. Door not securely ()pen closed.
Before You Call For Service Moisture door on t]l( ovel/ o T\_radio and wails whik cooking. might Wipe the moisture off with a pap(r towel o_ soft cloth. Moisture oven between door cooking S1 eain fl'ol/l o dissipate cooking Ol" v/_i)Ol al;ottl/d _ (s( /]l(_ Ligh_ ret'k orion (/OOI _ O17 ()tiler o Ioods. should shordv after linish(d. o when certain Moismr( Dimming change is tl)i//g case. light and in the blow(r sound at power other than lev(ls high.
We lBe Hotpointcom t ]ave a question or need assisted.nee wiIl't VOllr products appliance? on-line Try die ttoq)oint Website 24 hom:s a day, any day of the year! "_bu can also shop more great Expert Hotpointcom ttotl)oint Get on-line (800.432.2737) VO/lr take of all of our support services designed fi)r _r()_1_: convenience. fl)r ItotpoiHt ()r rel)air service is only one step away t_'om your door. 800.GE.CARES and advantage and service at COllVel/iel/ce (all 800.(;E.
We'll Be There! Hotpointcom 800.626.2002 In(livid uals qualified to sevvice their own Instructions _q)l)liam es ('ml have procedures to be t)m:ts or a((essories sent dire(tlv to their hon/c. performed by rely user. (VISA, MasterCard Discover cards are accepted.
Staple.H,'_,l!p o,.ea,,e.ll,.d_4,./_I,.,_..h.d d o,-id,.d purehase liMITED ONE-YEAR date is m'_,d_'dto obtai_t serviee under warra_tly. WAR3L4A!TT For one year tl'oirr (late of original lmrchas(, GE will replace any part in the microwme o\en that Ihils (hm to a d(lbct All warranty orrr Factor\. authoriz(d in materials or workmarrship. Dining this limited one-year warranty, (;E will proxide, free ofchmiw, all labor arrd related service costs to replace the d(lbctive part.