RANGES Thermostat Gas SAFETY INFORMATION .......... 3 USING THE RANGE In Case of a Power Failure . . . . . . . . . . . . . . . 7 Surface Burners . . . . . . . . . . . . . . . . . . . . . . . . 7 Using the Clock and Timer . . . . . . . . . . . . . . . 9 Oven Controls . . . . . . . . . . . . . . . . . . . . . . . . . .10 Sabbath Usage . . . . . . . . . . . . . . . . . . . . . . . . .10 Oven Racks . . . . . . . . . . . . . . . . . . . . . . . . . . . . 11 Aluminum Foil and Oven Liners. . . . . . . . . . .
THANK YOU FOR MAKING GE APPLIANCES A PART OF YOUR HOME. Whether you grew up with GE Appliances, or this is your first, we’re happy to have you in the family. We take pride in the craftsmanship, innovation and design that goes into every GE Appliances product, and we think you will too. Among other things, registration of your appliance ensures that we can deliver important product information and warranty details when you need them. Register your GE appliance now online.
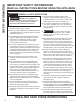
READ ALL INSTRUCTIONS BEFORE USING THE APPLIANCE WARNING Read all safety instructions before using the product. Failure to follow these instructions may result in fire, electrical shock, serious injury or death. WARNING If the information in this manual is not followed exactly, a fire or explosion may result, causing property damage, personal injury or death. - Do not store or use gasoline or other flammable vapors and liquids in the vicinity of this or any other appliance.
SAFETY INFORMATION IMPORTANT SAFETY INFORMATION READ ALL INSTRUCTIONS BEFORE USING THE APPLIANCE WARNING GENERAL SAFETY INSTRUCTIONS WARNING NEVER use this appliance as a space heater to heat or warm the room. Doing so may result in carbon monoxide poisoning and overheating of the oven. Ŷ 8VH WKLV DSSOLDQFH IRU LWV LQWHQGHG SXUSRVH DV described in this owner’s manual.
READ ALL INSTRUCTIONS BEFORE USING THE APPLIANCE WARNING KEEP FLAMMABLE MATERIALS AWAY FROM THE RANGE Failure to do so may result in fire or personal injury. Ŷ 'R QRW VWRUH RU XVH IODPPDEOH PDWHULDOV LQ DQ RYHQ or near the cooktop, including paper, plastic, pot holders, linens, wall coverings, curtains, drapes and gasoline or other flammable vapors and liquids. Ŷ 1HYHU ZHDU ORRVH ILWWLQJ RU KDQJLQJ JDUPHQWV ZKLOH using the appliance.
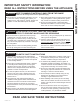
SAFETY INFORMATION IMPORTANT SAFETY INFORMATION READ ALL INSTRUCTIONS BEFORE USING THE APPLIANCE WARNING OVEN SAFETY INSTRUCTIONS WARNING NEVER cover any slots, holes, or passages in the oven bottom or cover an entire rack with materials such as aluminum foil or oven liners. Doing so blocks air flow through the oven and may cause carbon monoxide poisoning. Never place foil or oven liners on the oven bottom. They can trap heat causing risk of smoke or fire.
In the event of a power failure, the oven is inoperable and no attempt should be made to operate it. However, the VXUIDFH EXUQHUV PD\ EH OLW ZLWK D PDWFK 8VLQJ H[WUHPH FDXWLRQ KROG D OLW PDWFK QHDU WKH SRUWV EHQHDWK WKH VXUIDFH burner cap, then slowly turn the knob to the LITE position. Once lit, surface burners will continue to operate normally. Surface Burners Lighting a Surface Burner WARNING Burners should be operated only when covered by cookware.
USING THE RANGE: Surface Burners Surface Burners (Cont.) Surface Burner The round burner is for general cooking purposes. Size cookware appropriately to the flames. Top-of-Range Cookware Aluminum: Medium-weight cookware is recommended because it heats quickly and evenly. Most foods brown HYHQO\ LQ DQ DOXPLQXP VNLOOHW 8VH VDXFHSDQV ZLWK WLJKW fitting lids when cooking with minimum amounts of water.
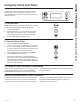
Throughout this manual, features and appearance may vary from your model. You have the choice of having the timer show the time counting down or the time of day. In either case, the timer will signal at the end of the timer period to alert you that the time is up. To Set the Clock NOTE: When you first plug in the range or after a power IDLOXUH WKH HQWLUH &ORFN 7LPHU GLVSOD\ ZLOO OLJKW XS 1. 3UHVV WKH Clock pad. 2.
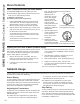
Oven Temperature Knob (on some models) Turn the Oven Temp knob to the setting you want. Each click will change the oven temperature DSSUR[LPDWHO\ ) OVEN TEMP 5DQJH LV SOXV RU PLQXV ) IURP WKH DUURZ :H VXJJHVW that you make the adjustment one click from the original setting and check oven performance before )URQW RI 29(1 7(03 NQRE NQRE DSSHDUDQFH PD\ YDU\ making any additional adjustments. Ŷ 7KH 2YHQ &\FOH OLJKW FRPHV RQ ZKHQ WKH EXUQHU LV RQ It will cycle on and off during cooking.
Oven Light Operation Sabbath Mode Power Outage Note The oven light can be set to either on or off prior to the start of the Sabbath or the holiday. Opening and closing of the door will not change the state of the oven light. If a power outage occurs during a Sabbath bake, the unit will return to Sabbath bake mode when power is restored and the oven will return to the same temperature as before the outage, without any intervention from the user.
USING THE RANGE: &RRNZDUH &RRNLQJ 0RGHV 2YHQ $LU 9HQWV Cookware Cookware Guidelines The material, finish, and size of cookware affect baking performance. Dark, coated and dull pans absorb heat more readily WKDQ OLJKW VKLQ\ SDQV 3DQV WKDW DEVRUE KHDW PRUH readily can result in a browner, crisper, and thicker crust. If using dark and coated cookware check food earlier than minimum cook time.
RECOMMENDED MODE(S) RECOMMENDED RACK POSITION(S) ADDITIONAL SUGGESTIONS Layer cakes, sheet cakes, bundt cakes, muffins, quick breads, biscuits, scones on a Single Rack Bake 2 or 3 8VH VKLQ\ FRRNZDUH Layer cakes* on Multiple Racks Bake 2 and 4 Ensure adequate airflow VHH LOOXVWUDWLRQ EHORZ &KLIIRQ FDNHV DQJHO IRRG Bake 8VH VKLQ\ FRRNZDUH Cookies, biscuits, scones on a Single Rack Bake 3 8VH VKLQ\ FRRNZDUH Cookies, biscuits, scones on Multiple Racks Bake 2 and 4 Ensure adequate a
CARE AND CLEANING: Range – Exterior Range – Exterior Be sure all controls are off and all surfaces are cool before cleaning any part of the range. WARNING If your range is removed for cleaning, servicing or any reason, be sure the anti-tip device is reengaged properly when the range is replaced. Failure to take this precaution could result in tipping of the range and can result in death or serious burns to children or adults. Control Lockout If desired, the touch pads may be deactivated before cleaning.
The interior of your new oven can be cleaned manually or by using Self Clean mode. Spillage of marinades, fruit juices, tomato sauces and basting liquids containing acids may cause discoloration and should be wiped up immediately. Let hot surfaces cool, then clean and rinse. Manual Cleaning Do not use oven cleaners, strong liquid cleansers, steel wool, or scouring pads on the interior of the oven.
CARE AND CLEANING: Cooktop Cooktop Removal of Surface Burners for Cleaning Round Burner Cap 5HPRYDEOH Turn all controls OFF. Allow cooktop to cool before removing grates and burner parts. When removing the burner caps and heads, remember their size and location. Replace them in the same location after cleaning.
Burner Grates Manual Cleaning To self clean your grates on the oven bottom: Grates should be washed in hot, soapy water and rinsed with clean water. To soften burned-on food, place grates in a solution containing ¼-cup of household ammonia for several hours. Afterward, scrub grates with a plastic scouring pad soaked in hot, soapy water. Rinse well and dry. 5HPRYH DOO RYHQ UDFNV 2. Gently place one grate on the center of the oven bottom with the grate oriented in the upright position.
CARE AND CLEANING: Door and Drawer Door and Drawer Cleaning the Oven Door Cleaning the Door Interior Cleaning the Door Exterior Do not allow excess water to run into any holes or slots in the door. If a stain on the door vent trim is persistent, use a mild abrasive cleaner and a sponge-scrubber for best results. Do not use this method on any other surface. Wipe dish soap over any baked-on spatters on the glass.
WARNING SHOCK OR BURN HAZARD: Before replacing oven light bulb, disconnect the electrical power to the range at the main fuse or circuit breaker panel. Failure to do so may result in electric shock or burn. CAUTION BURN HAZARD: The glass cover and bulb should be removed when cool. Touching hot glass with bare hands or a damp cloth can cause burns. CAUTION Before replacing your oven light bulb, disconnect the electrical power to the range at the main fuse or circuit breaker panel.
TROUBLESHOOTING TIPS Troubleshooting Tips ... Before you call for service Save time and money! Review the charts on the following pages first and you may not need to call for service. Problem Possible Cause My new oven doesn't cook like my old one.
Problem Possible Cause What To Do Oven not clean after a clean cycle Oven controls improperly set. See the Care and Cleaning section. Oven was heavily soiled. Clean up heavy spillovers before starting the clean cycle. Heavily soiled ovens may need to self-clean again. Strong “burning” or “oily” odor emitting from the vent This is normal in a new oven and will disappear in time. To speed the process, set a self-clean cycle. See the Care and Cleaning section. This is temporary.
LIMITED WARRANTY GE Appliances Gas Range Limited Warranty GEAppliances.com All warranty service is provided by our Factory Service Centers, or an authorized Customer Care® technician. To schedule service online, visit us at GEAppliances.com/service RU FDOO *( $SSOLDQFHV DW *( &$5(6 3OHDVH have your serial number and your model number available when calling for service. Servicing your appliance may require the use of the onboard data port for diagnostics.
Looking For Something More? GE Appliances offers a variety of accessories to improve your cooking and maintenance experiences! Refer to the Consumer Support page for phone numbers and website information.
CONSUMER SUPPORT Consumer Support GE Appliances Website Have a question or need assistance with your appliance? Try the GE Appliances Website 24 hours a day, any day of the year! You can also shop for more great GE Appliances products and take advantage of all our on-line support VHUYLFHV GHVLJQHG IRU \RXU FRQYHQLHQFH ,Q WKH 86 GEAppliances.
A Gas con Termostato COCINAS INFORMACIÓN DE SEGURIDAD . . . . . 3 USO DE LA COCINA En Caso de Corte de Corriente . . . . . . . . . . . . . . . . 7 Quemadores . . . . . . . . . . . . . . . . . . . . . . . . . . . . . . . . 7 Uso del Reloj y el Temporizador . . . . . . . . . . . . . . . 9 Controles del Horno. . . . . . . . . . . . . . . . . . . . . . . . . 10 Uso del Modo Sabático . . . . . . . . . . . . . . . . . . . . . . 10 Estantes del Horno . . . . . . . . . . . . . . . . . . . . . . . . . .
GRACIAS POR HACER QUE GE APPLIANCES SEA PARTE DE SU HOGAR. Ya sea que haya crecido usando GE Appliances, o que ésta es su primera vez, nos complace tenerlo en la familia. Sentimos orgullo por el nivel de arte, innovación y diseño de cada uno de los electrodomésticos de GE Appliances, y creemos que usted también. Entre otras cosas, el registro de su electrodoméstico asegura que podamos entregarle información importante del producto y detalles de la garantía cuando los necesite.
LEA TODAS LAS INSTRUCCIONES ANTES DE USAR ESTE ELECTRODOMÉSTICO ADVERTENCIA Lea todas las instrucciones de seguridad antes de utilizar este producto. No seguir estas instrucciones puede generar un incendio, una descarga eléctrica, lesiones corporales o la muerte. ADVERTENCIA Si la información de este manual no se sigue exactamente, se podrá producir un incendio o explosión, ocasionando daños sobre la propiedad, lesiones o la muerte.
INFORMACIÓN DE SEGURIDAD INFORMACIÓN IMPORTANTE DE SEGURIDAD LEA TODAS LAS INSTRUCCIONES ANTES DE USAR ESTE ELECTRODOMÉSTICO ADVERTENCIA INSTRUCCIONES GENERALES DE SEGURIDAD ADVERTENCIA NUNCA use este electrodoméstico para calentar el ambiente. Como consecuencia de esto, se podrá producir envenenamiento con monóxido de carbono y el sobrecalentamiento del horno. Ŷ 8VH HVWH HOHFWURGRPpVWLFR VyOR SDUD VX SURSyVLWR RULJLQDO como se describe en el manual del propietario.
LEA TODAS LAS INSTRUCCIONES ANTES DE USAR ESTE ELECTRODOMÉSTICO ADVERTENCIA MANTENGA LOS MATERIALES INFLAMABLES ALEJADOS DE LA COCINA Si esto no se cumple, se podrán sufrir lesiones personales graves o incendios. Ŷ 1R JXDUGH QL XVH PDWHULDOHV LQIODPDEOHV HQ XQ KRUQR o cerca de la parte superior de la cocina, incluyendo papel, plástico, sostenedores de ollas, trapos, cobertores de pared, cortinas, paños y gasolina u otros vapores y líquidos inflamables.
INFORMACIÓN DE SEGURIDAD INFORMACIÓN IMPORTANTE DE SEGURIDAD LEA TODAS LAS INSTRUCCIONES ANTES DE USAR ESTE ELECTRODOMÉSTICO ADVERTENCIA INSTRUCCIONES DE SEGURIDAD ADVERTENCIA NUNCA cubra ninguna ranura, agujeros o pasajes en el fondo del horno ni cubra un estante entero con materiales tales como papel de aluminio o cobertores de horno. Hacer esto bloquea el flujo de aire a través del horno y puede ocasionar envenenamiento con monóxido de carbono.
En el caso de un corte de luz, el horno quedará inoperable y no se deberá intentar usarlo. Sin embargo, los quemadores superficiales se podrán encender con un fósforo. Con extremo cuidado, sostenga un fósforo encendido cerca de los puertos debajo de la tapa del quemador superficial; luego de IRUPD OHQWD JLUH OD SHULOOD KDVWD OD SRVLFLyQ /,7( %DMR 8QD vez encendidos, los quemadores superficiales continuarán funcionando normalmente.
USO DE LA COCINA: 4XHPDGRUHV 4XHPDGRUHV &RQWLQ~D Quemador de la Superficie El quemador redondo es para realizar una cocción general. Olla de tamaño adecuado a las llamas. Utensilio sobre la Cocina Aluminio: Se recomienda un utensilio de peso mediano, ya que calienta de forma rápida y pareja. La mayoría de las comidas se doran de forma pareja en un sartén de aluminio. 8VH FDFHURODV FRQ WDSD KHUPpWLFD FXDQGR FRFLQH FRQ cantidades mínimas de agua.
Es posible que las funciones y apariencias varíen con relación a su modelo a lo largo del manual. 8VWHG WLHQH OD RSFLyQ GH TXH HO WHPSRUL]DGRU PXHVWUH OD FXHQWD regresiva de la hora del día. En tal caso, el temporizador emitirá una señal al concluir el período para alertar que el tiempo finalizó. Para Configurar el Reloj NOTA: Al enchufar por primera vez la cocina o luego de un corte GH FRUULHQWH WRGD OD SDQWDOOD GHO 5HORM 7HPSRUL]DGRU VH LOXPLQDUi 1. Presione la tecla Clock (Reloj). 2.
Perilla de la Temperatura del Horno (en algunos modelos) OFF TEMP 4 CLEA N 00 0 500 BROI 45 L Frente de la Perilla OVEN 7(03 7HPSHUDWXUD GHO +RUQR OD DSDULHQFLD GH OD SHULOOD SXHGH YDULDU LOOS EN SC R COMA O KE ER L KE ER T TATE O RO ST EW HOMA T 4.
Funcionamiento de la Luz del Horno La luz del horno se puede encender o apagar antes del inicio del modo sabático o del feriado. Abrir y cerrar la puerta no cambiará el estado de la luz del horno. Aviso de Corte de Luz durante el Modo Sabático Si se produce un corte de luz mientras realiza un horneado sabático, la unidad regresará al modo de horneado sabático cuando el servicio sea reestablecido, y el horno regresará a la misma temperatura configurada antes del corte, sin ninguna intervención del usuario.
USO DE LA COCINA: 8WHQVLOLRV 0RGRV GH &RFFLyQ 9HQWLODFLRQHV GH $LUH GHO +RUQR 12 Utensilios Pautas de Uso de Utensilios El material, el acabado y el tamaño de los utensilios afectan el horneado. Las ollas oscuras, revestidas y opacas absorben el calor más rápidamente que las ollas claras y brillantes. Al usar ollas que absorben el calor más rápidamente, las comidas podrán resultar más doradas, crocantes y con una capa más gruesa.
MODO(S) RECOMENDADO(S) POSICIÓN(ES) DE ESTANTES RECOMENDADA SUGERENCIAS ADICIONALES Tortas con capas, tortas rectangulares, roscas, panecillos, pan rápido en un Solo Estante Hornear 2o3 8VH XWHQVLOLRV EULOODQWHV Tortas con capas* en Múltiples Estantes Hornear 2y4 Asegúrese de que haya un flujo de aire adecuado 9HD OD LOXVWUDFLyQ 7RUWDV GH JUDVD SDVWHO GH iQJHO Hornear 1 8VH XWHQVLOLRV EULOODQWHV Galletas, galletitas, bizcochitos en un Solo Estante Hornear 3 8VH XWHQVLOLRV EULOODQWHV
CUIDADO Y LIMPIEZA: Cocina - Exterior Cocina - Exterior Asegúrese de que todos los controles estén apagados y que las superficies estén frías antes de limpiar cualquier parte de la cocina. ADVERTENCIA Si se quita la cocina para efectuar una limpieza, reparaciones o cualquier otra razón, verifique que el dispositivo anti-volcaduras se coloque de manera adecuada cuando vuelva a instalarse la cocina. Si no toma esta precaución, la cocina puede volcarse y provocar lesiones.
(O LQWHULRU GH VX QXHYR KRUQR SXHGH VHU OLPSLDGR GH IRUPD PDQXDO R XWLOL]DQGR ORV PRGR 6HOI &OHDQ /LPSLH]D $XWRPiWLFD El derrame de adobo, jugos de fruta, salsas de tomate y líquidos para humedecer que contengan ácidos pueden ocasionar descoloración y se deberán limpiar de inmediato. Espere a que las superficies calientes se enfríen, y luego limpie y enjuague.
CUIDADO Y LIMPIEZA: Placa de Cocción Placa de Cocción Retiro de los Quemadores Superficiales para su Limpieza Apague todos los controles. Espere a que la placa de cocción se enfríe antes de retirar las rejillas y las partes del quemador. Al retirar las tapas y cabezas de los quemadores, recuerde su tamaño y ubicación. Vuelva a colocarlos en la misma ubicación luego de la limpieza.
Parrillas de Quemadores Limpieza Manual Las rejillas se deberán lavar con agua caliente y jabón y deberán ser enjuagadas con agua limpia. Para ablandar la comida quemada, coloque las rejillas en una solución con ¼ de taza de amoníaco hogareño durante varias horas. Luego, friegue las rejillas con un estropajo de plástico con agua caliente y jabón. Enjuague a fondo y seque. Para realizar la limpieza automática de sus rejillas en el fondo del horno: 1. Retire todos los estantes del horno. 2.
CUIDADO Y LIMPIEZA: Puerta y el Cajón Puerta y el Cajón Limpieza de la Puerta del Horno Limpieza del Interior de la Puerta Limpieza del Exterior de la Puerta No permita que el excedente de agua entre a ningún agujero o ranuras de la puerta. Si las manchas en el borde de la ventana de la puerta son persistentes, use un limpiador abrasivo suave o una esponja con estropajo para obtener un mejor resultado. No use este método sobre ninguna otra superficie.
WARNING SHOCK OR BURN HAZARD: %HIRUH UHSODFLQJ RYHQ OLJKW EXOE GLVFRQQHFW WKH HOHFWULFDO SRZHU WR WKH UDQJH DW WKH PDLQ IXVH RU FLUFXLW EUHDNHU SDQHO )DLOXUH WR GR VR PD\ UHVXOW LQ HOHFWULF VKRFN RU EXUQ CAUTION BURN HAZARD: 7KH JODVV FRYHU DQG EXOE VKRXOG EH UHPRYHG ZKHQ FRRO 7RXFKLQJ KRW JODVV ZLWK bare hands or a damp cloth can cause burns.
CONSEJOS PARA LA SOLUCIÓN DE PROBLEMAS 20 Consejos para la Solución de Problemas... Antes de solicitar el servicio técnico ¡Ahorre tiempo y dinero! Primero revise los cuadros que aparecen en las siguientes páginas y es posible que no necesite solicitar reparaciones. Problema Causa Posible Qué Hacer Mi horno nuevo no Su horno nuevo cuenta con un sistema de cocción cocina como el anterior.
Problema Causa Posible Qué Hacer El horno no limpia luego de un ciclo de limpieza Los controles del horno están configurados de forma incorrecta. Consulte la sección Cuidado y limpieza. El horno estaba demasiado sucio. Limpie derrames excesivos antes de iniciar el ciclo de limpieza. Es posible que, en hornos con mucha suciedad, sea necesario usar la limpieza automática nuevamente.
GARANTÍA LIMITADA Garantía Limitada de la Cocina a Gas de GE Appliances GEAppliances.com Todo el servicio de garantía es provisto por nuestros Centros de Servicio de Fabricación, o un técnico autorizado de Customer Care®. Para programar una visita del servicio técnico a través de Internet, visítenos en GEAppliances.com/service, o llame a GE Appliances al 800.GE.CARES. Cuando llame para solicitar el servicio, tenga los números de serie y modelo disponibles.
¿Busca Algo Más? ¡GE Appliances ofrece una variedad de accesorios para mejorar sus experiencias de cocción y mantenimiento! Para acceder a números telefónicos e información de sitios Web, consulte la página de Soporte para el Consumidor.
SOPORTE PARA EL CONSUMIDOR Soporte para el Consumidor Sitio Web de GE Appliances ¿Desea realizar una consulta o necesita ayuda con su electrodoméstico? ¡Intente a través del Sitio Web de GE Appliances las KRUDV GHO GtD FXDOTXLHU GtD GHO DxR 8VWHG WDPELpQ SXHGH FRPSUDU PiV HOHFWURGRPpVWLFRV PDUDYLOORVRV GH *( $SSOLDQFHV \ aprovechar todos nuestros servicios de soporte a través de Internet, diseñados para su conveniencia. (Q (( 88 GEAppliances.