Instructions for Installation and Use 60cm DUAL FUEL COOKER Contents GB Warning,2 GB English, 2 Introduction, 3 Safety Information, 4 Installation, 5-8 Features, 9 The Controls, 10 Clock/ Minute Minder Operation, 11 Hotplate, 12 Top Oven Cookery Notes, 13 HUD 61K S HUD 61P S HUD 61X S HUD 61G S DSD 60 S S HAD60 S Main Oven Cookery Notes, 14 Grilling, 15 Oven Cooking Charts, 16-17 Care and Cleaning, 18-20 Something Wrong With Your Cooker?, 21 If Something Still Goes Wrong, 22 Disposal of Your Applianc
WARNING GB WARNING: The appliance and its accessible parts become hot during use. Do not close the glass cover (if present) when the gas burners or electric hotplates are still hot. Care should be taken to avoid touching heating elements. Children less than 8 years of age shall be kept away unless continuously supervised. WARNING: Ensure that the appliance is switched off before replacing the lamp to avoid the possibility of electric shock.
Introduction To the Installer: Before installation, fill in the product details on the back cover of this book. The information can be found on the rating plate. To the User: You must read the instructions prior to installing and using the appliance and then retain them for future reference. ! Before operating your new appliance please read this instruction booklet carefully. It contains important information concerning the safe operation, installation and maintenance of the appliance.
Safety Information Please read the precautions below before using your cooker. GB ALWAYS . . . ALWAYS make sure you understand the controls before using the cooker. ALWAYS check that all controls on the cooker are turned off after use. ALWAYS stand back when opening an oven door to allow heat to disperse. ALWAYS use dry, good quality oven gloves when removing items from the ovens. ALWAYS take care when removing items from the top oven/grill when the main oven is on, as the contents may be hot.
Installation WARNING - THIS APPLIANCE MUST BE EARTHED. Mains Connection Your cooker should have been checked to ensure that the voltage corresponds with your supply voltage, this is stated on the rating plate, which is situated on the outer rear panel. The model number and serial number are located on the front of the cooker, as shown on the Feature's page.
Installation GB Prior to installation, ensure that the local distribution conditions (nature of the gas and gas pressure) and the adjustment conditions are compatible. The adjustment conditions for this appliance are stated on the data badge which is fitted on the back panel. This appliance is not designed to be connected to a combustion products evacuation device. It must be installed and connected in accordance with current installation regulations.
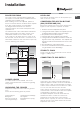
Installation Four skid feet are fitted which can be adjusted up or down to level the cooker. 750mm Min 840 mm Min LEVELLING The cooker can be close fitted below hotplate level. This requires a minimum distance of 600mm between cupboard units of hotplate height. When installing next to a tall cupboard, partition or wall, for a minimum distance of 400mm above hotplate level, allow a side clearance of at least 65mm.
Electrical Connection GB Warning - THIS APPLIANCE MUST BE EARTHED The cooker must be connected by a qualified electrician to a suitable double - pole control unit with a minimum rating of 32A and a minimum contact clearance of 3mm, which should be fitted adjacent to (but not above) the cooker, in accordance with IEE regulations. 1 Open the terminal board by inserting a screwdriver into the side tabs of the cover. Use the screwdriver as a lever by pushing it down to open the cover (see diagram).
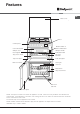
Features GB Glass cover * Timer Control panel Conventional Grill Model number & Serial number label Grill pan and food support Grill pan handle fixed/detachable 'Stay Clean' liners Top oven rod shelf Top Oven door Inner door glass Main Oven door Oven light Oven fan Door Switch 'Stay Clean' liners Main oven rod shelf Inner door glass NOTE: To keep the controls cool when the appliance is used, a flow of air may be blown from beneath the control panel.
The controls GB Switch on the electricity supply to the cooker at the Cooker Control Unit. ELECTRONIC IGINTION BUTTON* LEFT FRONT PLATE LEFT REAR PLATE GRILL PILOT LIGHT RIGHT REAR PLATE RIGHT FRONT PLATE Control Knobs for the gas burners The position of the gas burner controlled by each one of the knobs is shown by a solid ring •. To light one of the burners press down and turn the corresponding knob counter clockwise to the maximum setting.
Clock/Minute Minder Operation Programming cooking* END OF COOKING icon DURATION icon •• •• DECREASE TIME button GB ! A cooking mode must be selected before programming can take place. DISPLAY CLOCK icon Programming the cooking duration TIMER icon 1. Press the button several times until the icon and the three digits on the DISPLAY begin to flash. 2.
Hotplate GB The hotplate lid is fitted with a safety device which cuts off the gas supply to the hotplate burners unless the lid is fully open. Do not use the safety device as a means of controlling the hotplate burners. The hotplate has two high speed burners and two simmering burners which will accommodate pans between 100mm (4") and 240mm (91/2") diameter. All pans should be positioned centrally over the burners. SAFETY REQUIREMENTS FOR DEEP FAT FRYING 1.
Top Oven Cookery Notes The top oven should be used to cook small quantities of food.The oven is designed so that the grill element operates at a reduced heat output, this is combined with a heating element situated underneath the floor of the oven. To ensure even cooking of the food it is important that cooking utensils are positioned correctly on the oven shelf so that the element is directly above.
Main Oven Cookery Notes GB The oven is fitted with wirework shelf supports and two rod shelves. To heat the oven turn the knob clockwise, selecting the require temperature between 80°C (176°F) and 230°C (450°F) as recommended in the temperature chart. The pilot light will immediately come on and remain on until the oven reaches the required temperature. This light will then automatically go off and on during cooking as the oven thermostat maintains the correct temperature.
Grilling CAUTION - ACCESSIBLE PARTS MAY BECOME HOT WHEN THE GRILL IS USED. YOUNG CHILDREN SHOULD BE KEPT AWAY. GRILLING SHOULD NEVER BE UNDERTAKEN WITH THE GRILL DOOR CLOSED The grill control is designed to provide variable heat control of either the full width of the grill or just the left half. Turning the control knob clockwise will switch on the full width and turning anti-clockwise will switch on just the left half.
Oven Cooking Charts GB Top Oven Cooking Baking Pre-heat Temperature °C Time in mins.
Oven Cooking Charts GB Top Oven Cooking Meat Pre-heat Temperature °C Time (approx.) Position in Oven Beef/ Lamb (slow roasting) Yes 170/180 35 mins per 450g (1lb) + 35 mins over.
Care and Cleaning GB Door and Control Panel (Glass) Regularly wipe with a clean, damp cloth and polish with a clean, dry cloth. Door and Control Panel Trims (Stainless Steel) Regularly wipe with a clean, damp cloth and polish with a clean, dry cloth. WARNING: TO AVOID ELECTRIC SHOCK, BEFORE REPLACING THE OVEN LIGHT, SWITCH THE COOKER OFF AT THE COOKER CONTROL UNIT (and allow to cool if the oven has been used).
Care and Cleaning Ensure the glass panel is not subjected to any sharp mechanical blows. Take particular care not to damage the inner surface which is coated with a heat reflective layer. After cleaning, rinse and dry with a soft cloth. For slight soiling the inner glass panel may be cleaned, while still warm, without removing it from the door. Warning: Oven must not be operated with inner door glass removed.
Care and Cleaning GB CLEANING THE DOORS* SIDE OPENING DOORS Cleaning the door glass is the same as the drop down doors,except take care to support the weight of the inner glass when removing and refitting. NEVER OPERATE THE COOKER WITHOUT THE INNER DOOR GLASS IN POSITION. DROP DOWN DOORS Remove the door inner glass as follows. 1. NOTE: The inner door glass has a special reflective coating on one side.
Something Wrong with your Cooker? Before contacting your Service Centre or Installer, check the problem guide below, there may be nothing wrong with your cooker. GB PROBLEM CHECK Burner will not light: If all burners fail to ignite: Check that sparks appear at the burners; a clicking noise should be heard. If not; Check that the electricity supply is turned on. If the electricity supply has failed, all burners can be lit by a match.
If something still goes wrong ... GB .... don't panic Parts Just quickly check these points bifore calling a Hotpoint engineer: 1. Check that the mains supply is switched on. 2. Check that the Timer is not flashing or, the incorrect 'Time of Day' is showing: - The power supply has been interrupted but has now come back on again. Reset the Timer to the correct 'Time of Day' as stated in the Timer instructions. Oven back to Manual operation. 3.
Hotpoint Service Cover Satisfaction Guaranteed or Your Money Back Hotpoint's Extended Warranties Hotpoint gives you a unique 'Satisfaction Guaranteed' promise - valid for ninety days after you have purchased your Hotpoint product. If there is a technical problem with your Hotpoint appliance, just call Hotpoint Service (see back page). If necessary we will arrange for an engineer to call.
GB After Sales Service No one is better placed to care for your Hotpoint appliance during the course of its working life than us - the manufacturer. Essential Contact Information Hotpoint Service We are the largest service team in the country offering you access to 400 skilled telephone advisors and 1100 fully qualified engineers on call to ensure you receive fast, reliable, local service. UK: 08448 224 224 Republic of Ireland: 0818 313 413 www.hotpoint.co.
Guarantee GB 12 months Parts and Labour Guarantee Your appliance has the benefit of our manufacturer's guarantee, which covers the cost of breakdown repairs for twelve months from the date of purchase. This gives you the reassurance that if, within that time, your appliance is proven to be defective because of either workmanship or materials, we will, at our discretion, either repair or replace the appliance at no cost to you.
GB 26 PLEASE PHONE US TO REGISTER YOUR APPLIANCE AND ACTIVATE YOUR PARTS GUARANTEE ON 08448 24 24 24
GB PLEASE PHONE US TO REGISTER YOUR APPLIANCE AND ACTIVATE YOUR PARTS GUARANTEE ON 08448 24 24 24 27
05/2012 - 195103660.