OSHS89ED OSHS89EDC English Operating Instructions OVEN Contents Pl ea 08 se to 44 ph ac 8 o gu tiv 24 ne ar ate 24 us an y 2 on te ou 4 e r Operating Instructions,1 Warnings,2 Description of the appliance,3 Installation,5 Electrical Connection,6 Oven structure,7 Start-up and use,8 Cooking modes,9 Precautions and tips,17 Maintenance and care,17 Troubleshooting,19 Afetr Sales Service,23 Guarantee,24
GB Warnings WARNING: The appliance and its accessible parts become hot during use. Care should be taken to avoid touching heating elements. Children less than 8 years of age shall be kept away unless continuously supervised.
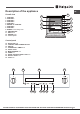
Description of the appliance GB Overall view 9 13 1. POSITION 1 2. POSITION 2 3. POSITION 3 4. POSITION 4 5. POSITION 5 6. DIVIDER “D” POSITION 7. POSITION 6 8. POSITION 7 9. GUIDES for the sliding racks 10. DRIPPING PAN 11. RACK shelf 12. DIVIDER shelf 13. Control panel 12 7 11 5 10 3 1 8 6 4 2 Control panel 14. 15. 16. 17. 18. 19. 20. 21. 22. 23.
GB Display 24. 25. 26. 27. 28. 29. 30. 31. 32. 33. 34.
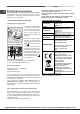
Installation Ventilation To ensure adequate ventilation, the back panel of the cabinet must be removed. It is advisable to install the oven so that it rests on two strips of wood, or on a completely flat surface with an opening of at least 45 x 560 mm (see diagrams). ! Please keep this instruction booklet in a safe place for future reference.
GB Electrical Connection The electrical connection to the mains must be made on the appliance. The power voltage and frequency are as indicated on the rating plate. ! THIS APPLIANCE MUST BE EARTHED. Fitting the power supply cable L N 1. Open the terminal board by inserting a screwdriver into the side tabs of the cover. Use the screwdriver as a lever by pushing it down to open the cover (see diagram) . 2.
Oven structure The OPEN SPACE oven has a capacity of 70 litres and offers users the option of cooking on 4 shelves at the same time or cooking large quantities which would not necessarily be possible in a traditional oven. The 56 universal (Creation) and automatic (Success) cooking modes guarantee perfect results every time, regardless of the dish you are cooking.
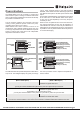
GB Start-up and use pull (2). WARNING! The oven is provided with a stop system to extract the racks and prevent them from coming out of the oven (1). As shown in the drawing, to extract them completely, simply lift the racks, holding them on the front part, and ! The first time you use your appliance, heat the empty oven with its door closed at its maximum temperature for at least half an hour. Make sure that the room is well ventilated before switching the oven off and opening the oven door.
Residual heat indicators The appliance is fitted with a residual heat indicator. When the oven is off, the “residual heat” light on the display comes on to indicate high temperatures inside the oven cavity. The indicator light switches off when the inside of the oven has cooled down. Restoring the factory settings The oven factory settings can be restored to reset all selections made by the user (clock and customised durations).
GB MULTILEVEL mode All heating elements and the fan are activated. Since the heat remains constant throughout the oven, the air cooks and browns food in a uniform manner. A maximum of two racks may be used at the same time. Rotisserie spit* To operate the rotisserie function (see diagram) proceed as follows: 1. Place the dripping pan in position 1. 2. Place the rotisserie support in position 3 and insert the spit in the hole provided on the back panel of the oven. 3.
BREAD mode Use this function to bake bread. To obtain the best results, we recommend that you carefully observe the instructions below: • Follow the recipe. • Do not exceed the maximum weight of the dripping pan. • Remember to pour 100 g (1dl) of cold water into the dripping pan, which should be placed in position 7. • The dough must be left to rise at room temperature for 1 – 1 ½ hours (depending on the room temperature) or until the dough has doubled in size.
GB The temperature is set automatically, according to the cooking mode selected; however, you may adjust it to suit your recipe. You can also set a cooking duration with an immediate or delayed start. MULTILEVEL mode All heating elements and the fan are activated. Since the heat remains constant throughout the oven, the air cooks and browns food in a uniform manner. A maximum of two racks may be used at the same time.
3. Turn the TIMER knob towards “+” and “-” to adjust the cooking end time value. 4. Once you have reached the desired end time, press the GB button again. The display will show the duration, the cooking end time and the set temperature alternately. 5. Press the button to activate the programmed mode. Programming has been set when the and buttons are illuminated. The DISPLAY shows the cooking end time and the cooking duration alternately. 6.
GB Cooking advice table for ovens with an ExtraLarge Space cavity Function Food Weight (Kg) Cook on shelf no.
Cooking advice table for using the Small Space and Main Space at the same time Main Space Function Food Weight (kg) Pizza* Rack position Preheating Recommended temperature (°C) GB Cooking duration (minutes) no.
GB Cooking advice table for the Main Space feature Function Food Weight (Kg) Cook on shelf no.
Precautions and tips ! This appliance has been designed and manufactured in compliance with international safety standards. The following warnings are provided for safety reasons and must be read carefully. General safety • The appliance was designed for domestic use inside the home and is not intended for commercial or industrial use. • The appliance must not be installed outdoors, even in covered areas. It is extremely dangerous to leave the appliance exposed to rain and storms.
GB • The stainless steel or enamel-coated external parts and the rubber seals may be cleaned using a sponge that has been soaked in lukewarm water and neutral soap. Use specialised products for the removal of stubborn stains. After cleaning, rinse and dry thoroughly. Do not use abrasive powders or corrosive substances. • The inside of the oven should ideally be cleaned after each use, while it is still lukewarm. Use hot water and detergent, then rinse well and dry with a soft cloth.
Troubleshooting GB Problem Possible cause The “Clock button” and the digits on the display flash. The appliance has just been Set the clock. connected to the electricity mains or there has been a blackout. There has been a blackout. Reprogram the cooking mode. A programmed cooking mode does not start. Only the high luminosity “Clock button” is lit. An automatic mode has been selected. “Hot” appears on the display and cooking does not start.
GB PLEASE PHONE US TO REGISTER YOUR APPLIANCE AND ACTIVATE YOUR PARTS GUARANTEE ON 08448 24 24 24 20
GB PLEASE PHONE US TO REGISTER YOUR APPLIANCE AND ACTIVATE YOUR PARTS GUARANTEE ON 08448 24 24 24 21
GB PLEASE PHONE US TO REGISTER YOUR APPLIANCE AND ACTIVATE YOUR PARTS GUARANTEE ON 08448 24 24 24 22
Afetr Sales Service GB No one is better placed to care for your Hotpoint appliance during the course of its working life than us – the manufacturer. Essential Contact Information Hotpoint Service We are the largest service team in the country offering you access to 400 skilled telephone advisors and 1000 fully qualified engineers on call to ensure you receive fast, reliable, local service. UK: 08448 224 224 Republic of Ireland: 0818 313 413 www.hotpointservice.co.
195107398.02 06/2013 - XEROX FABRIANO GB Guarantee 12 months Parts and Labour Guarantee Your appliance has the benefit of our manufacturer’s guarantee, which covers the cost of breakdown repairs for twelve months from the date of purchase. This gives you the reassurance that if, within that time, your appliance is proven to be defective because of either workmanship or materials, we will, at our discretion, either repair or replace the appliance at no cost to you.