Use and Care Guide
ENGLISH . . . . . . . . . . . . . . . . . . . . . . . . . . . . . . . . . . . . . . . . . . . . . . . . . . . . .
EN ENGLISH HEALTH & SAFETY, USE & CARE and INSTALLATION GUIDE THANK YOU FOR PURCHASING A HOTPOINT - ARISTON PRODUCT To receive more comprehensive help and support, please register your product at www.hotpoint-ariston.com/register Table of contents Health and Safety guide SAFETY INSTRUCTIONS. . . . . . . . . . . . . . . . . . . . . . . . . . . . . . . . . . . . . . . . . . . . . . . . . . . . . . . . . . . . . . . . . . . . . . . . .
SAFETY INSTRUCTIONS IMPORTANT TO BE READ AND OBSERVED Before using the appliance carefully read these safety instructions. Keep them close at hand for future reference. These instructions and the appliance itself provide important safety warnings, to be observed at all times. The manufacturer declines any liability for failure to observe these safety instructions, for inapropriate use of the appliance or incorrect setting of controls.
Contact an authorized service center. For appliances with fitted plug, if the plug is not suitable for you socket outlet, contact a qualified technician. Do not use extension leads, multiple sockets or adapters. Do not operate this appliance if it has a damaged mains cord or plug, if it is not working properly, or if it has been damaged or dropped. Keep the cord away from hot surfaces. The electrical components must not be accessible to the user after installation.
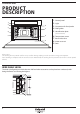
Use and Care Guide PRODUCT DESCRIPTION 1 2 6 3 7 4 1. Control panel 2. Light 3. Connection for food probe 4. Shelf guides 5. Identification plate (do not remove) 5 8 9 6. Temperature sensor 7. Steam inlet valve 8. Water reservoir 9. Door Please note: The cooling fan may switch itself on every so often during cooking in order to reduce energy consumption. Once cooking is complete and the oven has been switched off, the cooling fan may continue to run for a certain period of time.
EN CONTROL PANEL 1 2 3 1. ON / OFF / PAUSE For switching the oven on or off and for pausing or stopping a function. 2. MENU For gaining quick access to the main menu. 3. FAVOURITES For accessing the 10 most used functions. 4 5 6 4. BACK For returning to the previous menu. 5. DISPLAY 6. NAVIGATION BUTTONS For navigating through menus, moving the cursor and changing settings. 7 8 7. OK / SELECT For selecting functions and confirming settings. 8.
ACCESSORIES WIRE SHELF This allows the hot air to circulate effectively. Place food directly on the wire shelf or use it to support baking trays and tins or other heat-resistant ovenware. When cooking food directly on the wire shelf, place the dripping pan on the level below it. It can also be placed on top of either the dripping pan or the steamer tray on the same level.
EN USING THE WATER RESERVOIR The water reservoir can be easily accessed by opening the door. Remove it by lifting it slightly upwards and then pulling it towards you. The water reservoir must be filled before activating any of the cooking functions: Fill it with drinking water up to the “MAX” mark.
INSERTING THE WIRE SHELF AND OTHER ACCESSORIES Insert the wire shelf horizontally by sliding it across the shelf guides, making sure that the side with the raised edge is facing upwards. Other accessories, such as the dripping pan and the steamer tray, are inserted horizontally in the same way as the wire shelf. REMOVING AND REFITTING THE SHELF GUIDES 1. To remove the shelf guides, slide them forwards and pull them towards you to unhook them from the brackets. 10 2.
EN FUNCTIONS TRADITIONAL FUNCTIONS STEAM For cooking natural and healthy dishes using steam to preserve the food's natural nutritional value. This function is particularly suited to cooking vegetables, fish and fruit, and also for blanching. Unless otherwise indicated, remove all packaging and protective film before placing the food in the oven. The temperature of the oven must be lower than 100 °C before using this function. If it is not, allow the oven to cool before starting.
SPECIALS PROVING For optimal proving of sweet or savoury dough. To maintain the quality of proving, do not activate the function if the oven is still hot following a cooking cycle. PRESERVATION For making preserves out of fruit and vegetables. YOGHURT For making yoghurt. DISINFECTION For disinfecting baby bottles or jars using steam. DRAINING BOILER For draining the boiler automatically to prevent residual water remaining in there when the appliance will not be used for a certain period of time.
EN HOW TO USE THE OVEN Read the safety instructions carefully before using the appliance. USING THE APPLIANCE FOR THE FIRST TIME 1. SELECT THE LANGUAGE 4. CALIBRATING You will need to set the language and the time when you switch on the appliance for the first time: The display will show you a list of available languages. To enable the oven to produce steam efficiently, it needs to be calibrated before being used for cooking.
DAILY USE 1. SELECT A FUNCTION Press the button to switch on the oven: The display will show the main menu and a list of available functions. or to scroll through the list. Use Settings Manual 3. SET THE TEMPERATURE/ STEAM LEVEL Use or to move the cursor to the setting that you would like to change. Once the cursor is in position, change the setting by pressing : The setting you have selected will start to flash.
5. SET THE COOKING END TIME/DELAYED START Many functions allow you to program the cooking end time by delaying the time at which the function starts. When setting the duration of the function, the display will show what time cooking is expected to be complete. Use or to move the cursor to END TIME and press : The time will flash. 00:20 180 °C TEMPERATURE High COOKTIME Forced Air + Steam 18:36 HH:MM STEAMLEVEL EN .
. USING THE SPECIAL FUNCTIONS PRESERVATION We recommend using only fresh, high-quality fruit or vegetables to make jams and preserves. Fill the jars with fruit or vegetables (precooked, if possible) and top them up with preserving liquid or canning syrup, leaving approx. 2 cm at the top. Then put the lids on loosely without tightening them. Place the wire shelf on level 2 with the dripping pan on the level below and place the jars on the wire shelf.
EN . TIMER STEAM CLEANING This function softens deposits and food residues, which makes it easier to clean the oven. When used regularly, it enables you to easily remove any food residues or deposits in the compartment. Please note: We recommend removing any accessories from the oven before activating this function. When the oven is switched off, the display can be used as a timer. To activate the function, make sure that the oven is switched off and then press : The timer will flash on the display.
USEFUL TIPS HOW TO READ THE COOKING TABLE The table lists the best function, accessories and level to use to cook various different types of food. Cooking times start from the moment food is placed in the oven, excluding preheating (where required). Cooking temperatures and times are approximate and depend on the amount of food and the type of accessory used. Use the lowest recommended values to begin with and, if the food is not cooked enough, then move on to higher values.
EN COOKING TABLE PREHEAT TEMPERATURE (°C) STEAM LEVEL Gateaux (cakes) Yes 160 - 35-40 Cookies Yes 165 - 175 - 12 - 15 Choux buns Yes 190-200 - 25 - 30 Bread Yes 180-190 Low - medium 35 - 40 Swiss rolls Yes 230 - 7-8 Quiche Yes 180-190 - 35 - 40 Puff pastry Yes 180-190 - 15-20 - 90 - 100 - 10 - 15 Frozen Buffalo wings Yes 190-200 - 15 - 18 Turkey breast Yes 200 - 210 Medium 50-60 Ribs Yes 160–170 Low 80 - 90 Fish gratin Yes 190-200 Low 15- 25 Fis
PREHEAT TEMPERATURE (°C) STEAM LEVEL Rice / pasta - 100 - 15 - 20 Potatoes - 100 - 20 - 25 Meat in slices - 100 - 15 - 20 Meat in sauce - 100 - 25 - 30 Fish fillets - 100 - 10 - 15 FOOD FUNCTION DURATION LEVEL AND ACCESSORIES 3 2/1 3 2/1 3 2/1 3 3 2/1 STEAM DEFROST WEIGHT (g) FOOD Minced MEAT VEGETABLES BREAD FRUIT Steam Wire shelf 20 TEMPERATURE (°C) 30 - 35 60 20 - 25 60 25 -30 Bratwurst 450 10 - 15 10 - 15 60 Whole 1000 60 - 70 40 - 50 60
EN ASSISTED FUNCTIONS DURATION LEVEL AND ACCESSORIES Lasagna 25 - 35 2 Frozen Lasagna 40 - 50 2 Brown rice 20 - 60 3 Add 450 ml of water to 300 g of rice Basmati rice 25 - 30 3 Add 450 ml of water to 300 g of rice Long White Rice 35 - 40 3 Add 450 ml of water to 300 g of rice Bulgur 10 - 40 3 Add 600 ml of water to 300 g of rice Couscous 10-15 3 Add 300 ml of water to 300 g of couscous Potato gratin 40 - 50 2 Baked potatoes 45 - 55 2 Frozen gratin 20 - 30 2 VEGETARIAN ME
DURATION SIDE DISHES FISH POULTRY MEAT VEGETARIAN MEALS RECIPE Notes Cut the aubergines in half lengthways and scoop out most of the flesh. Dice some of the flesh and fry together with onion and mushrooms. Add minced meat, chopped tomatoes, spices and herbs and simmer. Place the aubergines in an ovenproof dish and stuff with the mixture. Sprinkle cheese on top.
EN DURATION PIZZA & SALTY CAKES SIDE DISHES RECIPE LEVEL AND ACCESSORIES Notes Carrots 20-30 3 1 Cauliflower 20-30 3 1 Corn on cob 20 - 30 3 1 Green beans 20 - 30 3 1 Steamed peppers 8 - 12 3 1 Steamed squash 5 - 10 2 Asparagus 20 - 30 3 1 Artichokes 40 - 55 3 1 Brussels sprouts 20 - 35 3 1 Potato wedges 30 - 40 2 Frozen French fries 15 - 25 2 Move around when prompted.
DURATION DESSERT EGGS BREAD / CAKES RECIPE Notes Bread loaf 30-40 2 Make a dough, place it in a loaf tin and leave to rise. Place in the oven when prompted. Rolls 10-15 2 Make dough, place it on a baking tray and leave to rise: We recommend using 150 ml water and 200 - 225 g flour. Place in the oven when prompted. Frozen rolls 10 - 13 2 Place in the oven when prompted. Prebaked rolls 8 - 10 2 Place in the oven when prompted. Canned rolls 10 - 14 2 Makes 4 - 6.
EN PRESERVATION FOOD VEGETABLES FRUIT QUANTITY TIME (MIN) 1l 40 - 120 500 ml 25 - 105 1l 30 - 50 500 ml 15 - 35 LEVEL AND ACCESSORIES 3 2/1 3 2/1 3 2/1 3 2/1 TESTED RECIPES Compiled for the certification authorities in accordance with the standard IEC 60350-1 Cooking time (mins) Temperature (°C) Preheat.
MAINTENANCE AND CLEANING Failure to carry out regular cleaning may cause the surfaces of the appliance to deteriorate. This in turn may shorten the service life of the appliance and cause dangerous situations to arise. Make sure that the appliance has cooled down before carrying out any maintenance or cleaning. Do not use wire wool, abrasive scourers or abrasive/corrosive cleaning agents, as these could damage the surfaces of the appliance.
EN REPLACING THE LIGHT 1. Disconnect the oven from the power supply. 2. Unscrew the cover from the light and carefully remove the seals and the washer. 4. Reconnect the oven to the power supply. Please note: Use 10 W/12 V type G4, T300 °C halogen lamps. The bulb used in the appliance is specifically designed for domestic appliances and is not suitable for general room lighting within the home (EC Regulation 244/2009). Lamps are available from our After-sales Service.
TROUBLESHOOTING Any problems that arise or faults that occur can often be resolved easily. Before contacting the After-sales Service, check the following table to see whether you can resolve the problem yourself. If the problem persists, contact your nearest After-sales Service Centre. Read the safety instructions carefully before carrying out any of the following work Problem Possible cause Solution The oven is not working. Power cut. Disconnection from the mains. Fault.
EN TECHNICAL SPECIFICATION A complete product specification, including the energy efficiency ratings for this oven, can be consulted at and downloaded from our website www.hotpoint.eu WWW AFTER-SALES SERVICE BEFORE CONTACTING OUR AFTER-SALES SERVICE 1. Check whether you can resolve the problem yourself using any of the measures described in the “Troubleshooting” section. 2. Turn off the oven and restart it to see if the fault persists.
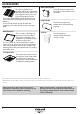
GUIDA INSTALLAZIONE A B C x2 x2 90°C 30
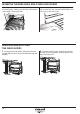
EN 497 mm 551 mm 20 mm 447 mm 455 mm 595 mm min 450 mm 8 mm 600 mm min 550 mm B X2 A 31
C X2 001 400010849298