Top-Freezer Refrigerators ge.com Safety Instructions . . . . . . . . . .2–4 Operating Instructions Automatic Icemaker . . . . . . . . . . . .7 Care and Cleaning . . . . . . . . . . . . .8 Shelves . . . . . . . . . . . . . . . . . . . . .5, 6 Storage Drawers . . . . . . . . . . . . . . .6 Temperature Controls . . . . . . . . . .5 Owner’s Manual and Installation Instructions Models 16, 17, 18 Installation Instructions Preparing to Install the Refrigerator . . . . . . . . . . . . . . .
DANGER! RISK OF CHILD ENTRAPMENT PROPER DISPOSAL OF THE REFRIGERATOR Child entrapment and suffocation are not problems of the past. Junked or abandoned refrigerators are still dangerous…even if they will sit for “just a few days.” If you are getting rid of your old refrigerator, please follow the instructions below to help prevent accidents.
ge.com WARNING! Use this appliance only for its intended purpose as described in this Owner’s Manual. SAFETY PRECAUTIONS When using electrical appliances, basic safety precautions should be followed, including the following: ■ Do not allow children to climb, stand or hang on the shelves in the refrigerator. They could damage the refrigerator and seriously injure themselves. ■ Do not touch the cold surfaces in the freezer compartment when hands are damp or wet.
WARNING! HOW TO CONNECT ELECTRICITY Do not, under any circumstances, cut or remove the third (ground) prong from the power cord. For personal safety, this appliance must be properly grounded. The power cord of this appliance is equipped with a 3prong (grounding) plug which mates with a standard 3-prong (grounding) wall outlet to minimize the possibility of electric shock hazard from this appliance. Installation Instructions Operating Instructions Safety Instructions IMPORTANT SAFETY INFORMATION.
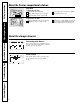
ge.com Turning the dial to 0 stops cooling in both compartments—fresh food and freezer. It does not shut off power to the refrigerator. Temperature Control Dial (on some models) The temperature control dial has nine settings plus 0. 1 is the warmest. 9 is the coldest. At first, set the dial at 5. After using the refrigerator, adjust the dial if necessary. Insert a coin into the slot in the middle of the dial and you can turn the dial to the setting that is best suited to your needs.
Safety Instructions About the freezer compartment shelves. Step Shelf To remove the step shelf: Lift left side of shelf slightly. 1 2 3 1 shelf to the left to free its right 2 Move ends from holes in the cabinet wall. To replace the step shelf: shelf tilted as shown, fit left ends 1 With of shelf into holes in cabinet wall. Operating Instructions right side of shelf, move shelf to 3 Lower the right and take it out.
ge.com Not all features are on all models. Adjustable Humidity Drawer (on some models) Slide the control all the way to the HIGH setting to provide high humidity recommended for most vegetables. Slide the control all the way to the LOW setting to provide lower humidity levels recommended for most fruits. Drawer and Cover Removal Safety Instructions About storage drawer and cover removal.
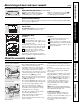
Safety Instructions Operating Instructions Installation Instructions Troubleshooting Tips Consumer Support Care and cleaning of the refrigerator. Cleaning the Outside Moving the Refrigerator The door handles and trim (on some models). Clean with a cloth dampened with soapy water. Dry with a soft cloth. Be careful when moving the refrigerator away from the wall. All types of floor coverings can be damaged, particularly cushioned coverings and those with embossed surfaces. Keep the outside clean.
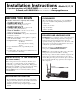
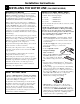
Installation Instructions Models 16, 17, 18 If you have questions, call 1.800.GE.CARES or visit our Website at: ge.com In Canada, call 1.800.561.3344 or Visit our Website at: www.geappliances.ca BEFORE YOU BEGIN CLEARANCES Read these instructions completely and carefully. Allow the following clearances for ease of installation, proper air circulation and plumbing and electrical connections. • IMPORTANT – Save these instructions for local inspector’s use.
Installation Instructions 1 INSTALLING THE WATER LINE (ON SOME MODELS) BEFORE YOU BEGIN WHAT YOU WILL NEED (CONT.) Recommended copper water supply kits are WX8X2, WX8X3 or WX8X4, depending on the amount of tubing you need. Approved plastic water supply lines are GE SmartConnect™ Refrigerator Tubing (WX08X10006, WX08X10015 and WX08X10025). GE SmartConnect™ Refrigerator Tubing Kits are available in the following lengths: 6′ (1.8 m) 15′ (4.6 m) 25′ (7.
Installation Instructions Install the shutoff valve on the nearest frequently used drinking water line. 4 ROUTE THE TUBING 1 SHUT OFF THE MAIN WATER SUPPLY AND UNPLUG REFRIGERATOR Route the tubing between the cold water line and the refrigerator. Route the tubing through a hole drilled in the wall or floor (behind the refrigerator or adjacent base cabinet) as close to the wall as possible.
Installation Instructions 1 INSTALLING THE WATER LINE 7 CONNECT THE TUBING (CONT.) 8 TURN THE WATER TO THE REFRIGERATOR ON AT THE SHUTOFF VALVE NOTES: • Before making the connection to the refrigerator, be sure the refrigerator power cord is not plugged into the wall outlet. • We recommend installing a water filter if your water supply has sand or particles that could clog the screen of the refrigerator’s water valve. Install it in the water line near the refrigerator.
Installation Instructions 2 REVERSING THE DOOR SWING 2 REMOVE THE FREEZER DOOR IMPORTANT NOTES 2.1 Tape the door shut with masking tape. When reversing the door swing: • Read the instructions all the way through before starting. • Handle parts carefully to avoid scratching paint. • Set screws down by their related parts to avoid using them in the wrong places. • Provide a non-scratching work surface for the doors. IMPORTANT: Once you begin, do not move the cabinet until door-swing reversal is completed.
Installation Instructions 2 REVERSING THE DOOR SWING (CONT.) 3 REMOVE THE FRESH FOOD DOOR (CONT.) 3 REMOVE THE FRESH FOOD DOOR 3.5 Transfer the two screws from the opposite side of the cabinet to the screw holes vacated by the center hinge removal. 3.1 Tape the door shut with masking tape. 3.6 Transfer the washer (if your model has one) to the opposite side. 3.2 Using a 5/16″ hex-head socket screwdriver and a 5/16″ open-end wrench, remove the two screws holding the center hinge to the cabinet.
Installation Instructions 4 REVERSING THE HARDWARE (CONT.) 5 REVERSING THE DOOR HANDLES (CONT.) 4.2 Interchange hinge and screws at top right with screws at top left of cabinet. Do not tighten screws on hinge side at this time. 5.1.4 Remove plug button from the top hinge hole on the left side of the door and insert it into the hole on the opposite side that was vacated by removal of the top hinge. Plug Button Installing the hinge on the left. Installing the hinge on the right. 5.1.
Installation Instructions 2 REVERSING THE DOOR SWING 5 REVERSING THE DOOR HANDLES (CONT.) 5.4 Transfer Freezer Door Handle 5.4.1 Remove the screw holding the handle to the top of the door and the two screws holding the handle to the bottom of the door. 5.4.2 Remove the handle. (CONT.) 6 RE-HANGING THE DOORS (CONT.) 6.1.2 Insert the pin on the center hinge into the socket in the top of the door. Place the spacer, then the washer, on the hinge pin.
ge.com Newer refrigerators sound different from older refrigerators. Modern refrigerators have more features and use newer technology. Do you hear what I hear? These sounds are normal. ■ The new high efficiency ■ You may hear the fans spinning at HUMMM... WHOOSH... ■ You may hear a whooshing sound when the doors close. This is due to pressure equalizing within the refrigerator. CLICKS, POPS, CRACKS and CHIRPS ■ You may hear cracking or popping sounds when the refrigerator is first plugged in.
Safety Instructions Operating Instructions Installation Instructions Before you call for service… Troubleshooting Tips Problem Possible Causes What To Do Motor operates for long periods or cycles on and off frequently. (Modern refrigerators with more storage space and a larger space and a larger freezer require more operating time. They start and stop often to maintain even temperatures.) Normal when refrigerator is first plugged in. Often occurs when large amounts of food are placed in refrigerator.
CUSTOMER WARRANTY (for customers in Canada) Your refrigerator is warranted to be free of defects in material and workmanship.
Consumer Product Ownership Registration Dear Customer: Thank you for purchasing our product and thank you for placing your confidence in us. We are proud to have you as a customer! Follow these three steps to protect your new appliance investment: 1 2 3 Complete and mail your Consumer Product Ownership Registration today. Have the peace of mind of knowing we can contact you in the unlikely event of a safety modification. After mailing the registration below, store this document in a safe place.
For refrigerators installed in the U.S. ✁ Cut here ✁ Cut here Please place in envelope and mail to: General Electric Company Warranty Registration Department P.O. Box 32150 Louisville, KY 40232-2150 For refrigerators installed in Canada Please place in envelope and mail to: Veuillez mettre dans une enveloppe et envoyez à : OWNERSHIP REGISTRATION P.O.
✁ For refrigerators installed in the U.S. Consumer Product Ownership Registration Model Number ant ort l p Im Mai ay! d To Mr. ■ Ms. ■ Mrs. ■ Cut here Serial Number Miss ■ First Name Last Name Street Address Apt. # E-mail Address* Date Placed In Use Month Day GE Consumer & Industrial Appliances General Electric Company Louisville, KY 40225 ge.
All warranty service provided by our Factory Service Centers, or an authorized Customer Care® technician. To schedule service, on-line, 24 hours a day, visit us at ge.com, or call 800.GE.CARES (800.432.2737). Please have serial number and model number available when calling for service. For The Period Of: Staple your receipt here. Proof of the original purchase date is needed to obtain service under the warranty. GE Will Replace: Safety Instructions Refrigerator Warranty.
Consumer Support. GE Appliances Website ge.com In the U.S.: www.Hotpoint.com Have a question or need assistance with your appliance? Try the GE Appliances Website 24 hours a day, any day of the year! For greater convenience and faster service, you can now download Owner’s Manuals, order parts, or even schedule service on-line. In Canada: www.geappliances.ca Schedule Service ge.com In the U.S.: www.Hotpoint.com Expert GE repair service is only one step away from your door.