INSTRUCTION FOR USE
EN 2
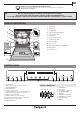
EN THANK YOU FOR PURCHASING A HOTPOINT PRODUCT. To receive more comprehensive help and support, please register your product at: www.hotpoint.eu/register Before using the appliance carefully read Safety Instructions guide. The control panel of this dishwasher activates pushing by ON/OFF button. For energy saving the control panel deactivates automatically after 10 minutes if no cycle has started. PRODUCT DESCRIPTION 1. Upper rack 2. Cutlery rack 3. Foldable flaps 4. Upper rack height adjuster 5.
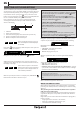
EN FIRST TIME USE After connecting the appliance to the power supply for the first time, the display will guide you to set up the appliance for first use. 1. The language selection LANGUAGE: ENGLISH? <> = CHANGE OK = YES To select preferred language please press button „<” or „>”. Confirm by pressing „OK” button. ENGLISH SELECTED After language confirmation, the appliance will go through the first time use configuration menu. 2.
EN 1. Open the dispenser B by pressing and pulling up the tab on the lid. 2. Carefully introduce the rinse aid as far as the maximum (110 ml) reference notch of the filling space A - avoid spilling it. If this happens, clean the spill immediately with a dry cloth. 3. Press the lid down until you hear a click to close it. 4. Confirm operation by pressing „OK” button. NEVER pour the rinse aid directly into the tub.
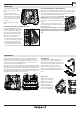
EN ADVICE AND TIPS TIPS Before loading the baskets, remove all food residues from the crockery and empty the glasses. You do not need to rinse beforehand under running water. Arrange the crockery so that it is held in place firmly and does not tip over; and arrange the containers with the openings facing downwards and the concave/convex parts placed obliquely, thus allowing the water to reach every surface and flow freely.
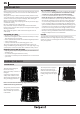
EN UPPER RACK ADJUSTING THE HEIGHT OF THE UPPER RACK The height of the upper rack can be adjusted: high position to place bulky crockery in the lower basket and low position to make the most of the tip-up supports by creating more space upwards and avoid collision with the items loaded into lower rack. The upper rack is equipped with a Upper Rack height adjuster (see figure), without pressing the levers, lift it up by simply holding the rack sides, as soon as the rack is stable in its upper position.
EN SELECTING A CYCLE AND OPTIONS The list of available cycles and options can be found in Cycle Table on next page. Eco cycle is selected by default. If you want to have Last Used cycle selected by default, you can change it in „Settings Menu”. It is possible to select a cycle by pressing 1 of 6 cycles direct access buttons or by pressing „Extra Cycles” button repeatedly. When the last one is reached a further press goes back to the first.
EN CYCLES TABLE Energy cosumption (kWh/cycle) EXTRA DRY, TABLET, START DELAY 3:10 9.5 0.75 AUTO-INTENSIVE 65 ° 3D ZONE WASH, ZONE WASH, TURBO, EXTRA DRY, TABLET, START DELAY 2:00 - 3:10 14.0 - 17.0 1.50 - 1.85 AUTO-MIXED 55° 3D ZONE WASH, ZONE WASH, TURBO, EXTRA DRY, TABLET, START DELAY 1:30 - 2:30 14.5 - 16.0 1.15 - 1.30 0:55 - 1:20 13.0 - 14.5 1.15 - 1.25 1:40 11.5 1.20 0:30 9.0 0.50 3:30 15.0 1.15 - 1:40 10.0 1.
EN OPTIONS AND SETTINGS With each cycle additional options can be used. A full list of available options working with specific cycles can be found in the Cycle Table on the previous page. All active options are shown on the display. To set an option press „OK” button. SET OPTIONS message is shown for a few seconds. Then use „<” or „>” button to navigate through the option list. Press „OK” to select the option, in the setting menu the LED above „OK” button is lit.
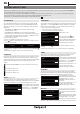
EN SETTINGS MENU To change machne settings you need to enter into the Settins Menu. Press „OK” button and navigate with „< , >” until SETTINGS is shown, then press „OK” button. To exit the setting menu, press any cycle button or press „< , >” button untill EXIT is shown, then press „OK” button. Language ActiveDry 1.LANGUAGE OK 1.ITALIANO <> 1.ENGLISH To change language, enter in the setting menu by pressing „OK” button and navigate with „< , >” until „LANGUAGE” is shown, then press „OK” button.
EN CARE AND MAINTENANCE ATTENTION: Always unplug the appliance when cleaning it and when performing maintenance work.Do not use flammable liquids to clean the machine. CLEANING THE DISHWASHER Any marks on the inside of the appliance may be removed using a cloth dampened with water and a little vinegar. The external surfaces of the machine and the control panel can be cleaned using a non-abrasive cloth which has been dampened with water. Do not use solvents or abrasive products.
EN INSTALLATION ATTENTION: If the appliance must be moved at any time, keep it in an upright position; if absolutely necessary, it may be tilted onto its back. ELECTRICAL CONNECTION WARNING: Under no circumstances should the water inlet hose be cut as it contains live electrical parts.
EN TROUBLESHOOTING In case your dishwasher doesn’t work properly, check if the problem can be solved by going through the following list. For other errors or issues please contact authorized After-sales Service which contact details can be found in the warranty booklet. The manufacturer ensures the availability of spare parts for at least 10 years after production date of this appliance. PROBLEMS Display shows: CHECK SALT! or ADD SALT POSSIBLE CAUSES SOLUTIONS Salt reservoir is empty.
EN TROUBLESHOOTING PROBLEMS POSSIBLE CAUSES SOLUTIONS The door doesn’t lock. Racks are not fit to the end. Verify that racks are fit to the end. The door is not lock. Vigorously push the door until you hear the “clack” sound. The dishes are rattling against each. Arrange the crockery correctly (see Loading the Racks). An excessive amount of foam has been produced. The detergent has not been measured out correctly or it is not suitable for use in dishwashers (see Filling the Detergent Dispenser).
EN 400011521848 12/2020 as - Xerox Fabriano 16