HDM67V8D2CX/UK
EN ENGLISH Health and Safety guide Quick guide Installation guide 2
EN SAFETY INSTRUCTIONS IMPORTANT TO BE READ AND OBSERVED Before using the appliance, read these safety instructions. Keep them nearby for future reference. These instructions and the appliance itself provide important safety warnings, to be observed at all times. The manufacturer declines any liability for failure to observe these safety instructions, for inappropriate use of the appliance or incorrect setting of controls. WARNING: The appliance and its accessible parts become hot during use.
WARNING: In order to prevent the appliance from tipping, the retention chain provided must be installed. Refer to the instructions for installation. ELECTRICAL WARNINGS < $ * & =.
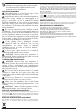
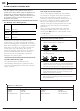
EN PRODUCT DESCRIPTION 1. Glass ceramic hob 1. 2. Control panel 2. 3. Runners for accessories (the level is indicated on the wall of the cooking compartment) 3. 4. Removable Inner Door Glass 5. Main oven door 4. 3. 5.
EN ACCESSORIES GRID KIT GRILL PAN The number and type of accessories may vary depending on which model is purchased. Other accessories that are not supplied can be purchased separately from the After-sales Service. Grill Pan Handle The grill pan handle is detachable from the pan to facilitate cleaning and storage. Fix the pan handle securely before use: 1. Fit the handle to the grill pan so that the external ‘hooks’ embrace the edge of the pan (fig. 1) 2.
EN FIRST TIME USE DAILY USE MAIN OVEN To heat the oven turn the knob clockwise, selecting the require temperature between 80°C (176°F) and 250°C (482°F) as recommended in the temperature chart. The pilot light will immediately come on and remain on until the oven reaches the required temperature. This light will then automatically go off and on during cooking as the oven thermostat maintains the correct temperature.
EN USING THE GLASS CERAMIC HOB The glue applied on the gaskets leaves traces of grease on the glass. Before using the appliance, we recommend you remove these with a special nonabrasive cleaning product. During the first few hours of use there may be a smell of rubber which will disappear very quickly.
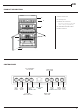
EN FUNCTIONS & DAILY USE 1. SELECT A FUNCTION To select a function, turn the Top Oven/Grill or Main Oven Selection Knob to the symbol for the function you require, then select the required temperature by turning the Top Oven/Grill or Main Oven Temperature Knob. MAIN OVEN TOP OVEN LIGHT For switching on the oven light. LIGHT For switching on the oven light. CONVENTIONAL CONVENTIONAL For cooking any kind of dish on one shelf only. For cooking any kind of dish on one shelf only.
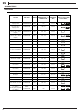
EN COOKING TABLE MAIN OVEN RECIPE FUNCTION PREHEAT TEMPERATURE (°C) / POWER LEVEL DURATION (Min) LEVEL (L-number) AND ACCESSORIES Leavened cakes / Sponge cakes CONVENTIONAL YES 170 30 - 50 2 Leavened cakes / Sponge cakes FORCED AIR YES 160-170 30 - 50 2/4 Filled cake (cheese cake, strudel, fruit pie) CONVENTIONAL YES 160 - 180 40 - 60 2 Filled cake (cheese cake, strudel, fruit pie) FORCED AIR YES 150 - 170 40 - 70 2/4 Cookies / Shortbread CONVENTIONAL YES 140 - 150 30 - 60
EN COOKING TABLE MAIN OVEN RECIPE FUNCTION PREHEAT TEMPERATURE (°C) / POWER LEVEL DURATION (Min) Vols-au-vent / Puff pastry crackers CONVENTIONAL YES 180 - 210 15 - 40 Vols-au-vent / Puff pastry crackers FORCED AIR YES 180 - 210 15 - 40 YES 180 - 200 30 - 65 3 - 190 - MAX 40 - 90 3 - 230 - MAX 50 - 100 3 Lasagne / Flans / Baked CONVENTIONAL pasta / Cannelloni Lamb / Veal / Beef / Pork TURBO GRILL 1 kg Chicken / Rabbit / Duck TURBO GRILL 1 kg LEVEL (L-number) AND ACCESSORIES 3 4
EN COOKING TABLE MAIN OVEN STEAM RECIPE 12 FUNCTION WATER (9 g) TEMPERATURE (°C) / DURATION (Min) LEVEL (L-number) AND ACCESSORIES Leavened cakes/Sponge cakes STEAM 100 170-180 30-60 2 Shortbread/Cookies STEAM 100 140-150 35-55 3 Small cakes/Muffin STEAM 100 160-170 3 Focaccia STEAM 150 200-220 30-55 20-40 Bread rolls STEAM 100 210 25-40 3 Bread loaf STEAM 150 170-180 70-100 3 Roast Beef STEAM 200 200 35-60 3 Roast Beef 2Kg STEAM 250 200 40-70 3 Leg of la
EN COOKING TABLE TOP OVEN FUNCTION PREHEAT TEMPERATURE (°C) / POWER LEVEL DURATION (Min) CONVENTIONAL YES 170 20 - 50 1 CONVENTIONAL YES 160 - 180 40 - 60 2 Filled cake (cheese cake, strudel, fruit pie) CONVECTION BAKE YES 160 - 180 50 - 80 1/3 Cookies / Shortbread CONVENTIONAL YES 140 - 150 20 - 50 2 Cookies / Shortbread CONVECTION BAKE YES 140 - 150 30 - 50 1/3 Small cakes / Muffin CONVENTIONAL YES 160 - 170 20 - 50 2 Choux buns CONVENTIONAL YES 170 - 200 20 - 50
EN ELECTRONIC TIMER Upper arrow button Upper cavity button Delay icon (Upper oven) Clock icon Duration icon (Upper oven) Lower arrow button Lower cavity button Delay icon (Lower oven) Minute Minder icon Duration icon (Lower oven) Minute Minder button Clock button Delay button minder) Turn both the function and temperature knobs to the required settings. 5.
EN CLEANING AND MAINTENANCE Cleaning the glass door with 2 panels TOP OVEN DOORS 1. Open the door fully. Removing the retaining bar depress carefully the clips on both sides of the bar. Pull the trim up gently until the retainer is released. 2. Carefully slide the first inner glass towards you, taking care not to allow the glass to fall. 3. Now the external glass panel can be washed. Ensure the glass panel is not subjected to any sharp mechanical blows.
EN CLEANING AND MAINTENANCE TURN OFF THE MAIN SWITCH AND ENSURE THE COOKER IS COLD BEFORE CLEANING. BEFORE SWITCHING ON AGAIN, ENSURE THAT ALL CONTROLS ARE IN THE OFF POSITION. Do not use steam cleaning equipment. Use protective gloves during all operations. Carry out the required operations when the oven is cold. Disconnect the appliance from the power supply. Disconnect the appliance from the power supply.
EN TROUBLESHOOTING What to do if... Possible reasons Solutions The oven is not working. Power cut. Disconnection from the mains. Check for the presence of mains electrical power and whether the oven is connected to the electricity supply. Turn off the oven and restart it to see if the fault persists. USEFUL TIPS HOW TO READ THE COOKING TABLE The table lists the best function, accessories and level to use to cook various different types of food.
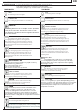
Min. 650 mm Min. 420 mm 60 max. 15 mm 4.1 H 18 4.
6 7 19
04/2022 - W11465831 www.hotpoint.co.uk Your new cooker comes with 4 chrome shelf supports packed in the main oven along with the shelves. There are 2 shelf supports for the top oven and 2 for the bottom oven. See Fig. 1. Fitting - Step 1 The top of the shelf supports engage in slots in the side walls of the oven as in Fig. 2 below. Note the rods‘A’ are longer at the top than ‘B’ at the bottom, and the hooks‘C’are at the back of the oven.