Instructions for Installation and Use Gas Hob Model GF640 - GF 641
CONTENTS Introduction For Your Safety Know your Hob How to use your Hob Practical Advice Care and Cleaning Troubleshooting Installation Electrical Connection Characteristics of Burners and Nozzels After Sales Service Hotpoint Guarantee Key Contacts 3 4 5 5 6 7 7 8-10 11 12 14 15 Back Cover Retention of this Instruction Book This Instruction Book must be kept handy for reference as it contains important details on the safe and proper use of the appliance.
Introduction Your new hob is guaranteed* and will give lasting service. This guarantee is only applicable if the appliance has been installed in accordance with the installation instructions detailed in this booklet. To help make best use of your cooking equipment, please read this booklet carefully. The hob is designed specifically for domestic use and responsibility will not be accepted for use in any other installation.
For Your Safety When used properly your appliance is completely safe but as with any electrical product there are certain precautions that must be observed. PLEASE READ THE BELOW PRECAUTIONS BEFORE USING YOUR APPLIANCE. To maintain the efficiency and safety of this appliance, we recommend you do the following: - only call the Service Centres authorised by the manufacturer. - always use genuine spare parts. - keep any ventilation slots clear of obstructions.
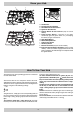
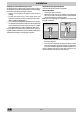
Know your Hob I J A F H B D C A. B. C. D. E. Gas Burners Pan Support for Cookware Control Knobs for Gas Burners Ignitor for Gas Burners Ignition Button for Gas Burners (only on certain models) F. Flame Failure Device - Activates if the flame accidentally goes out (spills, drafts, etc.), interrupting the delivery of gas to the burner. G. Semi Rapid Burner H. Reduced Rapid Burner I. Triple Crown Burner J. Auxilliary Burner L. Electric Hot Plates (only on certain models) M.
Practical Advice Practical Advise on Using the Burners For best performance, follow these general guidelines: • Use the appropriate cookware for each burner (see table) in order to prevent the flame from reaching the sides of the pot or pan; • Alwasy use cookware with a flat bottom and keep the lid on; • When the contents come to a boil, turn the knob to "Low". Burner It may occur that the cooktop does not function or does not function properly.
Care and Cleaning Before cleaning or performing maintenance on your appliance, disconnect it from the electrical power supply. To extend the life of the cooktop, it is absolutely indispensable that it be cleaned carefully and thoroughly on a frequent basis, keeping in mind the following: • Do not use steam equipment to clean the appliance.
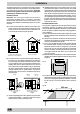
Installation The following instructions are intended for the installer so that the installation and maintenance procedures may be followed in the most professional and expert manner possible. Important: Disconnect the appliance from the electrical supply before performing any maintenance or repair. d) Liquidified petroleum gases are heavier than air and, as a result, settle downwards.
Installation Gas Connection for the Hob The hob should be connected to the gas supply by an authorized installer. During installation of this product it is essential to fit an approved gas tap to isolate the supply from the appliance for the convenience of any subsequent removal or servicing.
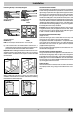
Installation Adapting the Hob for Different Types of Gas To adapt the hob to a different type of gas than that for which it was designed, (see the sticker under the hob or on the packaging), the burner nozzles must be changed, as follows: • Remove the pan supports and slide the burners out of the cooktop. • Unscrew the nozzles using a 7mm socket wrench and replace them with those for the new type of gas. (See table 1, “Burner and Nozzle Specifications”).
Electrical Connection Before connecting to the power supply, make sure that: • the limiter switch and the domestic system can withstand the load from the appliance (see rating plate). • the supply system is efficiently earthed according to standards and laws in force. • the socket or double-pole switch are easily accessible Electrical connection WARNING: THIS APPLIANCE MUST BE EARTHED.
Characteristic of the burners and nozzles Table 1 Burner Liquid Gas Diameter Thermal Power (mm) kW (p.c.s.*) Nom. Red. By-pass 1/100 (mm) Natural Gas Nozzle 1/100 Flow* g/h Nozzler 1/100 (1) (mm) *** ** (mm) Flow* l/h Rapid Fast (Large) (R) (R) 100 3.00 0.7 41 39 86 218 214 116 286 Reduced Fast (RR) Rapid (RR) 100 2.60 0.70 41 39 80 189 186 110 248 Semi Rapid Fast (Medium) (Medium) (S) (S) 75 1.65 0.4 30 28 64 120 118 96 157 Auxiliary (Small) (A) 55 1.00 0.
Notes 13
After Sales Service "No company is better positioned to offer an after sales service on a Hotpoint appliance than us - the manufacturer" As part of our commitment to you, all Hotpoint appliances have the added benefit of a fully inclusive parts and labour guarantee for the first 12 months. In addition to this you also have the advantage of free replacement parts for the first 5 years when fitted by a Hotpoint engineer.
Guarantee "Satisfaction guaranteed or your money back" We give you a unique 'satisfaction guaranteed' promise - valid for 90 days - after you have purchased your Hotpoint appliance. If there is a technical problem simply call Hotpoint Repair service or visit our web-site at www.theservicecentre.co.uk and where necessary, we will arrange for an engineer to call. If the technical problem is not resolved under this guarantee, we will replace your machine or, if you prefer, give you your money back.
Key Contacts After Sales Service Over 1200 trained specialists, directly employed by us, ensure that you can have complete confidence in both the appliances and services we offer. Repair Service and Information Desk UK: 08709 066 066 (Open 8 to 8 Mon - Fri, 8 to 6 Sat, 10 to 4 Sun & Bank Holidays) www.theservicecentre.co.