FHB 51 IX/HA S EHS 51 I X/HA EHS 51 KX/HA Italiano Istruzioni per l’uso FORNO Sommario Istruzioni per l’uso,1 Avvertenze,2 Assistenza,3 Descrizione dell’apparecchio,4 Descrizione dell’apparecchio,4 Installazione,5 Avvio e utilizzo,7 Programmi,7 Precauzioni e consigli,9 Manutenzione e cura,9 English Operating Instructions OVEN Operating Instructions,1 Warnings,2 Assistance,3 Description of the appliance,4 Description of the appliance,4 Installation,11 Start-up and use,13 Cooking modes,13 Precautions a
Avvertenze Warnings ATTENZIONE: Questo apparecchio e le sue parti accessibili diventano molto caldi durante l’uso. Bisogna fare attenzione ed evitare di toccare gli elementi riscaldanti. Tenere lontani i bambini inferiori agli 8 anni se non continuamente sorvegliati.
Assistenza Assistance ! Non ricorrere mai a tecnici non autorizzati. ! Never use the services of an unauthorised technician. Comunicare: • Il tipo di anomalia; • Il modello della macchina (Mod.) • Il numero di serie (S/N) Queste ultime informazioni si trovano sulla targhetta caratteristiche posta sull’apparecchio Please have the following information to hand: • The type of problem encountered. • The appliance model (Mod.). • The serial number (S/N).
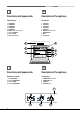
Descrizione dell’apparecchio Description of the appliance Vista d’insieme Overall view 1 2 3 4 5 6 7 8 9 1 2 3 4 5 6 7 8 9 POSIZIONE 1 POSIZIONE 2 POSIZIONE 3 POSIZIONE 4 POSIZIONE 5 GUIDE di scorrimento dei ripiani Ripiano LECCARDA Ripiano GRIGLIA Pannello di controllo POSITION 1 POSITION 2 POSITION 3 POSITION 4 POSITION 5 GUIDES for the sliding racks DRIPPING PAN GRILL Control panel 9 6 8 5 7 3 4 2 1 Descrizione dell’apparecchio Description of the appliance Pannello di controllo Contro
Installazione ! È importante conservare questo libretto per poterlo consultare in ogni momento. In caso di vendita, di cessione o di trasloco, assicurarsi che resti insieme all’apparecchio per informare il nuovo proprietario sul funzionamento e sui relativi avvertimenti. Centraggio e fissaggio Per fissare l’apparecchio al mobile: aprire la porta del forno e avvitare 4 viti a legno nei 4 fori posti sulla cornice perimetrale.
IT ! L’installatore è responsabile del corretto collegamento elettrico e dell’osservanza delle norme di sicurezza.
Avvio e utilizzo Programmi ATTENZIONE ! Il forno è dotato di un sistema di arresto griglie che consente di estrarle senza che queste fuoriescano dal forno. (1) Per estrarre completamente le griglie è sufficiente, come indicato sul disegno, alzarle, prendendole dalla parte anteriore e tirarle. (2) ! Alla prima accensione fare funzionare il forno a vuoto per almeno un’ora con il termostato al massimo e a porta chiusa. Poi spegnere, aprire la porta del forno e aerare il locale.
IT PIZZA • Per una buona cottura della pizza ultilizzate il programma MULTICOTTURA. • Utilizzare una teglia in alluminio leggero, appoggiandola sulla griglia in dotazione. Con la leccarda si allungano i tempi di cottura e difficilmente si ottiene una pizza croccante. • Nel caso di pizze molto farcite è consigliabile inserire la mozzarella a metà cottura.
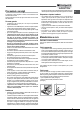
Precauzioni e consigli ! L’apparecchio è stato progettato e costruito in conformità alle norme internazionali di sicurezza. Queste avvertenze sono fornite per ragioni di sicurezza e devono essere lette attentamente. Sicurezza generale • L’apparecchio è stato concepito per un uso di tipo non professionale all’interno dell’abitazione. • L’apparecchio non va installato all’aperto, nemmeno se lo spazio è riparato, perché è molto pericoloso lasciarlo esposto a pioggia e temporali.
IT 3 (con controporta in vetro). afferrare la porta ai due lati esterni, richiudendola lentamente ma non del tutto. Tirare la porta verso di sé estraendola dalle cerniere (vedi figura). Rimontare la porta seguendo il procedimento in senso contrario. Controllare le guarnizioni Controllare periodicamente lo stato della guarnizione attorno alla porta del forno. In caso risulti danneggiata rivolgersi al Centro Assistenza più vicino (vedi Assistenza).
Installation ! Please keep this instruction booklet in a safe place for future reference. If the appliance is sold, given away or moved, please make sure the booklet is also passed on to the new owners so that they may benefit from the advice contained within it. Centring and fixing Secure the appliance to the cabinet by opening the oven door and inserting 4 screws into the 4 holes on the outer frame.
GB ! The installer must ensure that the correct electrical connection has been performed and that it is fully compliant with safety regulations. Before connecting the appliance to the power supply, make sure that • The appliance is earthed and the plug is compliant with the law. • The socket can withstand the maximum power of the appliance, which is indicated on the data plate. • The voltage is in the range between the values indicated on the data plate.
Start-up and use Cooking modes WARNING! The oven is provided with a stop system to extract the racks and prevent them from coming out of the oven (1). As shown in the drawing, to extract them completely, simply lift the racks, holding them on the front part, and pull (2). ! The first time you use your appliance, heat the empty oven with its door closed at its maximum temperature for at least half an hour. Ensure that the room is well ventilated before switching the oven off and opening the oven door.
GB PIZZA • For best results when cooking pizza, use the MULTI-COOKING mode. • Use a light aluminium pizza pan. Place it on the rack provided. For a crispy crust, do not use the dripping pan (prevents crust from forming by extending cooking time). • If the pizza has a lot of toppings, we recommend adding the mozzarella cheese on top of the pizza halfway through the cooking process.
Precautions and tips ! This appliance has been designed and manufactured in compliance with international safety standards. The following warnings are provided for safety reasons and must be read carefully. General safety • The appliance was designed for domestic use inside the home and is not intended for commercial or industrial use. • The appliance must not be installed outdoors, even in covered areas. It is extremely dangerous to leave the appliance exposed to rain and storms.
195122733.00 04/2014 - XEROX FABRIANO GB Grip the door on the two external sides and close it approximately half way.Pull the door towards you lifting it out of its seat (see diagram). To replace the door, reverse this sequence. Inspecting the seals Check the door seals around the oven regularly. If the seals are damaged, please contact your nearest Service Centre (see Assistance). We recommend that the oven is not used until the seals have been replaced.