
Operating instructions


4
GB
PLEASE PHONE US TO REGISTER YOUR APPLIANCE AND ACTIVATE YOUR PARTS GUARANTEE ON 08448 24 24 24
Installation
! Before placing your new appliance into operation please
read these operating instructions carefully. It contains
important information concerning the safe installation and
operation of the appliance.
! Please keep these operating instructions for future
reference. Make sure that the instructions are kept with the
appliance if it is sold, given away or moved.
!7KHDSSOLDQFHPXVWEHLQVWDOOHGE\DTXDOL¿HGSURIHVVLRQDO
in accordance with the instructions provided.
! Any necessary adjustment or maintenance must be
performed after the cooker has been disconnected from
the electricity supply.
7KHFRRNHUVKDYHWKHIROORZLQJWHFKQLFDOVSHFL¿FDWLRQV
Category: II 2H3+
Room ventilation
The appliance may only be installed in permanently-
ventilated rooms, according to current national legislation.
The room in which the appliance is installed must be
ventilated adequately in order to provide as much air as is
QHHGHGE\WKHQRUPDOJDVFRPEXVWLRQSURFHVVWKHÀRZRI
air must not be lower than 2 m
3
/h per kW of installed power).
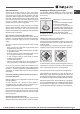
The air inlets, protected by grilles, should have a duct
with an inner cross section of at least 100 cm
2
and should
be positioned so that they are not liable to even partial
REVWUXFWLRQVHH¿JXUH$
These inlets should be enlarged by 100% - with a minimum
of 200 cm
2
- whenever the surface of the hob is not equipped
ZLWKDÀDPHIDLOXUHVDIHW\GHYLFH:KHQWKHÀRZRIDLULV
provided in an indirect manner from adjacent rooms (see
¿JXUH%SURYLGHGWKDWWKHVHDUHQRWFRPPXQDOSDUWVRID
EXLOGLQJDUHDVZLWKLQFUHDVHG¿UHKD]DUGVRUEHGURRPVWKH
LQOHWVVKRXOGEH¿WWHGZLWKDYHQWLODWLRQGXFWOHDGLQJRXWVLGH
as described above.
A
Examples of
ventilation holes
for comburant air.
Enlarging the ventilation slot
between window and floor.
Adjacent
Room
Room to be
Vented
A B
! After prolonged use of the appliance, it is advisable to open
a window or increase the speed of any fans used.
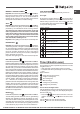
Disposing of combustion fumes
7KH HI¿FLHQW GLVSRVDO RI FRPEXVWLRQ IXPHV VKRXOG EH
guaranteed using a hood which is connected to a safe
DQGHI¿FLHQWQDWXUDOVXFWLRQFKLPQH\RUXVLQJDQHOHFWULF
fan which begins to operate automatically every time the
DSSOLDQFHLVVZLWFKHGRQVHH¿JXUH
In a chimney stack or branched flue.
(exclusively for cooking appliances)
Directly to
the Outside
!7KHOLTXH¿HGSHWUROHXPJDVHVDUHKHDYLHUWKDQDLUDQG
FROOHFW E\ WKH ÀRRU WKHUHIRUH DOO URRPV FRQWDLQLQJ /3*
cylinders must have openings leading outside so that any
leaked gas can escape easily.
/3*F\OLQGHUVWKHUHIRUHZKHWKHUSDUWLDOO\RUFRPSOHWHO\IXOO
must not be installed or stored in rooms or storage areas which
are below ground level (cellars, etc.). Only the cylinder being
used should be stored in the room; this should also be kept well
away from sources of heat (ovens, chimneys, stoves) which
may cause the temperature of the cylinder to rise above 50°C.
Positioning and levelling
! The appliance may be installed alongside any cupboards
whose height does not exceed that of the hob surface.
! Make sure that the wall in contact with the back of the
DSSOLDQFH LV PDGH IURP D QRQÀDPPDEOH KHDWUHVLVWDQW
material (T 90°C).
To install the appliance correctly:
3ODFHLWLQWKHNLWFKHQWKHGLQLQJURRPRUWKHVWXGLRÀDW
(not in the bathroom).
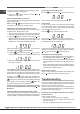
,I WKH WRS RI WKH KRE LV KLJKHU WKDQ WKH FXSERDUGV WKH
appliance must be installed at least 500 mm away from them.
HOOD
420
Min.
min. 650 mm. with hood
min.
700 mm. without hood
mm.
600
Min. mm.
420
Min. mm.
,IWKHFRRNHULVLQVWDOOHG
underneath a wall cabinet,
there must be a minimum
distance of 420 mm between
this cabinet and the top of
the hob.
This distance should be
increased to 700 mm if the
ZDOOFDELQHWVDUHÀDPPDEOH
VHH¿JXUH
'RQRWSRVLWLRQEOLQGVEHKLQGWKHFRRNHURUOHVVWKDQ
mm away from its sides.
$Q\ KRRGV PXVW EH LQVWDOOHG LQ DFFRUGDQFH ZLWK WKH
instructions listed in the relevant operating manual.
Levelling
If it is necessary to level the
appliance, screw the
adjustable feet into the
places provided on each
corner of the base of the
FRRNHUVHH¿JXUH