
Operating instructions


14
GB
PLEASE PHONE US TO REGISTER YOUR APPLIANCE AND ACTIVATE YOUR PARTS GUARANTEE ON 08448 24 24 24
$IWHUFRRNLQJZKHUHOLTXLGKDVRYHUÀRZHGRUZKHQWKHGLUW
has not been eliminated completely (for example when
grilling food, and the temperatures reached are not high
enough for the full self-cleaning action of the enamel to
be performed), we recommend you leave the oven on
at maximum temperature so that all grease residue and
the like are eliminated.
,I DIWHU ORQJWHUP XVH \RX ¿QG HYLGHQW JUHDVH VWDLQV
deposited on the self-cleaning oven walls, probably due to
your failing to follow the above maintenance advice, clean
the surfaces thoroughly with hot water and a soft cloth (do
not use any detergents), then rinse and dry thoroughly.
'R QRW UHPRYH DQ\ GU\ FDNHGRQ JUHDVH XVLQJ VKDUS
objects, as these could etch the self-cleaning coating.
,IWKHVHOIFOHDQLQJVXUIDFHVLQVLGHWKHRYHQDUHGDPDJHG
or worn, due to incorrect or poor maintenance or after
many years of use, you can request a kit of self-cleaning
panels to line the inside of the oven. To order these, just
contact an authorised Service Centre.
2YHQH[WHULRU
2QO\FOHDQWKHDSSOLDQFHZKHQWKHRYHQLVFROG
7KHVWHHOSDUWVDQGHVSHFLDOO\WKHDUHDVZLWKWKHVFUHHQ
printed symbols should not be cleaned with solvents or
abrasive detergents. It is advisable to use only a damp
cloth with lukewarm water and washing up liquid.
Stainless steel may remain stained if in long-term contact
with very calcareous water or aggressive detergents
(containing phosphorus).
It is therefore always necessary to rinse and dry all
surfaces thoroughly after cleaning.
Important: cleaning operations must be made
horizontally, in the direction of the steel glazing.
$IWHUFOHDQLQJDQ\WUHDWPHQWVWRSROLVKWKHVXUIDFHVPD\
EHSHUIRUPHGRQO\XVHVSHFL¿FSURGXFWVIRUVWDLQOHVVVWHHO
Important: do not use abrasive powders, aggressive
detergents or acidic substances for cleaning.
Hob:
7KHUHPRYDEOHSDUWVRIWKHEXUQHUVRQWKHKREVKRXOG
be washed frequently with warm water and soap, making
sure to remove any caked-on substances. Check that the
gas outlet slits are not clogged. Dry the burners carefully
before using them again.
&OHDQWKHHQGSDUWRIWKHDXWRPDWLFJORZSOXJLJQLWRUVRI
the hob and gas oven frequently.
Greasing the taps
$VWLPHSDVVHVDWDSPD\ORFNRUEHFRPHGLI¿FXOWWRWXUQ
In this case it will be necessary to clean inside and replace
the grease. This procedure must be performed by a
technician authorized by the manufacturer.
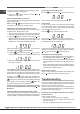
Disassembling/assembling the oven door
To make it easier to clean the inside of your oven, the oven
door can be removed, by proceeding as follows:
2SHQWKHGRRUFRPSOHWHO\DQGOLIWWKHOHYHUV³B”;
1RZVKXWWLQJWKHGRRUVOLJKWO\\RXFDQOLIWLWRXWE\SXOOLQJ
out the hooks “A´DVVKRZQLQ¿JXUH
To reassemble the door:
:LWKWKHGRRULQDYHUWLFDOSRVLWLRQLQVHUWWKHWZRKRRNV
“A” into the slots;
(QVXUHWKDWVHDW³D” is hooked perfectly onto the edge of the
slot (move the oven door backwards and forward slightly);
.HHSWKHRYHQGRRURSHQIXOO\XQKRRNWKHOHYHUV³B”
downwards and then shut the door again.
Replacing the oven light bulb
Make sure that the appliance
is disconnected from the
electricity supply.
Unscrew the glass protective
cover from inside the oven,
unscrew the lightbulb
and replace it with an
identical one suitable for
high temperatures (300°C)
and with the following
characteristics:
- Voltage 230 V
- Wattage 15 W
- Type E 14.
! Do not use the oven lamp as/for ambient lighting.