Instructions for Installation and Use Dual Fuel Cooker Model EG900X To the Installer Before installation fill in the product details on the back cover of this book. The information can be found on the rating plate. To the User You must read the instructions prior to installing and using the appliance and then retain them for future reference.
CONTENTS Introduction For Your Safety Know your Cooker How to use your Hob How to use your Oven Know your Timer Cooking Advice Cooking Chart Care and Cleaning Troubleshooting Installation Electrical Connection Burner and Nozzle Specifications and Oven Specifications After Sales Service Hotpoint Guarantee Key Contacts 3 4 5 6 7 8 9 10 11 12 13-14 15 16 18 19 Back Cover Retention of this Instruction Book This Instruction Book must be kept handy for reference as it contains important details on the safe and
INTRODUCTION Your new dual fuel cooker is guaranteed* and will give lasting service. This guarantee is only applicable if the appliance has been installed in accordance with the installation instructions detailed in this booklet. To help make best use of your cooking equipment, please read this booklet carefully. The appliance is designed specifically for domestic use and responsibility will not be accepted for use in any other installation.
FOR YOUR SAFETY When used properly your appliance is completely safe but as with any electrical product there are certain precautions that must be observed. PLEASE READ THE BELOW PRECAUTIONS BEFORE USING YOUR APPLIANCE. To maintain the efficiency and safety of this appliance, we recommend you do the following: - only call the Service Centres authorised by the manufacturer. - always use genuine spare parts. ALWAYS: - make sure you remove all packaging and dispose of safely.
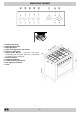
KNOW YOUR COOKER F E A B C D E F G H M R P Auxiliary gas burner Semi-rapid gas burner Rapid gas burner Triple crown gas burner (wok burner) Ignitor for gas burners Flame Failue Device - Activates if the flame accidentally goes out (spills, drafts, etc.), interrupting the supply of gas to the burner.
HOW TO USE YOUR HOB Gas burners On the control panel, the following symbols are indicated around each knob "M". Off Practical advice on using the hob: To obtain maximum efficiency from the burners, we recommend you only use pans with a diameter suitable for the burner being used, so that the flame does not extend beyond the pan base (see the following table). When a liquid starts boiling, we recommend you turn the flame down just enough to keep the liquid simmering. High flame Low flame BURNER A.
HOW TO USE YOUR OVEN The 'Multi-function' oven combines the advantages of convection ovens with those of fan assisted models in a single appliance. It is an extremely versatile appliance that allows you to choose easily between 7 different cooking modes. The various cooking modes are selected by means of the function selector 'G' and the temperature selector 'H' situated on the control panel: Fanned Grill Important: do not set the temperature selector 'H' over 175°C.
TIMER (ELECTRIC OVEN) The programmer makes it possible to preset the oven and the grill in terms of: • delay start with a preset length of time for cooking; • immediate start with a preset length of time for cooking; • timer.
COOKING ADVICE The oven offers a wide range of alternatives which allows you to cook any type of food in the best possible way. With time you will learn to make the best use of this versatile cooking appliance and the following are only a guide, which may be varied according to your own personal taste. I used more than one rack (in the "fan-assisted" mode) and they are not all at the same stage of cooking Use a lower temperature setting.
COOKING CHART NB. Cooking times shown in the charts are approximate and may vary according to personal taste. When cooking a certain food for the first time, it is advisable to choose the lowest values in the cooking time range given in the table and then increase times if necessary.
CARE AND CLEANING Before cleaning or carrying out any maintenance on your appliance, you must disconnect it from the power supply. To extend the life of your appliance, it must be cleaned frequently, keeping in mind that: The hob: • The enamelled parts must be washed with warm water without using any abrasive powders or corrosive substances which could cause damage. • The removeable parts of the burners should be washed with warm soapy watermaking sure to remove caked on substances.
Troubleshooting Before calling service for assistance, check through the following list, there may be nothing wrong. First of all, check to see that there are no interruptions in the gas and electrical supplies, and, in particular, that the gas valves for the mains are open. If your oven releases alot of smoke during cooking. Check to make sure that: • You have selected the correct cooking mode for the type of food and the dish is in the correct recommended shelf position.
INSTALLATION The following instructions are provided for qualified installers so that they may carry out installation, adjustment and technical maintenance operations correctly and in compliance with the applicable norms in force. Important: Disconnect the appliance from the electrical and gas supply before performing any maintenance or repair. Maximum caution should be used should it be necessary to keep the appliance connected to the electricity supply.
INSTALLATION or a more efficient ventilation system by increasing the extraction power of the electric fan if installed. Liquid petroleum gas descends towards the floor as it is heavier than air. Apertures in the outside walls in rooms containing LPG cylinders should therefore be at floor level, in order to allow any gas from leaks to be expelled.
ELECTRICAL CONNECTION Those ovens equipped with a three-pole power supply cable are designed to operate with an alternating current with the voltage and frequency indicated on the data plate (located on the appliance) and in the instruction booklet. Connecting the supply cable to the mains The appliance must be connected to a double pole isolating switch, having a minimum contact separation of 3mm.
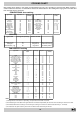
BURNER AND NOZZLE SPECIFICATIONS Table 1 Liquid gas Diameter (mm) Thermal Power kW (H.s.)* By-pass 1/100 Nozzle 1/100 Natural gas Flow * g/h Nozzle 1/100 Flow * l/h BURNER Nominal Reduced (mm) (mm) G30 G31 (mm) G20 C. Rapid 100 3.00 0.7 40 86 218 214 116 286 B. Semi-rapid 75 1.65 0.4 30 64 120 118 96 157 A. Auxiliary 55 1.0 0.3 27 50 73 71 71 95 D. Triple Ring 130 3.25 1.
NOTES 17
After Sales Service No one is better placed to care for your Hotpoint appliance during the course of its working life than us the manufacturer. Essential Contact Information Hotpoint Service We are the largest service team in Europe offering you access to 400 skilled telephone advisors and 1100 fully qualified engineers on call to ensure you receive fast, reliable, local service. UK: 08709 066 066 Republic of Ireland: 0818 313 413 www.hotpointservice.co.
Guarantee 12 Months Parts and Labour Guarantee Your appliance has the benefit of our manufacturers guarantee, which covers the cost of breakdown repairs for twelve months from the date of purchase. This gives you the reassurance that if, within that time, your appliance is proven to be defective because of either workmanship or materials, we will, at our discretion, either repair or replace the appliance at no cost to you.
Key Contacts After Sales Service Over 1200 trained specialists, directly employed by us, ensure that you can have complete confidence in both the appliances and services we offer. Repair Service and Information Desk UK: 08709 066 066 (Open 8 to 8 Mon - Fri, 8.30 to 5.30 Sat, 10 to 4 Sun & Bank Holidays) www.hotpointservice.co.