DIFP 8T96 EN English Operating instructions DISHWASHER - Contents Operating instructions, 1 Precautions and advice, 2-3 Assistance, 3 Product Data, 3 Installation, 6-7 Electrical Connection, 8 Description of the appliance, 9 Refined salt and rinse aid, 10 Loading the racks, 11-12 Detergent and dishwasher use, 13 Wash cycles, 14 Special wash cycles and options, 15 Care and maintenance, 16 Troubleshooting, 17 Product Guarantee and Repair Information, 18 ْيبَرَع AR تعليمات التشغيل المحتويات- ماكي
Precautions and advice Precautions and advice This appliance was designed and manufactured in compliance with international safety standards. The following information has been provided for safety reasons and should be read carefully. Keep this instruction manual in a safe place for future reference. If the appliance is sold, given away or moved, make sure the manual is kept with the machine. Read the instructions carefully, as they include important information on safe installation, use and maintenance.
atmosphere and public health. The crossed-out dustbin symbol shown on all products reminds the owners of their obligations regarding separated waste collection. For further information relating to the correct disposal of household appliances, owners may contact the relevant public authority or the local appliance dealer. Saving energy and respecting the environment Saving water and energy • Only begin a wash cycle when the dishwasher is full.
متاحة). • أختر دورة غسل مالئمة لنوع األواني باستخدام جدول دورات الغسل: لألطباق ذات مستوى االتساخ العادي ،استخدم دورة الغسلاالقتصادية ،التي تضمن استخدام مستويات منخفضة من استهالك الطاقة والماء. إذا كانت الحمولة أقل من المعتاد ،استخدم خيار نصفالحمولة (أنظر دورات الغسيل الخاصة والخيارات ،إذا كانت متوفرة). • إذا كان تعاقد التزويد بالتيار الكهربائي لديك يقدم تفاصيل عن أوقات توفير الطاقة ،قم بتشغيل دورات الغسل خالل األوقات التي يكون فيها أسعار الكهرباء أقل .
AR احتياطات ونصائح تم تصميم هذا الجهاز وتصنيعه طبقا لمواصفات األمان العالمية سارية المفعول .يتم تزويد التحذيرات التالية ألسباب وقائية ولذلك يجب قراءتها بعناية. احتفظ بدليل التعليمات هذا في مكان آمن لمراجعته في المستقبل. إذا تم بيع الجهاز ،أو منحه للغير أو نقله ،الرجاء التأكد من أن دليل التعليمات مرفق بالجهاز. يجب قراءة التعليمات بعناية ،فهي تحتوي على معلومات هامة عن التركيب واالستخدام والصيانة بشكل آمن.
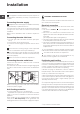
Installation EN If the appliance must be moved at any time, keep it in an upright position; if absolutely necessary, it may be tilted onto its back. WARNING: HAZARDOUS VOLTAGE! Under no circumstances should the water inlet hose be cut as it contains live electrical parts. Connecting the water supply Adaptation of the water supply for installation should only be performed by a qualified technician.
Advice regarding the first wash cycle After the installation, remove the stoppers from the racks and the retaining elastic elements from the upper rack (if any). Water softener settings Before starting the first wash cycle, set the hardness level of the water from the mains supply. (see chapter Rinse aid and refined salt). First load the softener tank with water, then introduce about 1 kg of salt. It is perfectly normal for water to flow out. As soon as this procedure is complete, run a wash cycle.
Electrical Connection EN Electrical Connection If your appliance is supplied with a 13 amp. fused plug it can be plugged into a 13 amp socket for immediate use. Before using the appliance please read the instruction below. WARNING: THIS APPLIANCE MUST BE EARTHED. THE FOLLOWING OPERATIONS SHOULD BE CARRIED OUT BY A QUALIFIED ELECTRICIAN. Replacing the fuse: When replacing a faulty fuse, a 13 amp ASTA approved fuse to BS 1362 should always be used, and the fuse cover re-fitted.
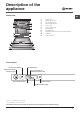
Description of the appliance Overall view EN 1. 2. 3. 4. 5. 6. 7. 8. 9. 10. 11.
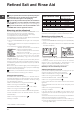
Refined Salt and Rinse Aid EN Only use products which have been specifically designed for dishwashers. Do not use table salt or industrial salt. Follow the instructions given on the packaging. If you are using a multi-function product, we recommend that you add salt in any case, especially if the water is hard or very hard. (Follow the instructions given on the packaging.) If you do not add salt or rinse aid, the LOW SALT* and LOW RINSE AID* indicator lights will remain lit.
Loading the racks Tips Before loading the racks, remove all food residues from the crockery and empty liquids from glasses and containers. No preventive rinsing is needed under running water. Arrange the crockery so that it is held in place firmly and does not tip over; and arrange the containers with the openings facing downwards and the concave/convex parts placed obliquely, thus allowing the water to reach every surface and flow freely.
EN Tip-up compartments with adjustable position The side tip-up compartments can be positioned at three different heights to optimize the arrangement of crockery inside the rack. Wine glasses can be placed safely in the tip-up compartments by inserting the stem of each glass into the corresponding slots. For optimum drying results incline the tip-up compartments more. To change the inclination, pull up the tip-up compartment, slide it slightly and position it as you wish.
Detergent and dishwasher use Measuring out the detergent A good wash result also depends on the correct amount of detergent being used. Exceeding the stated amount does not result in a more effective wash and increases environmental pollution. Based on how soiled the items are, the amount can be adjusted to individual cases using powder or liquid detergent. In the case of normally soiled items, use approximately either 35 gr (powder detergent) or 35 ml (liquid detergent).
Wash cycles EN Wash-cycle data is measured under laboratory conditions according to European Standard EN 50242. Based on the different conditions of use, the wash-cycle duration and data can change. The number and type of wash cycles and options may vary depending on the dishwasher model. Drying Options Wash Cycle Duration H:Min. Water Consumption (l/cycle) Energy Consumption (kWh/cycle) 1. Eco Yes Delayed start 03:10’ 9,0 0,93 2.
Special wash cycles and Options Notes: Optimum performance levels when using the “Rapid 40’” cycle can be achieved by respecting the specified number of place settings. To reduce consumption, only run the dishwasher when it is full. Note for Test Laboratories: for information on comparative EN testing conditions, please send an email to the following address: assistenza_en_lvs@indesitcompany.
Care and maintenance EN Shutting off the water and electricity supplies • Turn off the water tap after every wash cycle to avoid leaks. • Always unplug the appliance when cleaning it and when performing maintenance work. Cleaning the dishwasher • The external surfaces of the machine and the control panel can be cleaned using a non-abrasive cloth which has been dampened with water. Do not use solvents or abrasive products.
Troubleshooting Whenever the appliance fails to work, check for a solution from the following list before calling for Assistance. Problem: EN Possible causes / Solutions: The dishwasher does not start • The water supply tap is not turned on. or cannot be controlled. • Switch off the appliance by pressing the ON/OFF button, switch it back on after approximately one minute and reset the wash cycle. • The appliance has not been plugged in properly or another electricity socket should be used.
Product Guarantee and Repair Information Guarantee EN 12 Months Parts and Labour Guarantee Your appliance has the benefit of our manufacturer’s guarantee, which covers the cost of breakdown repairs for twelve months from the date of purchase.
EN 19
التركيب إذا توجّ ب نقل الجهاز في أي وقت ،احتفظ به بشكل عامودي؛ إذا كان األمر ضروريا جدا ،يمكن إمالته على الجهة الخلفية منه. توصيل مصدر التزويد بالماء يجب أال يقوم بتجهيز مصدر التزويد بالماء للتركيب إال بواسطة المختص الفني المؤهل. يمكن وضع خراطيم إدخال وإخراج الماء باتجاه اليمين أو اليسار بهدف الحصول على أفضل وضع تركيب ممكن. تأكد من ماكينة غسل األطباق ال الجعل الخراطيم مثنية أو معوجّ ة.
AR نصيحة متعلقة بدورة الغسل األولى قم بعد التركيب بخلع السدادات من األرفف ،واألجزاء البالستيكية الواقية من الرف العلوي (إن وُ جدت). تحتوي الماكينة على جرس/مجموعة من األصوات (باالعتماد على موديل ماكينة غسيل األطباق) إلشعار المستخدم بأن األمر تم تنفيذه :سواء توصيل الطاقة أو إنهاء الدورة أو غيرها. إعدادات مخفف الماء قبل البدء في دورة الغسل األولى ،قم بضبط مستوى قساوة الماء من مصدر الماء الرئيسي( .راجع فصل مادة الشطف المساعدة وملح التكرير).
التوصيالت الكهربائية التوصيالت الكهربائية إذا كان الجهاز لديك مزودا بقابس مصهره 13أمبير ،فيمكن إدخاله إلى مقبس 13أمبير لالستخدام الفوري .قبل استخدام الجهاز ،يرجى قراءة المعلومات أدناه. مؤرضا. تحذير :يجب على هذا الجهاز أن يكون ّ يجب تنفيذ العمليات التالية من قبل أخصائي كهرباء مؤهل.
وصف الجهاز AR نظرة عامة .1 .2 .3 .4 .5 .6 .7 .8 .9 .10 .
مادة الشطف المساعدة وملح التكرير، استخدم المنتجات المصنعة خصيصا لماكنات غسل األطباق فقط .ال تستخدم ملح السفرة أو الملح الصناعي. اتبع التعليمات الموجودة على العبوة. إذا تم استخدام منتج متعدد االستخدامات ،فإننا نوصي بأن تضيف الملح في أية حالة ،وخاصة إذا كانت المياه قاسية أو قاسية جدا( .اتبع التعليمات الموجودة على العبوة). إذا لم تضف الملح أو مادة الشطف المساعدة ،ستبقى مؤشرات انخفاض الملح* وانخفاض مادة الشطف المساعدة* مضاءة.
تحميل الرفوف AR نصائح قبل تحميل الرفوف ،أزل كل فضالت الطعام عن األواني وقم بتفريغ السوائل من األكواب واألواني .ليست هناك حاجة للشطف االحتياطي باستخدام الماء الجاري. قم بترتيب األواني بحيث تستقر في أماكنها بثبات وال تنقلب ،وضع األوعية بحيث تكون فتحتها ألسفل ،وتكون األجزاء المقعرة والمحدبة في وضع مائل ،مما يسمح للماء بالوصول إلى جميع األسطح ويتدفق بسالسة. تأكد من أن األغطية والمقابض والصواني والمقاليات ال تعوق أذرع الرشاش من الدوران .ضع أية قطع صغيرة في سلة السكاكين.
حجرات قابلة للطي وموضع قابل للضبط يمكن وضع الحجرات الجانبية القابلة للطي على ثالثة ارتفاعات مختلفة ،وذلك للتحكم في ترتيب األواني داخل الرف. يمكن وضع كؤوس النبيذ بأمان في الحجرات القابلة للطي ،وذلك بإدخال ساق كل كأس في الفتحات المناسبة. للحصول على أفضل نتائج التجفيف ،قم بإمالة الحجرات القابلة للطي بشكل أكبر .لتغيير درجة الميل ،اجذب الحجرة القابلة للطي ،وقم بزلقها قليالً وضبطها في الموضع الذي تريده.
مواد التنظيف واستخدام ماكينة غسل األطباق AR تشغيل ماكينة غسل األطباق .1افتح حنفية الماء. .2افتح الباب واضغط الزر ( ON-OFFتشغيل/إيقاف تشغيل) :يضيء مؤشرات مصابيح ( ON/OFFتشغيل/إيقاف تشغيل) ،والخيارات والشاشة. .3قياس مواد التنظيف( .أنظر المعلومات المجاورة). .4قم بتحميل الرفوف (أنظر تحميل الرفوف). .5أختر دورة غسل مالئمة لنوع األواني ومدى اتساخها (أنظر جدول دورات الغسل) بواسطة الضغط على زر .P .6حدد خيارات الغسل*( .
دورات الغسيل يتم تحليل بيانات دورة الغسيل في ظل ظروف المختبرات ،وبما يتوافق مع المعيار القياسي األوروبي .EN 50242 تتغير مدة وبيانات دورة الغسيل بناء على ظروف االستخدام المختلفة. AR يمكن لرقم ونوع دورة الغسل وكذلك الخيارات أن تتغير وفقا لطراز ماكينة غسل األطباق. دورة الغسل التي تحتاج إلى تجفيف الخيارات المدة التقريبية لدورات الغسيل استهالك الماء (لتر/دورة) استهالك الطاقة (كيلو وات ساعة/ دورة) .
دورات الغسل الخاصة والخيارات AR خيارات الغسيل مالحظات: يمكن الوصول إلى مستويات األداء األمثل عند استخدام دورة "سريع 40دقيقة" عند التقيد بالرقم المحدد في إعدادات المواضع. للحد من االستهالك ،ال تقم بتشغيل ماكينة غسل األطباق إال عندما تكون ممتلئة. مالحظة لمختبرات الفحوص :للمعلومات المتعلقة بشروط اختبارات المالءمة ،ENالرجاء إرسال بريد إلكتروني إلى العنوان التالي: assistenza_en_lvs@indesitcompany.
العناية والصيانة قطع إمدادات الماء والكهرباء • قم بإقفال حنفية الماء بعد كل دورة غسل لتحاشي التسربات. • افصل الجهاز عن الكهرباء دائما عند تنظيفه أو أثناء أي عمل صيانة. تنظيف ماكينة غسل األطباق • يمكن تنظيف األسطح الخارجية في الماكينة ولوحة التحكم باستخدام خرقة غير كاشطة مبللة بالماء .ال تستخدم المنتجات المذيبة أو الكاشطة. • يمكن إزالة أي بقع داخل الجهاز باستخدام خرقة مبللة بالماء والقليل من الخل.
استكشاف المشاكل وحلها AR إذا لم يعمل الجهاز ،وقبل استدعائك للمساعدة ابحث عن حل في القائمة التالية. األسباب المحتملة /الحلول: المشكلة: ماكينة غسل األطباق ال تبدأ بالعمل أو ال • لم يتم فتح صنبور مصدر الماء. • قم بإطفاء الجهاز بواسطة الضغط على زر التشغيل/إيقاف التشغيل ) ،(ON/OFFوأعد تشغيله بعد دقيقة واحدة يمكن التحكم فيها. تقريبا ً وأعد ضبط دورة الغسل. • لم يتم توصيل الجهاز بالكهرباء بشكل صحيح ،أو يجب استخدام مقبس كهربائي آخر.
400011289501 07/2018 jk - Xerox Fabriano AR www.indesit.co.