Instructions DE77 DQ77 DE47 DQ47
PLEASE READ THIS BOOKLET CAREFULLY.
Introduction Your new appliance is guaranteed* and will give lasting service. This guarantee is only applicable if the appliance has been installed in accordance with the installation instructions detailed in this booklet. To help make best use of your cooking equipment, please read this booklet carefully. The appliance is designed specifically for domestic use and responsibility will not be accepted for use in any other installation.
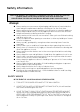
Safety Information When used properly your appliance is completely safe but as with any electrical product there are certain precautions that must be observed. PLEASE READ THE PRECAUTIONS BELOW BEFORE USING YOUR APPLIANCE. Always ● Always make sure you remove all packaging and literature from inside the oven and grill compartments before switching on for the first time. ● Always make sure you understand the controls prior to using the appliance.
Safety Information Never ● Never leave children unsupervised where a cooking appliance is installed as all cooking surfaces will be hot during and after use. ● Never allow anyone to sit or stand on any part of the appliance. ● Never store items above the appliance that children may attempt to reach. ● Never remove the oven shelves whilst the oven is hot. ● Never heat up unopened food containers as pressure can build up causing the container to burst.
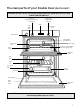
The main parts of your Double Oven (DE77 & DQ77) WARNING: DO NOT TOUCH THE GLASS DOORS WHEN THE OVEN IS IN USE AS THESE AREAS CAN BECOME HOT.
The main parts of your Double Oven (DE47 & DQ47) WARNING: DO NOT TOUCH THE GLASS DOORS WHEN THE OVEN IS IN USE AS THESE AREAS CAN BECOME HOT.
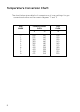
Temperature Conversion Chart The chart below gives details of comparisons of oven settings for gas conventional ovens and fan oven in degrees ˚F and ˚C GAS MARK 1 /2 1 2 3 4 5 6 7 8 9 8 CONVENTIONAL OVEN FAN OVEN ˚F ˚C ˚C 250 275 300 325 350 375 400 425 450 475 120 140 150 160 180 190 200 220 230 240 100 120 130 140 160 170 180 200 210 220
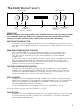
The Controls (DE77 & DQ77) Top Oven Pilot Main Oven Pilot ❍ ❍ ❍❍ A Grill Control B Top Oven Temperature Control / Grill Select C Timer D Main Oven Multifunction Temperature Selector Control IMPORTANT Before using your oven in the ordinary way, ALWAYS make sure that the timer has been set to MANUAL operation. Unless this is done, the main oven cannot heat up. Before seeking assistance, make sure this is done (refer to oven timer operation).
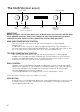
The Controls (DE47 & DQ47) Top Oven Pilot Main Oven Pilot ❍ ❍ A Grill Control ❍ B Top Oven Temperature Control / Grill Select C Timer Main Oven Temperature Control IMPORTANT Before using your oven in the ordinary way, ALWAYS make sure that the timer has been set to MANUAL operation. Unless this is done, the main oven cannot heat up. Before seeking assistance, make sure this is done (refer to oven timer operation).
Multifunction Selector Switch The Multifunction selector switch is used when operating the main oven. With the exception of the O position the main oven light will remain on when this selector switch is used. Off With the selector in this position the main oven will not heat up. The timer will still operate. Fan Oven The oven fan and a rear element are controlled when this function is selected. Use the main oven thermostat control to set the required temperature.
Oven Timer Operation Note: Timer must be set to ‘Time of Day’ and ‘Manual’ before the ovens can be used. AUTOMATIC COOKING The Top Oven and Main Oven can be controlled by the automatic timer. When the timer control has been set for one oven, it is possible to use the other oven only during the same automatic cooking programme. NEVER operate the grill when the ovens are set to cook automatically because the oven cavity can become warm and this may cause bacterial growth in food.
Know Your Timer CLOCKFACE The timer incorporates a 24 hour clock. Ensure the correct time of day is always set, before using your cooker. SYMBOLS A ‘bell’ symbol will light up when you select a Minute Minder Period and will remain lit for the period set. At the end of the Minute Minder Period, the timer will emit an audible tone and the ‘bell’ symbol will disappear. The ‘cookpot’ symbol will light up either:– – When the timer is in manual mode, or – During the actual Cook Period.
Electronic Clock & Automatic Oven Timer Operation SETTING THE TIME OF DAY Step 1 Make sure all oven controls are turned Off. Step 2 Check the electricity supply to the cooker is turned on. Step 3 When switched on the display will show 0.00 and the Auto symbol, flashing intermittently. Step 4 Press & hold in both the Cook Period & End Time buttons together. Step 5 With the Cook Period & End Time buttons still held in, press the “+” or “-” buttons to set the correct time of day.
Electronic Clock & Automatic Oven Timer Operation AUTO COOKING PROGRAMMES There are two Auto Cooking programmes that can be selected using your timer:– (a) To set the timer to switch the oven(s) On and Off Automatically (b) To set timer to switch on immediately and OFF automatically after a set cook period. a) TO SET THE TIMER TO SWITCH THE OVEN(S) ON AND OFF AUTOMATICALLY This allows you to cook at a specified time for a chosen period before the oven switches off Automatically.
Electronic Clock & Automatic Oven Timer Operation Note 1 When cooking automatically the Cook Period can be checked at any time by simply pressing the Cook Period button. Note 2 When cooking automatically the End Time can be checked at any time by simply pressing the End Time button. b) TO SET TIMER TO SWITCH ON IMMEDIATELY AND OFF AUTOMATICALLY AFTER A SET COOK PERIOD Step 1 Check that the correct time of day is set, if not follow instructions for setting the time of day.
Electronic Clock & Automatic Oven Timer Operation TO CANCEL AN AUTO COOKING PROGRAMME BEFORE THE COOK PERIOD HAS FINISHED. Step 1 Turn the oven control(s) to the OFF position. Step 2 Press the Manual button to return the oven(s) to “Manual” operation. The ‘Auto’ symbol will go out. Note 1 When cooking automatically the Cook Period can be checked at any time by simply pressing the Cook Period button. OTHER NOTES ON TIMER OPERATION 1.
Grill Pan and Handle The grill pan handle is detachable from the pan, to facilitate cleaning and storage. The grill pan handle can be fixed as follows: (d) (c) (b) (a) Step 1 Step 1 Step 2 Step 3 Step 4 Step 2 Step 3 Step 4 Remove the screw and washers from the grill pan bracket (a). Tilt the handle over the recess (b). Slide it towards the centre of the pan (c). Locate the handle over the bracket (d). For a fixed handle, replace the screw and washers and ensure they are fully tightened up.
Operation when using the Top Oven for Grilling GRILL SETTING CONTROL TIMER C D ❍ ❍ A B ❍ ❍ TOP OVEN TEMPERATURE AND GRILL SELECTION CONTROL Step 1 Ensure oven timer is set to manual. Place the shelf in the correct position (see Grilling Guide). Place the food/grill pan on the shelf, positioned centrally under the grill element. Leave the top oven door fully open. Step 2 Turn knob (B) clockwise to select grill function setting: Set to: For Half Grill (Left hand side only). For Full Grill.
Using the Top Oven for Solarplus Grilling Your cooker is not fitted with a conventional grill. Hotpoint have developed a Solarplus high speed grill which is designed to reduce your grilling times. It is quicker because it takes less time to warm up from cold. Conventional grills require 5 minutes pre-heat before food can be placed beneath them, but for normal grilling the Solarplus grill can be used directly from cold without any pre-heat.
5 - 10 minutes Setting MAX Browning of food eg.
Using the Top Oven as a Convection Oven The top oven should be used to cook small quantities of food. The oven is designed so that the grill element operates at a reduced heat output, this is combined with a heating element situated underneath the floor of the oven. To ensure even cooking of the food it is important that cooking utensils are positioned correctly on the oven shelf so that the element is directly above. As a guide, the front of the utensil should be approx.
Operation when using the Top Oven as a Convection Oven A B ❍ ❍ C D ❍ ❍ TIMER TOP OVEN TEMPERATURE & GRILL SELECTION CONTROL Step 1 Check that the timer is in manual. Step 2 Place the shelf in the correct position (see Oven Temperature Charts). Step 3 Select the required cooking temperature (100oC-MAX) using control (B) (see Top Oven Temperature Charts). The pilot light ( ● ) will immediately come on, and remain on until the oven reaches the required temperature.
Yes Yes Yes Yes Yes Milk Pudding Baked Custard Bread Meringues Yes 150-180 100 Yes No Runner 2 from bottom of oven. Yes Runner 1. Runner 1. Runner 1. Runner 2 from bottom of oven.
190/200 170/180 190/200 170/180 190/200 170/180 190/200 Yes Pork (slow roasting) Yes Yes Yes Veal (foil covered) Poultry/Game Yes (slow roasting) Yes Pork (foil covered) Veal Yes (slow roasting) Yes Beef/ Lamb (foil covered) Poultry/Game (foil covered) Casserole Cooking 2-21/2 hrs 25-30 mins per 450g (1 lb) 25-30 mins per 450g (1 lb) + 25 mins over 40-45 mins per 450g (1 lb) 40-45 mins per 450g (1 lb) + 40 mins over 40 mins per 450g (1 lb) 40 mins per 450g (1 lb) + 40 mins over
Main Oven - Fan Grilling (DE77 & DQ77) Fan grilling is a combination of heat from the grill element and the oven fan circulating the hot air around the food. Joints of meat and poultry will be browned as if they were cooked on a rotisserie or spit but more economically as the door left closed. If required, fan grilling can be timed using the Oven Auto timer. Follow the timer instructions before selecting fan grill and the required temperature.
Main Oven - Fan Grilling Roasting Chart (DE77 & DQ77) Shelf positions are counted from the base upwards ie: lowest shelf position is 1. Type of Meat or Poultry Weight kg Temp ˚C Plus Extra Total Cooking Time Time (mins) (min/kg) Time (mins) Tips PORK Pork Chop - thick 170 25 Dependent on size Gammon Steaks 160 30 Dependent on size 160-170 150-170 140-150 140-150 140 60-70 60-70 65-75 65-75 70-75 170 25 1.0 1.5 2.0 2.5 over 2.
Using the Main Oven for Other Functions FAN ONLY SETTING DEFROSTING FROZEN MEAT & POULTRY Joints of meat and whole birds should be defrosted slowly, preferably in a refrigerator (allowing 5-6 hours per lb.) or at room temperature (allowing 2-3 hours per lb.). Frozen meat or poultry must be completely defrosted before cooking in the oven. However, to decrease the amount of time required to defrost food items, a nonheating fan only setting may be selected for the main oven only.
Main Oven - Conventional Oven (DE77 & DQ77) Important NEVER line the shelves, the floor or the sides of the oven with aluminium foil as overheating and damage may result. The oven is heated by elements at the top of the oven and underneath the floor of the oven. Food should not be placed on the floor of the oven. Do not use the oven without the removable oven roof in position with its front flange facing downwards. Operating Procedure 1. Ensure Oven Timer is set to Manual. 2.
Main Oven - Fan Oven Cookery Notes Since a fan oven heats up more quickly, and generally cooks food at a lower temperature than a conventional oven, pre-heating the oven is often unnecessary. However, foods such as bread, scones, Yorkshire pudding, do benefit from being placed in a pre-heated oven. The charts are a guide only, giving approximate cooking temperatures and times. To suit personal taste and requirements, it may be necessary to increase or decrease temperatures by 10˚C.
Main Oven - Fan Oven Cookery Notes Temperature and Time The oven is provided with two shelves. A third is available as an optional extra, contact Genuine Parts & Accessories Hotline (see back page) for further information. If three shelves are used to cook large quantities of food for home freezing or parties, it may be necessary to increase the cooking times given in the charts by a few minutes, to allow for the loss of heat due to the extra time taken to load the oven, and the larger mass of food.
190/200 170/180 190/200 190/200 170/180 190/200 Yes Pork (slow roasting) Yes Yes Yes Yes Yes Pork (foil covered) Veal (slow roasting) Veal (foil covered) Poultry/Game Yes (slow roasting) Yes Beef/ Lamb (foil covered) Poultry/Game (foil covered) Casserole Cooking 2-21/2 hrs 25-30 mins per 450g (1 lb) 25-30 mins per 450g (1 lb) + 25 mins over 40-45 mins per 450g (1 lb) 40-45 mins per 450g (1 lb) + 40 mins over 40 mins per 450g (1 lb) 40 mins per 450g (1 lb) + 40 mins over 35-45 m
Yes Scones Small Cakes Yes Yes Yes Yes Yes Yes Yorkshire Pudding Individual Yorkshire Puddings Milk Pudding Baked Custard Bread Meringues 3rd from bottom 3 -31/2 hrs. 80/90 No Yes No No Yes Yes No No No No Yes Yes No No Yes 80-90 200/210 140/150 130/140 190/200 180/190 190/200 190/200 130/140 140/150 180/200 170/190 160/170 170/180 210/220 Temperature ˚C Fan Oven Preheat 3-4 hrs. approx. 30-35 mins. approx. 35-45 mins. approx. 11/2 - 2 hrs. approx.
Main Oven - Circulaire Roasting (DE77 & DQ77) CIRCULAIRE ROASTING Circulaire roasting - food is placed on the roasting rack, this allows the oven fan to circulate the hot air around the food, making it suitable for thin foods, such as chops, steaks, sausages as well as meat joints and poultry, as it will cook both sides at the same time. it is possible to cook on any shelf position, as the temperature in the oven is evenly distributed.
Main Oven - Circulaire Roasting Chart (DE77 & DQ77) Type of Meat & Poultry BEEF Beef - any type of joint PORK Pork - any type of joint Pork - Chops LAMB Lamb - any type of joint Lamb - Chops CHICKEN/TURKEY up to 4kg (8lb) Temperature ˚C Time (approximate) 160/180 20-25 minutes per 450g (1lb) + 20 minutes extra 160/180 25 minutes per 450g (1lb) + 25 minutes extra 170 160/180 170 160/180 30-45 minutes 25 minutes per 450g (1lb) + 25 minutes extra 20-30 minutes PLACE FOOD ON ROASTING RACK, THEN POSI
Using the Main Oven for Other Functions ‘S’ SLOW COOK SETTING This is used for slow cooking, keeping food warm and warming plates for short periods. Extra care should be taken when warming bone china, as it may be damaged in a hot oven. DO NOT place food or plates directly on the oven floor as this could damage both the oven lining and the plates which are being warmed. ADVANTAGES OF SLOW COOKING ARE: The oven stays cleaner because there is less splashing.
Main Oven Grilling (DE77 & DQ77) DO NOT allow young children near the appliance when the grill is in use as the surfaces can get extremely hot. GRILLING SHOULD NEVER BE UNDERTAKEN WITH THE DOOR CLOSED. - Do Not line the grill pan with aluminium foil. - Ensure that the grill pan is cleaned after every use. Excess fat build-up in the bottom of the pan could cause a fire hazard. - Preheat the grill on the required setting for 5 minutes Grilling Procedure: 1.
Care and Cleaning Warning: Before cleaning, please ensure that the electricity supply to the appliance is switched off and the appliance is fully cold. 1. “STAYCLEAN” OVEN LINERS (Top Oven Sides, Main Oven Sides and Rear Panel) (a) How "Stayclean" works. The surfaces of the "Stayclean" oven liners (Main Oven rear panel) are treated with a special vitreous enamel which absorbs cooking soils. At temperatures of 220°C (425°F) or above, the special surface enables these soils to be slowly destroyed.
Care and Cleaning 3. OVEN DOORS (a) Control Panel Regularly wipe with a clean, damp cloth and polish with a clean, dry cloth. CONTROL PANEL OVEN DOORS (b) Trims It is advisable to clean the trims regularly to prevent any build up of soiling which may detract from the appearance of the cooker. The recommended method of cleaning is to wipe over the trims with a clean, soft cloth wrung out in warm water, or mild non abrasive cleaner.
Care and Cleaning Take particular care not to damage the inner surface of the door inner glass that is coated with a heat reflective layer. Do not use scouring pads, or abrasive powder, which will scratch the glass. Ensure that the glass panel is not subjected to any sharp mechanical blows. Stubborn stains can be removed by using a fine steel wool pad. For slight soiling the inner glass panel may be cleaned, while still warm, without removing it from the door.
Installation Electrical Requirements For your own safety, we recommend that your cooker is installed by a competent person such as one who is registered with NICEIC (National Inspection Council for Electrical Installation Contracting). The cooker should be installed in accordance with the latest edition of the IEE Regulations. Warning: This appliance must be earthed. Electrical Connections The installer must check that the voltage shown at the rating plate corresponds with the house electricity supply.
Installation Important It is essential that the lower cupboard is constructed in the manner illustrated i.e. having side, back, and roof panels so joined as to provide no apertures which could permit access to the oven unit when installed. 1. General The appliance is designed for mounting at a safe level into an oven housing which must be secured to the backing wall. 2. Ventilation a. The oven housing unit cabinet dimensions must comply with fig. 4. b.
Tall Cabinet Ventilation Fig. 1 Ventilation Slot required here if cabinet does not fit to ceiling -51mm x 457mm min. area 50mm Air Gap Ventilation Slot required here if the cabinet does fit to the ceiling - 51mm x 457mm min. area 50mm Air Gap Ventilation Slot required here 51mm x 457mm min.
560mm Viewed down through cabinet 577mm le nd exc. ha s knob 560 mm Cabinet 887mm No. 6 x 15mm screw (4 supplied) 875mm Fig. 3 Oven Door 597 mm mm 550 Fig. 2 887mm 878mm if cooker trim is to overlap top edge of shelf 560 -574 mm Connector Box mm 550 * i mn Fig.
If something goes wrong... Before calling a Service Engineer, please check through the following lists. THERE MAY BE NOTHING WRONG. Problem Check Slight odour or small amount of smoke when grill / oven used first time This is normal and should cease after a short period. Nothing Works If you find that the timer display is blank, then it is likely that there is no electricity supply to your oven. Check: (i) That the main cooker wall is switched on.
If something goes wrong... Problem Check Grilling is uneven. Ensure that Grill pan has been positioned as stated in the Grilling section of this book. Oven lamp does not work. The oven lamp is not covered by the guarantee. The part is easily changed (see the section on oven lamp replacement) A new lamp may be obtained from our Genuine Parts & Accessories Hotline (see ‘Key Contacts’, back page). Condensation on the wall Steam and / or condensation may appear from the vent at at the rear of the cooker.
Hotpoint Service Cover Satisfaction Guaranteed or Your Money Back Hotpoint gives you a unique ‘Satisfaction Guaranteed’ promise – valid for ninety days after you have purchased your Hotpoint product. If there is a technical problem with your Hotpoint appliance, just call Hotpoint Service (see back page). If necessary we will arrange for an engineer to call. If the technical problem is not resolved under this Guarantee, Hotpoint will replace your appliance or, if you prefer, give you your money back.
Key Contacts Service Hotpoint has the largest appliance manufacturer’s service team in Europe, trained specialists directly employed by us to ensure your complete confidence. Repair Service UK: 08709 066 066 Republic of Ireland: 1850 302 200 You will be asked for the following information:Name, address and postcode.