Instructions for Installation and Use Built-in double oven
SAFETY INSTRUCTIONS IMPORTANT TO BE READ AND OBSERVED Before using the appliance, read these safety instructions. Keep them nearby for future reference. These instructions and the appliance itself provide important safety warnings, to be observed at all times. The manufacturer declines any liability for failure to observe these safety instructions, for inappropriate use of the appliance or incorrect setting of controls. Very young children (0-3 years) should be kept away from the appliance.
if the supply cord is damaged, it must be DISPOSAL OF PACKAGING MATERIALS packaging material is 100% recyclable and is marked with the replaced with an identical one by the manufacturer, The recycle symbol . The various parts of the packaging must therefore its service agent or similarly qualified persons in be disposed of responsibly and in full compliance with local authority regulations governing waste disposal. order to avoid a hazard - risk of electrical shock.
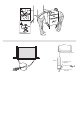
Installation 90°C
50 25 561 882 115 867 5 270 870 463 550 595 Fig. 1 50 562 Fig.
562mm Viewed down through cabinet Cabinet No. 6x25mm screw (4 supplied) Fig.
T e ain a ts o o o ble en ontrol anel rill lement ven ig t rill an o ven oor nner oor lass oo ort nner oor lass ven ig t ven elves oor itc ottom ven oor nl in some mo els Telescopic runners * The bottom oven on this cooker can comes equipped with telescopic runners to facilitate inserting or removing accessories. Assembling the telescopic runners* A Left guide rail Right guide rail B C Dire of ex ctio tra n ct io n D .
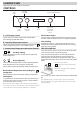
4 KNOBS OVEN (depending on which model is purchased) CONTROLS Top Oven Pilot Light Grill Pilot Light Bottom Oven Pilot Light A B Grill Control Top Oven Temperature Control C Timer IMPORTANT Before using your oven in the ordinary way, ALWAYS make sure that the timer has been set to MANUAL operation. Unless this is done, the bottom oven cannot heat up. Before seeking assistance, make sure this is done (refer to oven timer operation).
MULTIFUNCTION SELECTOR SWITCH The Multifunction selector switch is used when operating the bottom oven. With the exception of the O position the bottom oven light will remain on when this selector switch is used. Off With the selector in this position the bottom oven will not heat up. The timer will still operate. Fan Oven The oven fan and a rear element are controlled when this function is selected. Use the bottom oven thermostat control to set the required temperature.
3 KNOBS OVEN (depending on which model is purchased) CONTROLS o ven rill etting ontrol o ven em erat re ontrol lectronic imer A - Grill Setting Control Selects the heat at which the grill will cook the food. Grill Settings Control: MIN - MAX B - Top Oven Temperature Control Selects the cooking temperature (Degrees Centigrade) when using the top oven as a conventional oven.
THE ELECTRONIC PROGRAMMER DISPLAY END OF COOKING icon DURATION icon •• •• DECREASE TIME button CLOCK icon TIMER icon INCREASE TIME button SET TIME button The Top Oven and Bottom Oven can be controlled by the automatic timer. When the timer control has been set for one oven, it is possible to use the other oven only during the same automatic cooking programme.
USING THE TOP OVEN FOR SOLARPLUS GRI LING Solarplus high speed grill is designed to reduce your grilling times. It is quicker because it takes less time to warm up from cold. Conventional grills require 5 minutes pre-heat before food can be placed beneath them, but for normal grilling the Solarplus grill can be used directly from cold without any pre-heat. However, when toasting, optimum performance is achieved by pre-heating the grill for about 1 minute.
BOTTOM OVEN - FAN GRILLING Fan grilling is a combination of heat from the grill element and the oven fan circulating the hot air around the food. Joints of meat and poultry will be browned as if they were cooked on a rotisserie or spit but more economically as the door left closed. If required, fan grilling can be timed using the Oven Auto timer. Follow the timer instructions before selecting fan grill and the required temperature. If Manual fan grilling is required always ensure the timer is set to Manual.
TT Important: The oven is heated by elements at the rear of the oven. A fan at the rear of the oven operates to circulate heated air within the oven. Operating procedure: 1. Ensure Oven Timer is set to Manual. 2. Turn the selector switch to the fan oven position, then turn the oven thermostat control to the required temperature setting (see oven temperature charts). 3. The oven light will remain on. The oven indicator light will remain on until the oven reaches the set temperature.
To prepare meat and poultry for Roasting in your Fan Oven (f ) Meat and poultry wrapped in, or covered with a tent of aluminium foil will be juicy and tender. Roasting bags offer the same advantages. Always follow the (a) Wipe the meat or poultry, dry well and weigh it.
Grilling in top oven PREHEAT FOR 5 MINUTES SHELF POSITION FROM THE BASE OF THE OVEN SETTING (depending on Model) APPROXIMATE COOKING TIME 3 or 2 Setting 4 or MAX 5 - 10 minutes Grill pan and food support 3 or 2 Setting 4 or MAX for 4 minutes then reduce to LOWER setting 10 - 25 minutes Grill pan and food support * Setting MAX 2 Setting 4 or MAX for 6-8 minutes then reduce to LOWER setting 20 - 35 minutes Grill pan and food support * Whole Fillets Fingers Setting MAX 2 3 3 Setting 4 or MA
Top Oven Temperature Charts Baking Top Oven - Conventional Cooking Baking Pre-heat Temperature °C Time in mins.
Top Oven Temperature Charts Meat Top Oven - Conventional Cooking Meat Pre-heat Temperature °C Time (approx.) Beef/ Lamb (slow roasting) Yes 170/180 35 mins per 450g (1lb) + 35 mins over.
Bottom Oven Roasting Chart Fan Grilling (Only in 4 knobs models) Shelf positions are counted from the base upwards ie: lowest shelf position is 1. Type of Meat or Poultry Weight kg Temp °C Time (min/kg) Plus Extra Time (mins) Total Cooking Time (mins) Tips PORK Pork Chop - thick 170 25 Dependente on size Gammon Steaks Pork - 160 30 Dependente on size 160-170 150-170 140-150 140-150 140 60-70 60-70 65-75 65-75 70-75 170 25 1.0 1.5 2.0 2.5 0ver 2.
Bottom Oven Temperature Chart Meat (Only in 4 knobs models) Conventional Oven Meat Pre-heat Temperature °C Time (approx.) Position in Oven Beef/ Lamb (slow roasting) Yes 170/180 35 mins per 450g (1lb) + 35 mins over.
Bottom Oven Temperature Chart Baking (Only in 4 knobs models) Baking Conventional Oven Food Pre-heat Temperature °C Time in mins. Shelf Position Scones Yes 220/230 10-15 2nd from bottom Small Cakes Yes 180/190 15-25 3nd from bottom Victoria Sandwich Yes 160/170 20-30 3nd from bottom Sponge Sandwich (fatless) Yes 170/180 15-20 3nd from bottom Swiss Roll Yes 190/200 8-12 3nd from bottom Semi-rich Fruit cakes Yes 150/160 1¼ hrs.
Ca e an Cleanin Do not use steam cleaning equipment. Use protective lo es during all operations. T I C I T I C Do not use wire wool, abrasive scourers or abrasive/ corrosive cleaning agents, as these could damage the surfaces of the appliance. Carry out the required operations with the oven cold. Disconnect the appliance from the power supply. • lean t e s rfaces it a am microfi re clot . f t e are ver irt a a fe ro s of ne tral etergent. inis off it a r clot .
T o bles ootin n ro lems t at arise or fa lts t at occ r can often e resolve easil . efore contacting t e fter sales ervice c ec t e follo ing ta le to see o rself. f t e ro lem ersists contact o r nearest fter sales ervice entre. ea t e sa et inst tions a e ll be o e a PROBLEM POSSIBLE CAUSE o er c t. e oven is not or ing. isconnection from t e mains. T T C alf nction.
400011203494