Istruzioni per luso CUCINA E FORNO Sommario IT Italiano, 1 GB English,20 NL Nederlands, 57 FR Français, 38 Installazione, 2-3 Posizionamento e livellamento Collegamento elettrico Tabella caratteristiche Descrizione dellapparecchio, 4-5 Vista dinsieme Pannello di controllo Display Pannello di controllo piano di cottura Avvio e utilizzo, 6-9 CE6IFA.1 F/HA CE6IFA.
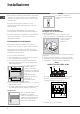
Installazione Le gambe* si montano a incastro sotto la base della cucina. È importante conservare questo libretto per poterlo consultare in ogni momento. In caso di vendita, di cessione o di trasloco, assicurarsi che resti insieme allapparecchio. Leggere attentamente le istruzioni: ci sono importanti informazioni sullinstallazione, sulluso e sulla sicurezza. Linstallazione dellapparecchio va effettuata secondo queste istruzioni da personale qualificato.
400V 2N~ H05RR-F 4x4 CEI-UNEL 35363 N L2 L1 1 3 5 2 4 400V 3N~ H05RR-F 5x2.5 CEI-UNEL 35363 N L3 L2 L1 Ad apparecchio installato, il cavo elettrico e la presa della corrente devono essere facilmente raggiungibili. IT Il cavo non deve subire piegature o compressioni. Il cavo deve essere controllato periodicamente e sostituito solo da tecnici autorizzati. Lazienda declina ogni responsabilità qualora queste norme non vengano rispettate.
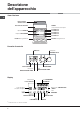
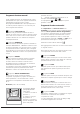
Descrizione dellapparecchio IT Vista dinsieme Piano cottura vetroceramica GUIDE di scorrimento dei ripiani posizione 5 posizione 4 posizione 3 posizione 2 posizione 1 Pannello di controllo Ripiano GRIGLIA Ripiano LECCARDA Piedino di regolazione Piedino di regolazione Pannello di controllo Manopola TERMOSTATO DISPLAY Manopola PROGRAMMI Tasto FAST CLEAN Manopola IMPOSTAZIONE TEMPI Tasto IMPOSTAZIONE TEMPI Display Indicatore del Preriscaldamento Icone PROGRAMMI AUTOMATICI Digit numerici TEMPERA
Pannello di controllo piano di cottura IT Spia CONTAMINUTI* Tasto AUMENTO POTENZA Tasto BOOSTER* Indicatori di POTENZA e di CALORE RESIDUO Spia ZONA COTTURA SELEZIONATA Display TIMER DI PROGRAMMAZIONE* Spia ZONA DI COTTURA PROGRAMMATA* Spia BOOSTER* Tasto ON/OFF Spia ON/OFF Spia COMANDI BLOCCATI Tasto BLOCCO DEI COMANDI Tasti SELEZIONE ZONE COTTURA Tasto TIMER DI PROGRAMMAZIONE* Tasto DIMINUZIONE POTENZA Tasto AUMENTO POTENZA per accendere la piastra e regolare la potenza (vedi Avvio e utilizzo)
Avvio e utilizzo IT Prima dell'uso, togliere tassativamente le pellicole in plastica poste ai lati dell'apparecchio Impostare lorologio Si può impostare sia quando il forno è spento che quando è acceso, ma non si è programmata la fine di una cottura. 1. Premere più volte il tasto finchè non e i primi due digit numerici lampeggiano licona sul DISPLAY; 2. ruotare la manopola IMPOSTAZIONE TEMPI verso il + e - per regolare lora; finchè non 3.
Programmi di cottura manuali Tutti i programmi hanno una temperatura di cottura preimpostata. Essa può essere regolata manualmente, impostandola a piacere tra 40°C e 250°C. Nel programma BARBECUE il valore preimpostato è un livello di potenza espresso in %. Anchesso può essere regolato manualmente. Programma MULTILIVELLO Si attivano tutti gli elementi riscaldanti ed entra in funzione la ventola. Poiché il calore è costante in tutto il forno, laria cuoce e rosola il cibo in modo uniforme.
IT Ricetta per la PIZZA : 1 Leccarda, Ripiano basso, a Forno Freddo o Caldo Ricetta per 3 pizze di circa 550g : 1000g Farina, 500g Acqua, 20g Sale, 20g Zucchero, 10cl Olio di Oliva, 20g lievito fresco (oppure 2 bustini in polvere) Lievitazione nell ambiente : 1 ora.
Consigli pratici di cottura BARBECUE Nelle cotture ventilate non utilizzare le posizioni 1 e 5: sono investite direttamente dallaria calda che potrebbe provocare bruciature sui cibi delicati. Inserire la griglia in posizione 3 o 4, disporre gli alimenti al centro della griglia. Si consiglia di impostare il livello di energia al massimo. Non allarmarsi se la resistenza superiore non resta costantemente accesa: il suo funzionamento è controllato da un termostato.
Utilizzo del piano cottura IT La colla applicata sulle guarnizioni lascia alcune tracce di grasso sul vetro. Prima di utilizzare lapparecchio, si raccomanda di eliminarle con un prodotto specifico per la manutenzione non abrasivo. Durante le prime ore di funzionamento è possibile avvertire un odore di gomma, che comunque scomparirà presto. Quando il piano cottura viene collegato elettricamente, dopo acuni secondi viene emesso un breve segnale acustico.
2. Agire sui tasti tempo. - + e Modalità demo per impostare il nuovo 3. Confermare premendo il tasto . Per cancellare una programmazione, agire come sopra. Al punto 2 premere il tasto - : la durata scende progressivamente fino allo spegnimento 0. La programmazione si azzera e il display esce dalla modalità programmazione.
IT Adoperare pentole di diametro sufficiente a coprire completamente la zona riscaldante, in modo da garantire lo sfruttamento di tutto il calore disponibile. Accertarsi che il fondo delle pentole sia sempre perfettamente asciutto e pulito, per garantire la corretta aderenza e una lunga durata, sia alle zone di cottura che alle pentole stesse.
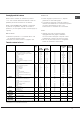
Descrizione tecnica delle zone di cottura IT Il sistema a induzione è il procedimento di cottura più rapido che esista. A differenza delle piastre tradizionali, non è la zona di cottura che si riscalda: il calore viene generato direttamente allinterno della pentola, la quale dovrà possedere necessariamente un fondo in materiale ferromagnetico. Piani cottura Zone di cottura Posteriore sx Posteriore dx Anteriore sx Anteriore dx Potenza totale CE6IFA.1 F /HA CE6IFA.
Cottura a fuoco lento Cottura a fuoco medio Cottura a fuoco vivo Cottura a fuoco vivissimo Consigli pratici per la cottura Cottura a fuoco lentissimo IT 14 ª ¶ ¶ § § S S ¢ ¢ £ ¡ Cottura a Pressione Pentola a pressione Frittura Grigliata Ebollizione Crêpe Cottura a fuoco vivo e doratura (Arrosti, Bistecche, Scaloppine, Filetti di pesce, Uova al tegamino) Addensamento rapido (Sughi liquidi) Acqua bollente (Pasta, Riso, Verdure) Latte Addensamento lento (Sughi consistenti) Cottura a ba
Precauzioni e consigli Lapparecchio è stato progettato e costruito in conformità alle norme internazionali di sicurezza. Queste avvertenze sono fornite per ragioni di sicurezza e devono essere lette attentamente. Sicurezza generale Lapparecchio è stato concepito per un uso di tipo non professionale allinterno dellabitazione. Lapparecchio non va installato allaperto, nemmeno se lo spazio è riparato, perché è molto pericoloso lasciarlo esposto a pioggia e temporali.
Per evitare ogni rischio di interferenze tra il piano di cottura e il pacemaker, quest'ultimo dovrà essere realizzato in conformità alle normative vigenti. A tale riguardo, possiamo garantire unicamente la conformità del nostro prodotto. Per informazioni sulla conformità o eventuali problemi di incompatibilità, si prega di rivolgersi al proprio medico curante o alla casa produttrice del pacemaker.
Manutenzione e cura Escludere la corrente elettrica Prima di ogni operazione isolare lapparecchio dalla rete di alimentazione elettrica. Pulire lapparecchio Non utilizzare mai pulitori a vapore o ad alta pressione per la pulizia dellapparecchio. Le parti esterne smaltate o inox e le guarnizioni in gomma possono essere pulite con una spugnetta imbevuta di acqua tiepida e sapone neutro. Se le macchie sono difficili da asportare usare prodotti specifici.
IT Pulizia automatica FAST CLEAN Dispositivi di sicurezza Il programma FAST CLEAN porta la temperatura interna del forno a raggiungere i 500°C e attiva il processo di pirolisi, ossia la carbonizzazione dei residui. Lo sporco viene letteralmente incenerito. Durante la pulizia automatica, le superfici possono diventare molto calde: tenere i bambini a distanza.
Assistenza Attenzione: Lapparecchio è dotato di un sistema di diagnostica automatica che consente di rilevare eventuali malfunzionamenti. Questi vengono comunicati dal display tramite messaggi del tipo: F seguito da numeri. In questi casi è necessario lintervento dellassistenza tecnica. Non ricorrere mai a tecnici non autorizzati. IT Comunicare: Il tipo di anomalia; Il modello della macchina (Mod.
Operating Instructions COOKER AND OVEN GB IT Italiano, 1 GB English, 20 NL Nederlands, 57 FR Français, 38 Contents Installation, 21-22 Positioning and levelling Electrical connection Table of characteristics Description of the appliance, 23-24 Overall view Control panel Display Control panel of cooking zone Start-up and use, 25-28 CE6IFA.1 F/HA CE6IFA.
Installation The legs* fit into the slots on the underside of the base of the cooker. Before operating your new appliance please read this instruction booklet carefully. It contains important information concerning the safe installation and operation of the appliance. Please keep these operating instructions for future reference. Make sure that the instructions are kept with the appliance if it is sold, given away or moved.
GB 400V 2N~ H05RR-F 4x4 CEI-UNEL 35363 N L2 L1 Once the appliance has been installed, the power supply cable and the electrical socket must be easily accessible. The cable must not be bent or compressed. 1 3 5 The cable must be checked regularly and replaced by authorised technicians only. 2 4 The manufacturer declines any liability should these safety measures not be observed. 400V 3N~ H05RR-F 5x2.
Description of the appliance Overall view GB Glass ceramic hob GUIDE RAILS for the sliding racks position 5 position 4 position 3 position 2 position 1 Control panel GRILL rack DRIPPING pan Adjustable foot Adjustable foot Control panel DISPLAY THERMOSTAT knob SELECTOR knob FAST CLEAN button TIMER knob TIME SETTING button Display AUTOMATIC COOKING MODE icons Preheating indicator TEMPERATURE and TIME digits Recommended rack position icon CLOCK icon STOP icon END OF COOKING icon DOOR LOCK in
GB Control panel of cooking zone TIMER* indicator light INCREASE POWER button BOOSTER* button POWER and RESIDUAL HEAT indicators COOKING ZONE SELECTED indicator light PROGRAMME TIMER* display COOKING ZONE PROGRAMMED* indicator light ON/OFF button BOOSTER* indicator light ON/OFF indicator light CONTROLS LOCKED indicator light CONTROL PANEL LOCK button COOKING ZONE SELECTOR buttons PROGRAMME TIMER* button REDUCE POWER button INCREASE POWER button switches on the hotplate and controls the power (see
Start-up and use Before operating the product, remove all plastic film from the sides of the appliance. The temperature may be changed by turning the THERMOSTAT knob Setting the clock 3. When the preheating indicator switches off and a buzzer sounds the preheating process is complete: you may now place the food in the oven. The clock may be set when the oven is switched off or when it is switched on, provided that a the end time of a cooking cycle has not been programmed previously. 1.
GB Manual cooking modes All cooking modes have a default cooking temperature which may be adjusted manually between 40°C and 250°C as desired. In the BARBECUE mode, the default power level value is indicated as a percentage (%) and may also be adjusted manually. MULTILEVEL mode All heating elements and the fan are activated. Since the heat remains constant throughout the oven, the air cooks and browns food in a uniform manner. A maximum of two racks may be used at the same time.
Recipe for PIZZA: 1 Dripping pan on a low shelf level, hot or cold oven Recipe for 3 pizzas weighing approximately 550 g: 1000 g flour, 500 ml water, 20 g salt, 20 g sugar, 100 ml olive oil, 20 g fresh yeast (or 2 sachets of powder yeast) Leavening at room temperature: 1 hour. Place inside hot or cold oven. Start the PIZZA cooking mode. Start the BREAD cooking mode. Once baked, leave the loaves on one of the grill racks until they have cooled completely.
GB can burn temperature sensitive foods. In the BARBECUE and GRATIN cooking modes, particularly when using the rotisserie spit, place the dripping pan in position 1 to collect cooking residues (fat and/or grease). MULTILEVEL Use positions 2 and 4, placing the food which requires more heat on 2. Place the dripping pan on the bottom and the rack on top. BARBECUE Place the grill rack in position 3 or 4 and place the food in the centre of the rack.
Start-up and use of cooking zone The glue applied on the gaskets leaves traces of grease on the glass. Before using the appliance, we recommend you remove these with a special nonabrasive cleaning product. During the first few hours of use there may be a smell of rubber which will disappear very quickly. A few seconds after the hob is connected to the electricity supply, a buzzer will sound. The hob may now be switched on.
GB 2. Use the buttons to set the new duration. 3. Confirm by pressing the Press and hold the To cancel a programme, follow the above - Timer The hob must be switched on. The timer can be used to set a duration up to 99 minutes. 1. Press the programming button until the timer indicator light is illuminated. . 2. Set the desired duration using the buttons. 3. Confirm by pressing the one second. Release the button: the duration decreases progressively until it reaches 0 and switches off.
Avoid using the same cookware which has been used on gas burners: the heat concentration on gas burners may distort the base of the pan, causing it not to adhere correctly. Power level Maximum operating time in hours 1 9 2 8 3 7 4 6 5 5 6 4 7 3 8 2 9 1 Safety devices Pan sensor Each cooking zone is equipped with a pan sensor device. The hotplate only emits heat when a pan with suitable measurements for the cooking zone is placed on it.
Low-flame cooking Medium-flame cooking High-flame cooking Very high-flame cooking Practical cooking advice Very lowflame cooking GB 32 ª ¶ ¶ § § S S ¢ ¢ £ ¡ Pressure cooking Pressure cooker Frying Grilling Boiling Crêpes Cooking on a high flame and browning (roasts, steaks, escalopes, fish fillets, fried eggs) Fast thickening (liquid juices) Boiling water (pasta, rice, vegetables) Milk Slow thickening (dense juices) Bain-marie cooking Pressure cooking after whistle Low-flame cooki
Precautions and tips This appliance has been designed and manufactured in compliance with international safety standards. The following warnings are provided for safety reasons and must be read carefully. General safety The appliance was designed for domestic use inside the home and is not intended for commercial or industrial use. The appliance must not be installed outdoors, even in covered areas. It is extremely dangerous to leave the appliance exposed to rain and storms.
GB Disposal When disposing of packaging material: observe local legislation so that the packaging may be reused. The European Directive 2002/96/EC relating to Waste Electrical and Electronic Equipment (WEEE) states that household appliances should not be disposed of using the normal solid urban waste cycle.
Care and maintenance Switching the appliance off Disconnect your appliance from the electricity supply before carrying out any work on it. Cleaning the appliance Never use steam cleaners or pressure cleaners on the appliance. The stainless steel or enamel-coated external parts and the rubber seals may be cleaned using a sponge which has been soaked in lukewarm water and neutral soap. Use specialised products for the removal of stubborn stains. After cleaning, rinse well and dry thoroughly.
GB Automatic cleaning using the FAST CLEAN function With the FAST CLEAN mode, the internal temperature of the oven reaches 500°C. The pyrolytic cycle is activated, burning away food and grime residues. Dirt is literally incinerated. Keep children away from the appliance during the automatic cleaning cycle as surfaces may become very hot. Particles may ignite inside the oven due to the combustion process. There is no cause for concern: this process is both normal and hazardfree.
Assistance Warning: The appliance is fitted with an automatic diagnostic system which detects any malfunctions. Malfunctions are displayed by messages of the following type: F followed by numbers. Call for technical assistance should a malfunction occur. Never use the services of an unauthorised technician. GB Please have the following information to hand: The type of problem encountered. The appliance model (Mod.). The serial number (S/N).
Mode demploi CUISINIERE Sommaire FR IT Italiano, 1 GB English,20 NL Nederlands, 57 FR Français, 38 Installation, 39-40 Positionnement et nivellement Raccordement électrique Caractéristiques techniques Description de lappareil,41-42 Vue densemble Tableau de bord Afficheur Tableau de bord de la table de cuisson Mise en marche et utilisation du four, 4346 CE6IFA.1 F/HA CE6IFA.
Installation Montage des pieds* fournis avec lappareil par encastrement sous la base. Conserver ce mode demploi pour pouvoir le consulter tout moment. En cas de vente, de cession ou de déménagement, veiller à ce quil suive lappareil.
0V 2N~ H05RR-F 4x4 CEI-UNEL 35363 N L2 L1 FR Après installation de lappareil, le câble électrique et la prise de courant doivent être facilement accessibles 1 3 5 Le câble ne doit être ni plié ni excessivement écrasé. 2 4 Le câble doit être contrôlé périodiquement et ne peut être remplacé que par un technicien agréé. 400V 3N~ H05RR-F 5x2.5 CEI-UNEL 35363 N L3 L2 L1 Nous déclinons toute responsabilité en cas de non respect des normes énumérées ci-dessus.
Description de lappareil Vue densemble FR Piano cottura vetroceramica GUIDE di scorrimento dei ripiani posizione 5 posizione 4 posizione 3 posizione 2 posizione 1 Pannello di controllo Ripiano GRIGLIA Ripiano LECCARDA Piedino di regolazione Piedino di regolazione Tableau de bord Bouton THERMOSTAT AFFICHEUR Touche FAST CLEAN Bouton SELECTION TEMPS Bouton PROGRAMMES Touche SELECTION TEMPS Afficheur *Nexiste que sur certains modèles 41
FR Tableau de bord de la table de cuisson Voyant MINUTEUR* Touche AUGMENTATION DE PUISSANCE Touche BOOSTER* Indicateurs de PUISSANCE et de CHALEUR RÉSIDUELLE Voyant FOYER SÉLECTIONNÉ Voyant BOOSTER* Afficheur PROGRAMMATEUR* Voyant FOYER PROGRAMMÉ* Touche ON/OFF Voyant ON/OFF Voyant COMMANDES VERROUILLÉES Touche VERROUILLAGE DES COMMANDES Touches SÉLECTION FOYER Touche PROGRAMMATEUR* Touche DIMINUTION DE PUISSANCE Touche AUGMENTATION DE PUISSANCE pour allumer le foyer et régler sa puissance (voir
Mise en marche et utilisation du four Avant toute utilisation, vous devez impérativement enlever les films plastiques situés sur les côtés de lappareil Régler lhorloge Son réglage est possible que le four soit éteint ou allumé mais ceci ne correspond pas à une programmation de fin de cuisson. 1. Appuyer plusieurs fois de suite sur la touche jusquà ce que licône et les deux digits numériques de lAFFICHEUR se mettent à clignoter ; 2.
FR Programmes de cuisson manuels ! Tous les programmes ont une température de cuisson présélectionnée. Il est possible de la régler manuellement, entre 40°C et 250°C au choix. Pour le programme BARBECUE la valeur présélectionnée est un niveau de puissance exprimé en %. Il peut lui aussi être réglé manuellement. Programme MULTICUISSON La chaleur est constante et bien répartie à lintérieur du four, lair cuit et dore de façon uniforme en tous points.
Recette du PAIN : 1 Plaque de 1000g Maxi. gradin du bas 2 Plaques de 1000g Maxi. gradins du bas et du milieu Recette pour 1000g de pâte : 600g de farine, 360g deau, 11g de sel, 25g de levure de boulanger fraîche (ou bien 2 sachets en poudre) Procédé : Mélanger la farine et le sel dans un grand récipient. Diluer la levure de boulanger dans de leau légèrement tiède (35 degrés environ). Disposer la farine en fontaine.
FR BARBECUE FOUR PIZZA Placer la grille au gradin 3 ou 4, enfourner les plats au milieu de la grille. Utiliser un plat en aluminium léger et lenfourner sur la grille du four. En cas dutilisation du plateau émaillé, le temps de cuisson sera plus long et la pizza beaucoup moins croustillante. Nous conseillons de sélectionner le niveau dénergie maximum. Ne pas sinquiéter si la résistance de voûte nest pas allumée en permanence : son fonctionnement est contrôlé par un thermostat.
Mise en marche et utilisation de la table de cuisson La colle utilisée pour les joints laisse des traces de graisse sur le verre. Nous vous conseillons de les éliminer avant dutiliser lappareil, à laide dun produit dentretien non abrasif. Une odeur de caoutchouc peut se dégager au cours des premières heures dutilisation, elle disparaîtra très vite. Lors du branchement de la table, un bip sonore retentit au bout de quelques secondes.
FR Extinction de la table de cuisson Modifier la programmation 1. Appuyer plusieurs fois de suite sur la touche , jusquà affichage du temps correspondant au foyer devant être modifié. 2. Sélectionner un nouveau temps à laide des touches - + et . 3. Appuyer sur la touche pour valider. : la durée diminue progressivement jusquà lextinction 0. La programmation est remise à zéro et lafficheur quitte le mode programmation. Le minuteur La table de cuisson doit être allumée.
Pour obtenir de meilleures performances de la table de cuisson : Utiliser des casseroles à fond plat et de forte épaisseur pour quelles adhèrent parfaitement à la zone de chauffe Surchauffe FR En cas de surchauffe de ses composants électroniques, la table séteint automatiquement et lafficheur indique F suivi dun chiffre clignotant. Cet affichage disparaît et la table est à nouveau utilisable dès que la température est redescendue à un niveau acceptable.
FR Description technique des foyers Linduction est le procédé de cuisson le plus rapide. Contrairement aux plaques traditionnelles, le foyer német aucune chaleur : la chaleur est produite à lintérieur du récipient à condition que le fond de ce dernier soit en matériau ferromagnétique. Tables de cuisson Foyers Arrière gauche Arrière droit Avant gauche Avant droit Puissance totale CE6IFA.1 F /HA CE6IFA.
Cuisson très douce Cuisson douce Cuisson moyenne Cuisson vive Cuiccon très vive Conseils utiles pour la cuisson ª ¶ ¶ § § S S ¢ ¢ £ ¡ FR Mise en pression Autocuisser Friture Grillade Ebullition Crepes Saise et coloration (Rotis, Steack, Escalope, Filets de poisson, Oeufs au plat) Réduction rapide (Sauce liquides) Eau Frémissante (Pates, Riz, Légumes) Lait Réduction lente (Sauce épaisses) Cuisson au bain-marie Cuisson Autocuiseur après chuchotement Mijotage (Ragouts) Réchauffage de
Précautions et conseils FR ! Cet appareil a été conçu et fabriqué conformément aux normes internationales de sécurité. Ces conseils sont fournis pour des raisons de sécurité et doivent être lus attentivement. Sécurité générale Cet appareil a été conçu pour un usage familial, de type non professionnel. Cet appareil ne doit pas être installé en extérieur, même dans un endroit abrité, il est en effet très dangereux de le laisser exposé à la pluie et aux orages.
Avis à toute personne portant un pacemaker ou autre implant médical actif : La table est conforme à toutes les réglementations en matière dinterférences électromagnétiques. Par conséquent, ce produit est parfaitement conforme à toutes les dispositions légales (directives 89/336/CEE). Il a été conçu de manière à ne pas provoquer dinterférences à dautres appareils électriques utilisés, pourvu que ceux-ci soient également conformes aux réglementations susmentionnées.
Nettoyage et entretien FR Mise hors tension Avant toute opération de nettoyage ou dentretien coupez lalimentation électrique de lappareil. Prenez soin de toujours bien rincer à leau claire et de sécher la table : les résidus des produits peuvent sincruster lors dune prochaine cuisson. Nettoyage de lappareil Contrôler les joints du four ! Ne nettojez jamais lappareil avec des nettoyeurs vapeur ou haute pression. Contrôlez périodiquement létat du joint autour de la porte du four.
Nettoyage automatique FAST CLEAN Pendant le programme FAST CLEAN la température à lintérieur du four atteint 500°C et lance le processus de pyrolyse, de carbonisation autrement dit des salissures alimentaires. Les salissures sont littéralement incinérées. Pendant la pyrolyse, les surfaces peuvent devenir très chaudes : garder les enfants à distance.
Assistance FR Attention : Lappareil est équipé dun système dautotest qui permet de détecter toute anomalie de fonctionnement. Ces anomalies sont affichées sous la forme: F suivi de chiffres. Contacter alors un service dassistance technique. Ne jamais faire appel à des techniciens non agréés. Lui indiquer : le type danomalie; le modèle de lappareil (Mod.
Gebruiksaanwijzing FORNUIS EN OVEN Inhoud IT Italiano, 1 GB English,20 NL Nederlands, 57 FR Français, 38 Installatie, 58-59 Plaatsen en waterpas zetten Elektrische aansluiting Tabel eigenschappen Beschrijving van het apparaat, 60-61 Aanzichttekening Bedieningspaneel Display Bedieningspaneel kookplaat Starten en gebruik, 62-65 CE6IFA.1 F/HA CE6IFA.
Installatie De poten* moeten aan het onderstuk van het fornuis worden vastgeklemd. Bewaar dit instructieboekje zorgvuldig voor eventuele raadpleging in de toekomst. In het geval u het apparaat verkoopt of u verhuist, moet u het boekje bij het apparaat bewaren. Lees de instructies aandachtig door: er staat belangrijke informatie in over installatie, gebruik en veiligheid. De installatie van het apparaat moet volgens deze instructies worden uitgevoerd door een bevoegde installateur.
400V 2N~ H05RR-F 4x4 CEI-UNEL 35363 N L2 L1 Wanneer het apparaat geïnstalleerd is, moeten de elektrische kabel en de contactdoos gemakkelijk te bereiken zijn. De kabel mag niet gebogen of samengedrukt worden. 1 3 5 2 4 De kabel moet van tijd tot tijd worden gecontroleerd en mag alleen door erkende monteurs worden vervangen. 400V 3N~ H05RR-F 5x2.5 CEI-UNEL 35363 N L3 L2 L1 De fabrikant kan nergens aansprakelijk voor worden gesteld als deze normen niet worden nageleefd.
Beschrijving van het apparaat NL Aanzichttekening Glaskeramische kookplaat GELEIDERS van de roosters stand 5 stand 4 stand 3 stand 2 stand 1 Bedieningspaneel Rooster GRILL Rooster LEKPLAAT Stelvoetje Stelvoetje Bedieningspaneel THERMOSTAATKNOP DISPLAY Toets FAST CLEAN PROGRAMMAKNOP Toets INSTELLEN TIJDEN Knop INSTELLEN TIJDEN Display Aanwijzer van de voorverwarming Symbolen AUTOMATISCHE PROGRAMMA'S Cijfers TEMPERATUREN en TIJDEN Symbool van het aangeraden kookvlak Symbool KLOK Symbool STOP A
Bedieningspaneel kookplaat NL Controlelampje TIMER* Toets TOENAME VERMOGEN Controlelampje GEPROGRAMMEERD KOOKGEDEELTE* Toets BOOSTER* Aanwijzers STROOMSTERKTE en RESTERENDE WARMTE Controlelampje GESELECTEERD KOOKGEDEELTE Display PROGRAMMERINGSTIMER* Controlelampje BOOSTER* Toets ON/OFF Controlelampje ON/OFF Controlelampje BLOKKERING BEDIENINGSPANEEL Toets SELECTIE KOOKGEDEELTES Toets BLOKKERING BEDIENINGSPANEEL Toets PROGRAMMERINGSTIMER* Toets AFNAME VERMOGEN Toets TOENAME VERMOGEN om de koo
Starten en gebruik NL Vóór gebruik is het strikt noodzakelijk het plastic folie aan de zijkanten van het apparaat te verwijderen. De klok instellen U kunt de klok zowel instellen als de oven uit is als wanneer hij aan is, maar alleen als u geen uitgestelde bereiding heeft ingesteld. 1. Druk meerdere malen op de toets totdat het en de eerste twee cijfers op het symbool DISPLAY beginnen te knipperen; 2.
Handmatige kookprogrammas Alle programmas hebben een vooringestelde kooktemperatuur. Deze kan handmatig worden aangepast,en naar wens worden ingesteld tussen de 40°C en de 250°C. In het programma BARBECUE is de ingestelde temperatuur in % uitgedrukt. Dit kan ook handmatig worden gewijzigd. Programma MULTILEVEL Alle verwarmingselementen gaan aan en de ventilator treedt in werking.
NL Recept voor PIZZA: 1 Bakplaat, lage ovenstand, oven koud of warm Recept voor 3 pizzas van ongeveer 550 g: 1000 g meel, 500 g water, 20 g zout, 20 g suiker, 10 cl olijfolie, 20 g bakkersgist (of 2 zakjes gedroogde gist) Rijzen op kamertemperatuur: 1 uur In koude of warme oven plaatsen Start de bereiding PIZZA Programma BROOD Voor een optimaal resultaat raden wij u aan de volgende aanwijzingen nauwkeurig op te volgen: houdt u zich aan het recept; het maximum gewicht per bakplaat; vergeet ni
Praktische kooktips BARBECUE Gebruik voor het koken met de heteluchtoven nooit de standen 1 en 5: bij deze standen zou de hete lucht de fijne gerechten kunnen verbranden. Plaats de grill op stand 3 of 4, plaats de gerechten op het midden van de grill. We raden u aan het energieniveau op de hoogste stand te zetten. Het is normaal dat het bovenste verwarmingselement niet constant aan blijft: zijn werking wordt geregeld door een thermostaat.
Gebruik van de kookplaat NL De lijm die gebruikt is voor de afdichtingen laat wat vetvlekjes achter op het glas. Voordat u het apparaat gebruikt raden wij u aan de vlekken te verwijderen met een speciaal niet-schurend schoonmaakmiddel. Gedurende de eerste paar uur dat u het apparaat gebruikt kan het zijn dat u een rubbergeur ruikt. Deze zal echter snel wegtrekken. Als de kookplaat elektrisch wordt aangesloten hoort u na enkele seconden een kort geluidssignaal afgaan.
3. Bevestig door op de toets te drukken. Om een programmering te annuleren moet u bovenstaande handelingen uitvoeren. Bij punt 2 : de duur vermindert drukt u op de toets langzaamaan tot aan de uitschakeling 0. De programmering wordt gewist en het display verlaat de programmeringsmodus. - inbegrepen), maar waarbij de verwarmingselementen niet aangaan.
Veiligheidsschakelaar NL Houd de bodem van de pannen altijd goed schoon en droog zodat ze goed aansluiten op het kookvlak. Dit verlengt de levensduur van zowel de pannen als het kookvlak zelf. Vermijd dezelfde pannen te gebruiken die u ook op een gasfornuis heeft gebruikt: de warmteconcentratie van gasbranders kan de bodem van pannen vervormen, waardoor ze niet goed meer aansluiten. Veiligheidssystemen Pannensensor Ieder kookgedeelte is voorzien van een systeem dat waarneemt of er een pan op staat.
Kookplaten Kookgedeeltes Linksachter Rechtsachter Linksvoor Rechtsvoor Totaal vermogen CE6IFA.1 F /HA CE6IFA.1 X F /HA Vermogen (in W) I 1400 600 se Ant. Sx* I 2200 B 3000* I 2200 B 3000* I 1400 600 se Post. Dx* 7200 Legenda: I = kookgedeelte met eenvoudige inductie B = booster: inschakelen van het extra vermogen tot 3000 W in het kookgedeelte * = het maximale vermogen wordt beperkt tot 600 W terwijl de booster in het kookgedeelte erachter actief is (zie Starten en gebruik).
Koken op laag vuur Koken op middelmatig vuur Koken op hoog vuur Koken op zeer hoog vuur Praktische kooktips Koken op zeer laag vuur NL 70 ª ¶ ¶ § § S S ¢ ¢ £ ¡ Koken met een snelkookpan Snelkookpan Frituren Grillen Koken Crêpes Koken op hoog vuur en bruin bakken (Braadstukken, biefstukken, kalfslappen, visfilets, gebakken eieren) Snel indikken (vloeibare sauzen) Koken van water (pasta, rijst, groente) Melk Langzaam indikken (gebonden sauzen) Au bain-marie koken Koken met snelkookpa
Voorzorgsmaatregelen en advies Dit apparaat is ontworpen en vervaardigd volgens de geldende internationale veiligheidsvoorschriften. Deze aanwijzingen zijn geschreven voor uw veiligheid en u dient ze derhalve goed door te nemen. Algemene veiligheidsmaatregelen Dit apparaat is vervaardigd voor nietprofessioneel gebruik binnenshuis. Het apparaat dient niet buitenshuis te worden geplaatst, ook niet in overdekte toestand. Het is erg gevaarlijk als het in aanraking komt met regen of onweer.
NL Mededeling voor dragers van een pacemaker of een ander actief ingeplant medisch apparaat: De kookplaat voldoet aan alle geldende normen betreffende elektromagnetische storing. Dit product is aldus in volkomen overeenstemming met de voorschriften van de wet (richtlijn 89/336/EEG). Het ontwerp is zodanig gepland dat het geen storingen veroorzaakt bij andere elektrische apparaten die worden gebruikt, mits ook dezen voldoen aan bovengenoemde normen.
Onderhoud en verzorging De elektrische stroom afsluiten Sluit altijd eerst de stroom af voordat u tot enige handeling overgaat. Reinigen van het apparaat Gebruik nooit stoom- of hogedrukreinigers voor het reinigen van het apparaat. De buitenkant, dus zowel het email en het roestvrij staal als de rubberen afdichtingen, kunnen met een spons en een sopje worden afgenomen. Als de vlekken moeilijk te verwijderen zijn, kunt u een speciaal reinigingsmiddel gebruiken.
NL Automatische reiniging FAST CLEAN Veiligheidsmechanismen Door de functie FAST CLEAN te activeren bereikt de oven een temperatuur van 500°C die nodig is voor het verbranden van voedselrestjes. Het vuil wordt letterlijk as. Gedurende de automatische reiniging kunnen de oppervlakken zeer heet worden: houd kinderen op een afstand.
Servicedienst Belangrijk: Het apparaat is voorzien van een diagnostisch systeem dat eventuele storingen opspoort. Deze kunt u op het display aflezen met berichten zoals: F gevolgd door enkele nummers. In dit geval moet u de technische dienst inschakelen. Wendt u nooit tot niet erkende monteurs. Dit dient u door te geven: Het soort storing; Het model apparaat (Mod.) Het serienummer (S/N) Deze informatie bevindt zich op het typeplaatje op het apparaat.
09/2010- 195071830.