Congratulations on the purchase of your new built-in appliance. IMPORTANT INFORMATION Please read this Instruction Manual thoroughly before installing and using your appliance for the first time.
IMPORTANT INFORMATION: ● Do not plug in and switch appliance on at the mains until installation is complete. ● You may be charged for a service call if a problem with your appliance is caused by incorrect installation or misuse. Electricity Supply WARNING: This appliance must be earthed. Fuses Your appliance comes fitted with a plug and a 13A fuse. If you need to replace the fuse, only those rated at 13A and ASTA approved to BS1362 should be used.
Contents Electricity Supply ...................................... Recycling & Disposal Information .............. 2 3 Installation Instructions............ 3 i. Remove Transit Bolts ....................... 4 ii. Choose a Location... ... 4 iii. Connect to the Water Supply........... 5 iv. Connect to a Drainage System.............. 6 v. Fitting the Door Panels and Plinth........ 7 vi. Fitting your appliance into your kitchen.. 9 vii. Levelling................... 10 The Controls..........................
i. Remove Transit Screws... WARNING: ● The appliance must not be plugged into the mains supply until all installation instructions have been completed. ● Retain the transit screws, spacers and washers. Should you move house then these should be replaced to support the inside of the appliance to prevent damage when in transit. BEFORE ATTEMPTING TO USE THE MACHINE, YOU MUST FOLLOW THE PROCEDURE DESCRIBED BELOW. The inside of the appliance is supported, for transportation, by four screws on the back panel.
iii. Connect to the Water Supply... ● Water taps and standpipe should be situated away from the rear of appliance but in easy access for turning on and off. ● For your machine to operate correctly it requires water pressures in the range of 6-150 psi (100 - 1000KPa). Most water supplies will be in this range.
iv. Connect to a Drainage System... ● Connect up the drain hose, after fitting the hooked end support supplied in the machine. ● Ensure the drainage hose is not obstructed, trapped or kinked. ● Any extension of the drainage pipe must be no longer than 1 metre, it must have the same inner diameter and must have no constrictions of any nature. ● Do not position standpipe near an electrical outlet.
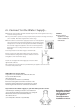
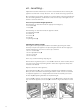
v. Fitting the Door Panel... The packaging is designed to make it possible to mount the wooden panel onto the appliance without removing it completely. ● The wooden panel that covers the face of the machine must not be less than 18mm in thickness and can be hinged on either side. For practical reasons, it is advisable to maintain the same opening direction as the appliance door itself (hinges applied to the left hand side).
Fitting the Door Panel and Plinth... Mounting parts onto the face of the appliance: - Mount the hinge supports onto the face of the machine, positioning the hole indicated by the arrow, in Fig.1, towards the inside of the face and using the type C screws. - Mount the magnetic plate on the opposite side, at the top, using the two type B screws. - Place the spacer illustrated in Fig 4/B between the machine front and the magnet receiver.
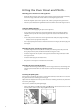
vi. Fitting your appliance into your kitchen... Inserting the machine into the cabinet:- Push the machine into the opening, aligning it with the cabinets (Fig.8). - Regulate the adjustable feet to raise the machine to the appropriate height. - To adjust the position of the wooden panel in both the vertical and horizontal directions, use the C and D screws, as shown in Fig.9. Important: Close the lower part of the appliance front by ensuring that the plinth rests against the floor. Fig. 8 Fig.
vii. Levelling... Adjust the feet until all four feet are in firm contact with the floor ensuring the appliance stands level in every direction. You can check this using a spirit level. We recommend you level the appliance to prevent vibration being transmitted to the surrounding furniture, check that the sides and the top of the appliance are unable to touch the furniture. Accessories provided for height adjustment The following can be found inside the polystyrene lid (Fig.
The Controls Understanding the Control Panel: F E D C G H A BM L I The Controls Washing Machine: Washer Dryer: Selection Knob and A. Programme Programme Start Programme Selection Knob and Programme Start B. Temperature Control Knob Temperature Control Knob C. Drying Cycle Knob Spin Selection Knob D. Detergent Dispenser Detergent Dispenser E. Rinse Hold Rinse Hold F. Quick Wash Reduced Spin G. Intensive Wash Quick Wash H. PreWash Intensive Wash I.
Getting to Know Your Appliance Functions - Washing Machine WARNINGS ● Do not overload appliance! It may damage laundry and reduce the quality of the wash. A. Programme Selection knob... Turn the knob, clockwise only, until the symbol/letter of the required programme (refer to Choosing a Wash Programme) is in line with the pointer on the control panel.
Getting to Know Your Appliance Functions - Washer Dryer A. Programme Selection knob... Turn the knob, clockwise only, until the symbol/letter of the required programme (refer to Choosing a Wash Programme) is in line with the pointer on the control panel. After the wash programme has been set and accepted by the washing machine, turning the Programme Selection knob will have no effect (except for when turned to position ● Stop/Reset). B. Temperature control knob...
Choosing a Programme Washing Machine: BWM12 IMPORTANT INFORMATION: Always observe the laundry items wash care label.
Choosing a Programme IMPORTANT INFORMATION: Always observe the laundry items wash care label.
The Dispenser Drawer IMPORTANT: Index - Do not exceed the maximum levels. 1. Pre-wash detergent compartment 2. Main wash detergent compartment 3. 1 2 Fabric conditioner compartment NB. Choose ‘low suds’ automatic powder, liquid or tablets, designed specifically for automatic washing machines / washer dryers. DO NOT use handwash detergent as excessive suds occur. 3 The dispenser drawer is opened by rotating outwards.
Using your appliance Setting a Wash Programme / Starting the appliance Load the laundry into the appliance and close the door. Load the detergent. Set the required programme. Turn the Temperature knob to that of the selected programme. Press on the ‘On/Off’ button. The On/off Indicator light (L) will start to flash. After a short time the selected programme will be accepted and the light will stop flashing and the wash cycle will begin.
Using your appliance IMPORTANT: - If you use in-drum dosing for your washing programme please ensure the plastic container is removed before a drying programme How to dry (Washer Dryer only). A Combined Washing and drying programme See table below and follow instructions provided for MAX load to have an automatic washing and drying cycle. - Select the wash programme. - Select the programme wash temperature. - Set the Drying Cycle knob C to the type of drying cycle required.
Washcare tips Cutting costs effectively:- ● Maximise the load size Achieve the best use of energy, water, detergent and time by using the recommended maximum load size. Save up to 50% energy by washing a full load instead of 2 half loads. ● Do you need a pre-wash? For heavily soiled laundry only! Save detergent, time, water and between 5 to 15% energy consumption by NOT selecting pre-wash for slight to normal soiled laundry.
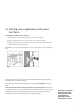
Cleaning WARNING ● Disconnect from the electricity supply before cleaning. Removing and Cleaning the Dispenser Drawer... Note: It is advisable to clean the detergent compartment regularly. To do this: 1 ● Do not clean any part of your appliance with abrasive cleaners, scouring agents, acids, chlorine based bleach or metal polish as they may cause damage. Open the drawer out as far as it will go. Lift it up (1) and pull (2), this should release it from its housing.
Troubleshooting... General Maintenance... Incidents may occasionally occur when you are using your appliance, if so, check the following points: My appliance does not work Check: ● water and power supplies and the fuse. ● if the door is closed properly. ● have you selected a delayed start? The Programme Selection knob keeps turning ● wait a few minutes for the drum to empty - switch off, select one of the ● symbols (Stop/Reset), then switch back on.
After Sales Service “No company is better positioned to offer an after sales service on a Hotpoint appliance than us - the manufacturer” As part of our commitment to you, all Hotpoint appliances have the added benefit of a fully inclusive parts and labour guarantee for the first 12 months. In addition to this you also have the advantage of free replacement parts for the first 5 years when fitted by a Hotpoint engineer.
Guarantee “Satisfaction guaranteed or your money back” We give you a unique ‘satisfaction guaranteed’ promise - valid for 90 days - after you have purchased your Hotpoint appliance. If there is a technical problem simply call Hotpoint Repair service or visit our web-site at www.theservicecentre.co.uk and where necessary, we will arrange for an engineer to call. If the technical problem is not resolved under this guarantee, we will replace your machine or, if you prefer, give you your money back.
Key Contacts After Sales Service Over 1200 trained specialists, directly employed by us, ensure that you can have complete confidence in both the appliances and services we offer. Repair Service and Information Desk UK: 08709 066 066 (Open 8 to 8 Mon - Fri, 8 to 6 Sat, 10 to 4 Sun & Bank Holidays) www.theservicecentre.co.