Instructions for Installation and Use Washer-dryer Model BWD 129
Instructions for use WASHER-DRYER Contents GB English,1 GB Installation, 2-3-4-5-6-7 Unpacking and levelling, 2 Electric and water connections, 2-3 The first wash cycle, 4 Technical details, 5 Instructions for the fitter, 6-7 Washer-dryer description, 8-9 Control panel, 8 Leds, 9 Starting and Programmes, 10 Briefly: how to start a programme, 10 Programme table, 10 Personalisations, 11 BWD 129 Setting the temperature, 11 Set the drying cycle, 11 Functions, 11 Detergents and laundry, 12 Detergent di
Installation GB Keep this instruction manual in a safe place for future reference. Should the appliance be sold, transferred or moved, make sure the instruction manual accompanies the Washer-dryer to inform the new owner as to its operation and features. Read these instructions carefully: they contain vital information on installation, use and safety. Unpacking and levelling Unpacking 1. Unpack the Washer-dryer. 2. Check whether the Washer-dryer has been damaged during transport.
Connecting the drain hose the socket is earthed and in compliance with the applicable law; the socket is compatible with the Washerdryer's plug. If this is not the case, replace the socket or the plug. 3 Service As the colours of the wires in the lead may not correspond with the coloured markings identifyng the terminals in your plug, proceed as follows: Connect Green & Yellow wire to terminal marked E or coloured Green or Green & Yellow. or Connect Brown wire to terminal marked L or coloured Red.
GB If a 13 amp plug (BS 1363) is used it must be fitted with a 13 amp fuse, either in the plug or adaptor or at the distribution board. If you are in any doubt the electrical supply to your machine, consult a qualified electrician before use.
GB Technical details Capacity from 1 to 5 kg for the wash programme; from 1 to 4 kg for the drying programme Electric connections voltage 230/240 Volts 50 Hz maximum absorbed power 2050 W Water connections maximum pressure 1 MPa (10 bar) minimum pressure 0.05 MPa (0.5 bar) drum capacity 46 litres Spin speed up to 1200 rpm Control programmes according to IEC456 directive Wash: programme C; temperature 60°C; run with a load of 5 kg.
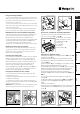
GB Instructions for the fitter Door Mounting Accessories (Fig. 1-2-3-4-5). Mounting the wooden panel onto the door and inserting the machine into cabinets: In the case where the machine must be shipped for final installation after the wooden panel has been mounted, we suggest leaving it in its original packaging. The packaging was designed to make it possible to mount the wooden panel onto the machine without removing it completely (see figures below).
G 57 min0 815 820 ÷ 900 D C Fig. 7 L H Fig. 11 Service Fig. 6 Troubleshooting 595 Care M C 600 min 540 Fig. 10 Adjusting the appliance height. The height of the appliance can be adjusted (from 815 mm to 835 mm), by turning the 4 feet.
Washer-dryer description GB Control panel FUNCTION Buttons Button Leds Detergent dispenser ON/OFF DOOR LOCKED Led START/ RESET Button M DRYING PROGRAMME Knob PROGRAMME Knob VARIABLE TEMPERATURE Knob Detergent dispenser: to add detergent and fabric softener (see page 12). ON/OFF button: to turn the Washer-dryer on and off. LEDS: to find out which wash cycle phase is under way. If the Delay Start function has been set, the time left until the programme starts will be indicated (see page 9).
Leds Delay set: If the Delay Start function has been enabled (see page. 11), once you have started the programme, the LED corresponding to the delay set will begin to flash: 2hr Rinse 4hr Spin 6hr Drying 9hr 2hr Rinse 4hr Spin 6hr Drying 9hr Once the set delay is complete, the flashing LED will turn off and the programme set will start. Spin Drying Note: - during draining, the LED corresponding to the Spin cycle phase will be turned on.
Starting and Programmes GB Briefly: starting a programme 5. Set the drying cycle if necessary (see page 11). 6. Add the detergent and any fabric softener (see page 12). 7. Start he programme by pressing the START/RESET button. To cancel it, keep the START/RESET button pressed for at least 2 seconds. 8. When the programme is finished, the DOOR LOCKED Led will flash to indicate that the appliance door can be opened. Take out your laundry and leave the appliance door ajar to allow the drum to dry thoroughly.
Personalisations Setting the temperature (Variable Temperature ) GB Turn the VARIABLE TEMPERATURE knob to set the wash temperature (see Programme table on page 10). The temperature can be lowered, or even set to a cold wash (Cold). Turn the DRYING PROGRAMME knob to set the desired drying type. Two options are available: A - Based on time: From 40 minutes to 150. A cooling stage is foreseen at the end of the drying cycle. Load type Max.
Detergents and laundry GB Detergent dispenser Special items Good washing results also depend on the correct dose of detergent: adding too much detergent won't necessarily make for a more efficient wash, and may in fact cause build up on the interior of your appliance and even pollute the environment. Curtains: fold curtains and place them in a pillow case or mesh bag. Wash them separately without exceeding half the appliance load. Use programme L which excludes the spin cycle automatically.
Precautions and advice The Washer-dryer was designed and built in General safety Troubleshooting Service 13 Care Saving on detergent, water, energy and time To avoid wasting resources, the Washer-dryer should be used with a full load. A full load instead of two half loads allows you to save up to 50% on energy. The pre-wash cycle is only necessary on extremely soiled garments. Avoiding it will save on detergent, time, water and between 5 and 15% energy.
Care and maintenance GB Cutting off the water or electricity supply Turn off the water tap after every wash. This will limit the wear of your appliance's water system and also prevent leaks. Unplug your appliance when cleaning it and during all maintenance operations. Cleaning your appliance The exterior and rubber parts of your appliance can be cleaned with a soft cloth soaked in lukewarm soapy water. Do not use solvents or abrasives.
Troubleshooting Your Washer-dryer could fail to work. Before calling for Assistance (see page 17), make sure the problem can't easily be solved by consulting the following list. The water inlet hose is not connected to the tap. The hose is bent. The water tap is not turned on. There is a water shortage. The water pressure is insufficient. The START/RESET button has not been pressed. The Washer-dryer continuously loads and unloads water.
GB $
Guarantee Your appliance has the benefit of our manufacturers guarantee, which covers the cost of breakdown repairs for twelve months from the date of purchase. This gives you the reassurance that if, within that time, your appliance is proven to be defective because of either workmanship or materials, we will, at our discretion, either repair or replace the appliance at no cost to you.
After Sales Service No one is better placed to care for your Hotpoint appliance during the course of its working life than us - the manufacturer. Essential Contact Information Hotpoint Service We are the largest service team in Europe offering you access to 400 skilled telephone advisors and 1100 fully qualified engineers on call to ensure you receive fast, reliable, local service. UK: 08709 066 066 Republic of Ireland: 0818 313 413 www.hotpointservice.co.