41055012GB.fm Page 16 Wednesday, February 20, 2008 3:39 PM INSTRUCTIONS FOR USE INSTALLATION ................................17 SAFEGUARDING THE ENVIRONMENT............................................ 20 IMPORTANT NOTES.................................... 20 BEFORE USING THE OVEN......................... 21 OVEN ACCESSORIES ................................... 22 CARE AND MAINTENANCE........................ 23 TROUBLESHOOTING GUIDE ..................... 27 AFTER SALES SERVICE ............................
41055012GB.fm Page 17 Wednesday, February 20, 2008 3:39 PM INSTALLATION Recommendations IMPORTANT: Disconnect the oven from the mains before carrying out any installation work or servicing. • Installation must be carried out by a qualified technician in accordance with the manufacturer's instructions and in compliance with local regulations. • Unpack the oven and make sure that the oven has not been damaged during transport and that the oven door closes properly.
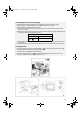
41055012GB.fm Page 18 Wednesday, February 20, 2008 3:39 PM • For ovens installed under the worktop, leave a minimum clearance of 5 mm between the upper edge of the oven and the lower edge of the worktop (fig. 5). For correct operation of the appliance, this clearance must always be unobstructed. • If the kitchen unit is not securely fixed to the wall, it must be anchored with standard brackets (A) (fig. 6). Electrical connection Regulations require that the appliance be earthed.
1055012GB.fm Page 19 Wednesday, February 20, 2008 3:39 PM Connecting the oven to the power supply • Make sure that the voltage indicated on the rating plate is the same as the mains voltage. The rating plate is on the front edge of the oven (visible when the door is open). • If the power cable is not present proceed as follows: 1. Remove the two fastening screws of the terminal box cover located on the bottom part of the oven's rear covering. 2.
41055012GB.fm Page 20 Wednesday, February 20, 2008 3:39 PM SAFEGUARDING THE ENVIRONMENT Disposal of packaging materials • The packaging material is 100% recyclable and is marked with the recycle symbol . • The various parts of the packing must therefore be disposed of responsibly and in full compliance with local authority regulations governing waste disposal.
41055012GB.fm Page 21 Wednesday, February 20, 2008 3:39 PM • The front panel and the handle of the oven door warm up when the appliance is switched on for a long time at high temperatures. • Never touch the oven with any wet part of the body and do not operate it with bare feet. • Do not pull the appliance or the power supply cable to disconnect them from the electrical supply.
41055012GB.fm Page 22 Wednesday, February 20, 2008 3:39 PM OVEN ACCESSORIES Accessories supplied depend on the model. The accessories provided with the oven are listed in the Product Description Sheet provided separately (under Accessories). Drip tray (1) 1 The drip tray is designed to collect fat and food particles when it is positioned under the grid or as a plate, such as when cooking meat, chicken and fish with or without vegetables.
41055012GB.fm Page 23 Wednesday, February 20, 2008 3:39 PM CARE AND MAINTENANCE Important: never clean the appliance with high pressure water or steam cleaning equipment. Exterior of the oven • Clean with a damp cloth. If it is very dirty, add a few drops of washing up detergent to the water. Wipe with a dry cloth. • Do not use corrosive or abrasive detergents, which dull the surface. In the event that one of these products comes into contact with the oven, immediately clean it using a damp cloth.
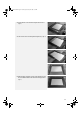
41055012GB.fm Page 24 Wednesday, February 20, 2008 3:39 PM Attention: When carrying out the following operations it is advisable to wear protective gloves. These instructions should be carefully followed both to prevent injury and in order not to damage the oven door and hinges. How to remove the oven door: 1. Open the oven door fully (see fig. 1). 1 2. Lift the two catches and push them forwards as far as they go (see fig. 2). 2 3. Remove the door by closing it partially and pulling it upwards (see fig.
41055012GB.fm Page 25 Wednesday, February 20, 2008 3:39 PM 3. Lift the bottom of the first sheet of glass and remove it (fig. 3). 3 4. Then remove the 2 remaining sheets of glass (fig. 4, fig. 5). 4 5 6 5. Refit the sheets of glass in reverse order making sure that the word SAFEGLASS on the last sheet is facing upwards (fig. 7).
41055012GB.fm Page 26 Wednesday, February 20, 2008 3:39 PM Pay attention to the hinges when cleaning and/or removing the door (fig. 8). To remount the door: 1. Insert the hinges into their grooves and lower the door fully. 2. Lower the two catches. 3. Close the oven door fully. Attention: These instructions should be carefully followed both to prevent injury and in order not to damage the oven door and hinges. 8 Changing the rear oven lamp bulb: 1. Disconnect the oven from the electrical supply. 2.
41055012GB.fm Page 27 Wednesday, February 20, 2008 3:39 PM TROUBLESHOOTING GUIDE Oven not working: • Check for the presence of mains electrical power and if the oven is connected to the electrical supply. • Turn off the oven and restart it to see if the fault persists. The door is locked and will not release: • Turn off the oven and restart it to see if the fault persists. IMPORTANT: • Check that the oven control knob is not turned to “0” or to “lamp” .