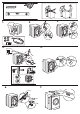
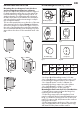
0 mm - 0,39 inch 3. 2. 1. 150 ml 100 ml 50 ml 4. 2 cm - 0,7 inch 6. 5. 7.
8. 9. max 0,5 cm max 0,2 inch 10. 11. 12. max 100 cm 39 inch min 65 cm 25 inch max 100 cm 39 inch min 65 cm 25 inch max 100 cm 39 inch min 65 cm 25 inch 13. 14.
SAFETY INSTRUCTIONS EN IMPORTANT TO BE READ AND OBSERVE Fabric softeners, or similar products, should be used as specified by the fabric softener instructions. The final part of a tumble dryer cycle occurs without heat (cool down cycle) to ensure that the items are left at a temperature that ensures that the items will not be damaged. Never stop a tumble dryer before the end of Very young children (0-3 years) should be kept the drying cycle unless all items are quickly away from the appliance.
Do not install your appliance where it may be exposed to extreme conditions, such as: poor ventilation, temperatures below 5 °C or above 35 °C. When installing the appliance make sure that the four feet are stable and resting on the floor, adjusting them as required, and check that the appliance is perfectly to level using a spirit level.
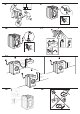
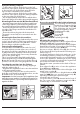
INSTRUCTIONS FOR THE FITTER Door Mounting Accessories (Fig. 1-2-3-4-5). Mounting the wooden panel onto the door and inserting the machine into cabinets: In the case where the machine must be shipped for final installation after the wooden panel has been mounted, we suggest leaving it in its original packaging. The packaging was designed to make it possible to mount the wooden panel onto the machine without removing it completely (see figures below).
Using the Drilling Template. - To trace the positions of the holes on the lefthand side of the panel, align the drilling template to the top left side of the panel using the lines traced on the extremities as a reference. - To trace the positions of the holes on the righthand side of the panel, align the drilling template to the top right side of the panel. - Use an appropriately sized router to mill the holes for the two hinges, the rubber plug and the magnet.
400011618385