FULL INSTRUCTIONS FOR INSTALLING AND OPERATING YOUR HOTPOINT DOUBLE OVEN MODEL BD52 BD62
Before you operate your new Hotpoint Double Oven Please read these instructions fully. ENSURE THAT THE OVEN IS INSTALLED BY A QUALIFIED ELECTRICIAN FOLLOWING THE INSTRUCTIONS BELOW. 1. Your oven should not be located adjacent to a gas hob/heater or eye level grill as flames from the burners could cause damage to your oven. 2.
PLEASE READ THIS BOOKLET CAREFULLY.
Installation Instructions Ensure that the electricity supply is turned off before installing your appliance. IMPORTANT DO NOT LIFT OVEN BY THE DOOR HANDLES. This equipment is designed specifically for domestic purposes and Hotpoint Limited cannot accept responsibility if used for any other type of application. All electrical installations must be carried out by a NICEIC registered installer. WARNING: THIS APPLIANCE MUST BE EARTHED. 1.
Installation Instructions d. The oven unit should now be lifted (by 2 adults) into the cabinet and pushed fully home. e. Finally the oven unit must be secured to the cabinet by means of the four pozi wash head screws, two through each side trim. f. REMOVE ALL PACKING MATERIAL FROM THE GRILL AND OVEN INTERIOR. List of Loose Items 4 x Pozi Wash Head No. 6 x 15mm screws.
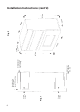
50mm Air Gap Fig. 1 50mm Air Gap Ventilation Slot here if cabinet doesn't fit to ceiling Ventilation Slot 51mm x 457mm min. area Ventilation Slot here if cabinet fits to ceiling 887mm 597 mm 577mm le d exc. han Fig.
No. 6 x 15mm screws (4 supplied) Oven Door Fig. 3 Viewed down through cabinet 560mm 887mm 878mm if trim is to overlap top edge of shelf o clu * ex rk and ns wo jectio pro min mm ipe *550 ding pther 560m 574m m min mm ax Fig.
For Your Safety, Always ... Please read through before operating your appliance. ALWAYS Have your appliance installed by a competent engineer or electrical contractor. ALWAYS Ensure the appliance has been properly earthed. ALWAYS Remove all transportation packing from inside the oven/grill before switching on for the first time. ALWAYS Make sure you understand the controls prior to using them. ALWAYS Keep children away from the oven at all times when oven/grilling as surfaces will get extremely hot.
For Your Safety, Never ... NEVER NEVER NEVER NEVER NEVER NEVER NEVER NEVER NEVER NEVER NEVER Leave children playing unsupervised where the oven is installed and in use. Attempt to grill with the grill/oven oven door closed. Allow children to sit or stand on any part of the appliance. Store food stuffs in the same cabinet as the oven. Store items above an oven that children may attempt to reach. Operate the oven with the inner glass panel removed. Remove the oven shelves when the oven is hot.
The main parts of your Double Oven WARNING: DO NOT TOUCH THE GLASS DOORS WHEN THE OVEN IS IN USE AS THESE AREAS CAN BECOME HOT.
The Cooking Systems in your Double Oven 1 2 3 Your new oven is equipped with three different cooking systems: 1. Conventional Heating (Top Oven) - with upper and lower heat. This system is particularly suitable for roasting and baking on one shelf only. 2. Grilling (Top Oven) - Has a full width, fully controllable grill. The grill also has an economy setting which enables you to use just the left section. NOTE: The oven door should be open when grilling. (See page 21.) 3.
Before Using the Oven for the First Time Make sure the electricity supply is switched ON. Please note that when the double oven is used for the first time a slight odour may be emitted due to the ‘burning off’ of any temporary finish on oven fittings and elements and the removal of moisture absorbed by the lagging. The odour will cease after a short period of use. To remove the ‘new smell’, heat up the empty oven for 30 minutes keeping the door closed.
The Controls Top Oven Pilot Dual Grill Control Top Oven Temperature Control / Grill Selector Timer Main Oven Pilot Main Oven Temperature Control Multifunction Selector IMPORTANT Before using your oven in the ordinary way, ALWAYS make sure that the timer has been set to MANUAL operation. Unless this is done, the main oven cannot heat up. Before seeking assistance, make sure this is done (refer to oven timer operation).
Multifunction Selector Switch The Multifunction selector switch is used when operating the main oven. With the exception of the O position the main oven light will remain on when this selector switch is used. Off With the selector in this position the main oven will not heat up. The timer will still operate. Fan Oven The oven fan and a rear element are controlled when this function is selected. Use the main oven thermostat control to set the required temperature.
Oven Timer Operation The oven timer offers you the following features: 1. Time of Day 2. Automatic Cooking 3. Minute Minder Automatic Cooking The main fan oven can be controlled automatically. Guidance on automatic cooking 1. Select foods which will take the same time to cook. 2. Set the oven timer so that the food has just finished or is just about to finish cooking on your return to the oven. This will ensure the food has not cooled down and does not require reheating before serving. 3.
Oven Timer Operation CLOCKFACE The timer incorporates a 24 hour clock. Ensure the correct time of day is always set, before using you cooker. PLEASE NOTE THAT THE DISPLAY WILL DIM BETWEEN 22.00 HOURS AND 06.00 HOURS TO PREVENT GLARE. However, should you operate the timer during these hours the display will return to normal brightness for a few seconds and then dim again. SYMBOLS will light up when you select a Minute Minder Period and will remain lit for the period set.
Oven Timer Operation SETTING THE TIME OF DAY Step 1 Make sure all oven controls are turned Off. Step 2 Check the electricity supply to the cooker is turned on. Step 3 When switched on the display will show 0.00 and Auto symbol will be flashing intermittently. Step 4 Press & hold in both the & buttons together. Step 5 With the & buttons still held in, press either the “+” or “–” buttons to set the correct time of day. Step 6 Release all the buttons simultaneously. THE TIME OF DAY IS NOW SET.
Oven Timer Operation AUTO COOKING PROGRAMMES There are two Auto Cooking programmes that can be selected using your timer:– (a) To set the timer to switch the oven(s) On and Off Automatically (b) To set timer to switch on immediately and OFF automatically after a set cook period. a) TO SET THE TIMER TO SWITCH THE OVEN(S) ON AND OFF AUTOMATICALLY This allows you to cook at a specified time for a chosen period before the oven switches off Automatically.
Oven Timer Operation Note 1 When cooking automatically the Cook Period can be checked at any time by simply pressing the Cook Period button. Note 2 When cooking automatically the End Time can be checked at any time by simply pressing the End Time button. b) TO SET TIMER TO SWITCH ON IMMEDIATELY AND OFF AUTOMATICALLY AFTER A SET COOK PERIOD Step 1 Step 2 Step 3 Check that the correct time of day is set, if not follow instructions for setting the time of day.
Oven Timer Operation TO CANCEL AN AUTO COOKING PROGRAMME BEFORE THE COOK PERIOD HAS FINISHED. Step 1 Turn the oven control(s) to the OFF position. Step 2 Press and hold in the button. Step 3 With the button still held in, return the display to 0.00 by pressing the “–” button. Step 4 Release the and “–” buttons and the display will revert to the time of day and the “Auto” symbol will flash. Step 5 Press the button to return the oven(s) to “Manual” operation. The “Auto” symbol will go out.
Grilling in the Top Oven Keep young children away from the appliance when the grill is in use as the surfaces get extremely hot. Grilling should NOT be undertaken with the Grill/Top Oven door closed. (See below) Never: Line the grill pan with aluminium foil. The grill control provides variable heat control of the grill element and will only operate once the oven control has been set to a grill position (fully clockwise).
Fixing the Grill Pan Handle Fix the grill pan handle securely in position before use. The grill pan handle is detachable from the pan, to facilitate cleaning and storage. The handle fits onto the grill pan edge with the small recess, Fig. 5. Tilt the handle over the recess and slide it towards the centre, Fig. 6 Ensure the handle is fully located Fig. 7. Insert the washer and fixing screw and tighten fully to ensure handle is secured . Recess Fig. 5 Always fit the screw prior to use. 22 Fig. 6 Fig.
Cooking in the Top Oven – Conventional Cooking The Top Oven can be used to cook small quantities of food or used in conjunction with the Main Oven to provide additional cooking space so often necessary when entertaining. The oven is designed so that the grill element operates at a reduced heat output (element will not glow), combined with a heating element situated underneath the floor of the oven. Do not place items directly onto the floor of the oven.
Yes Yes Yes Yes Yes Milk Pudding Baked Custard Bread Meringues Yes 150-180 100 Yes No Runner 2 from bottom of oven. Yes Runner 1. Runner 1. Runner 1. Runner 2 from bottom of oven. 80-90 200/210 140/150 130/140 190/200 190/200 180-240 45-50 40-50 105-135 20-25 40-45 Dependent on use 45-50 Depending on size 75-90 12-15 15-20 20-25 15-20 8-10 Time in mins.
Yes Yes Yes Yes Yes Yes Yes Yes Yes Beef/ Lamb (slow roasting) Beef/ Lamb (foil covered) Pork (slow roasting) Pork (foil covered) Veal (slow roasting) Veal (foil covered) Poultry/Game (slow roasting) Poultry/Game (foil covered) Casserole Cooking 2-21/2 hrs 25-30 mins per 450g (1 lb) 25-30 mins per 450g (1 lb) + 25 mins over 40-45 mins per 450g (1 lb) 40-45 mins per 450g (1 lb) + 40 mins over 40 mins per 450g (1 lb) 40 mins per 450g (1 lb) + 40 mins over 35-40 mins per 450g (1 lb)
Main Oven – Fan Grilling Fan grilling is a combination of heat from the grill element and the oven fan circulating the hot air around the food. Joints of meat and poultry will be browned as if they were cooked on a rotisserie or spit but more economically as the door left closed. If required, fan grilling can be timed using the Oven Auto timer. Follow the timer instructions before selecting fan grill and the required temperature. If Manual fan grilling is required always ensure the timer is set to Manual.
Main Oven - Fan Grilling Roasting Chart Shelf positions are counted from the base upwards ie: lowest shelf position is 1. Type of Meat or Poultry Weight kg Temp ˚C Plus Extra Total Cooking Time Time (mins) (min/kg) Time (mins) Tips PORK Pork Chop - thick 170 25 Dependent on size Gammon Steaks 160 30 Dependent on size 160-170 150-170 140-150 140-150 140 60-70 60-70 65-75 65-75 70-75 170 25 1.0 1.5 2.0 2.5 over 2.
Main Oven - Fan Only The oven has a fan only position, which can be used to assist defrosting by circulating unheated air around the food. Time to defrost will depend on type and size of the food and the room temperature. Operating Procedure 1. Turn the selector switch to the fan only position. 2. After use always return the control to the off position and close the oven door. DO NOT turn the oven thermostat control on. DO NOT defrost meat and poultry by warming the food through.
Main Oven - Conventional Oven Important NEVER line the shelves, the floor or the sides of the oven with aluminium foil as overheating and damage may result. The oven is heated by elements at the top of the oven and underneath the floor of the oven. Food should not be placed on the floor of the oven. Do not use the oven without the removable oven roof in position with its front flange facing downwards. Operating Procedure 1. Ensure Oven Timer is set to Manual. 2.
Main Oven - Fan Oven Cookery Notes Since a fan oven heats up more quickly, and generally cooks food at a lower temperature than a conventional oven, pre-heating the oven is often unnecessary. However, foods such as bread, scones Yorkshire pudding, do benefit from being placed in a preheated oven. The charts are a guide only, giving approximate cooking temperatures and times. To suit personal taste and requirements, it may be necessary to increase or decrease temperatures by 10˚C.
Main Oven - Fan Oven Cookery Notes Temperature and Time The oven is provided with two shelves. A third is available as an optional extra, contact Genuine Parts & Accessories Hotline (see back page) for further information. If three shelves are used to cook large quantities of food for home freezing or parties, it may be necessary to increase the cooking times given in the charts by a few minutes, to allow for the loss of heat due to the extra time taken to load the oven, and the larger mass of food.
Main Oven Temperature Chart Yes Yes Yes Yes Yes Yes Yes Yes Yes Beef/ Lamb (slow roasting) Beef/ Lamb (foil covered) Pork (slow roasting) Pork (foil covered) Veal (slow roasting) Veal (foil covered) Poultry/Game (slow roasting) Poultry/Game (foil covered) Casserole Cooking 150 190/200 170/180 190/200 170/180 190/200 170/180 190/200 170/180 Temperature ˚C 2-21/2 hrs 25-30 mins per 450g (1 lb) 25-30 mins per 450g (1 lb) + 25 mins over 40-45 mins per 450g (1 lb) 40-45 mins
Preheat Yes Food Scones Small Cakes Yes Yes Yes Yes Yes Yes Yorkshire Pudding Individual Yorkshire Puddings Milk Pudding Baked Custard Bread Meringues 3rd from bottom 3 -31/2 hrs. 80/90 No Yes No No Yes Yes No No No No Yes Yes No No Yes Preheat 70-90 200/210 140/150 130/140 190/200 180/190 190/200 190/200 130/140 140/150 180/200 170/190 160/170 170/180 210/220 Temperature ˚C Fan Oven 3-4 hrs. approx. 30-35 mins. approx. 35-45 mins. approx.
The Slow Cook Setting Your Multifunction oven has a ‘slow cooking’ facility. This is used for slow cooking, keeping food warm and warming plates for short periods. Some Advantages of Slow Cooking are:The oven stays cleaner because there is less splashing. Timing of food is not as critical, so there is less fear of overcooking. Fully loading the oven can be very economical. Cooking times can be extended in some cases by up to 2hrs. for late comers.
Using The Slow Cook Setting Points to bear in mind when preparing food:1. Make sure all dishes will fit into the oven before preparing the food. 2. All dishes cooked by the Slow Cook setting should be cooked for a minimum of 6 hours. They will 'hold' at this setting for a further hour but marked deterioration in appearance will be noticed in some cases. 3. Joints of meat and poultry should be cooked at fan oven 170˚C for 30 mins before turning to the Slow Cook setting. 4. Meat over 2.7 Kg.
Main Oven Grilling DO NOT allow young children near the appliance when the grill is in use as the surfaces can get extremely hot. GRILLING SHOULD NEVER BE UNDERTAKEN WITH THE DOOR CLOSED. Do Not line the grill pan with aluminium foil. Ensure that the grill pan is cleaned after every use. Excess fat build-up in the bottom of the pan could cause a fire hazard. Preheat the grill on the required setting for 5 minutes Door position for grilling: Food Grilling Procedure: 1.
Menus Menu 1 Method Leek and Potato Soup Stuffed Peppers Braised Red Cabbage Summer Pudding Slow Cook for 6 hrs. Leek and Potato Soup 450g (1 lb) Leeks, trimmed, washed and cut into rings 450g (1 lb) Potatoes, peeled, washed and thinly sliced 2 tablespoons vegetable oil 500ml (1 pint) hot vegetable stock Salt and Pepper 250ml (1/2 pint) single cream 250ml (1/2 pint) milk 1. Prepare leeks and potatoes. 2. Fry leeks in oil until soft. Add potato slices and cook for 3 minutes. 3.
Menus Braised Red Cabbage Menu 1 continued 225g (8 oz) onion, peeled and chopped 1. Place onion and oil in pan and cook 2 tablespoons vegetable oil for 3 minutes. 450g (1 lb) red cabbage, finely shred 2. Add cabbage, apple and pear and cook 225g (8 oz) cooking apple, peeled, cored for 3-4 minutes. Place in casserole dish. and diced 3. Add remaining ingredients to pan and 225g (8 oz) pear, peeled, cored and heat to boiling. Pour over vegetables. diced 4. Cover dish tightly with foil and lid.
Menus Braised Topside au Poivre 1. Sprinkle beef with peppercorns and salt. 2. Heat butter and oil in frying pan, cook half the courgettes and tomatoes, place in bottom of casserole dish. 3. Fry meat on both sides and place on top of vegetables, then cook remaining vegetables and place on top of meat in casserole dish. 4. Add red wine to pan and bring to the boil. Pour into casserole dish. 5. Cover dish with foil and fit lid tightly. 6. Place in oven.
Menus Long Grain Rice Menu 3 continued 10 oz (275g) long grain rice 3 tablespoons (45ml) oil 1 1/4pt (625ml) water 1. Wash the rice. 2. Fry the rice in oil until lightly browned. 3. Boil the water , add salt and place with rice in casserole dish. 4. Cover dish tightly with foil and lid. 5. Place in oven. Fruit Crumble 75g (3 oz) Caster sugar 175g (6 oz) Plain flour 75g (3 oz) Butter 75g (3 oz) demerara sugar 1. Place prepared fruit and sugar in dish. 2.
Menus Jacket Potatoes 1. Scrub the potatoes, prick well. 2. Wrap each potato in a piece of cooking foil. Pear Pudding 4 Large potatoes } Melted 50g (2 oz) butter together 50g (2 oz) dark brown sugar 100g (4 oz) margarine 100g (4 oz) caster sugar 2 size 4 eggs 100g (4 oz) self raising flour, sieved 1/4 teaspoon almond essence 3 pears, peeled, cored and cut into 4 1. Coat base of souffle dish with melted butter and sugar. 2. Cream together margarine and sugar until light and fluffy. 3.
Menus Menu 5 continued 225g (8 oz) slightly stale bread 250ml (1/2 pint) milk 2 eggs 1 tablespoon brandy, optional 175g (6 oz) mixed dried fruit 40g (1 1/2 oz) demerara sugar 50g (2 oz) melted butter 1 teaspoon mixed spice Finely grated rind of 1 lemon Grated nutmeg Caster sugar Spiced Bread Pudding 1. Grease shallow ovenproof dish. Line base with greased greaseproof paper. 2. Cut bread into very small pieces. 3. Bring milk to boil and pour over bread.
Menus Fruity Chicken Casserole 4 chicken joints 1 red pepper, de-seeded and sliced 2 sticks of celery, chopped 1 large onion, peeled and sliced 100g (4 oz) mushrooms, sliced 400g (14 oz) can sliced peaches 3 tablespoons cornflour 1 tablespoon soya sauce 3 tablespoons malt vinegar Salt and pepper 1. Skin chicken joints and place in 2 litre (3 1/2 pint) casserole dish. 2. Fry pepper, onion, celery and mushrooms in oil. 3. Cover chicken with vegetables. 4. Drain fruit, reserving juice, and add to casserole.
Care and Cleaning TURN OFF THE MAIN SWITCH BEFORE CLEANING. Before switching on again, ensure that all controls are in the OFF position. Cleaning the Exterior The outside of both ovens can be cleaned, when cooled down, using a cloth which has been rinsed in warm soapy water. The oven can then be wiped down with a clean dry cloth. Never use an abrasive powder as this will damage the surface. Lower Oven Remove the rod shelves and meat pan.
Care and Cleaning It should not normally be necessary to clean the Stay Clean panels with water. If the user feels it is desirable to do so, wash them down in warm, soapy water, followed by rinsing with clear water: Do not use biological/ enzyme washing powder, harsh abrasives or oven chemical cleaners of any kind. Replacement oven liners arE available should you require them, from your nearest Hotpoint Service Centre (see back page).
Care and Cleaning Take particular care not to damage the inner surface of the door inner glass that is coated with a heat reflective layer. Do not use scouring pads, or abrasive powder, which will scratch the glass. Ensure that the glass panel is not subjected to any sharp mechanical blows. Stubborn stains can be removed by using a fine steel wool pad. For slight soiling the inner glass panel may be cleaned, while still warm, without removing it from the door.
If something goes wrong... Before calling a Service Engineer, please check through the following lists. THERE MAY BE NOTHING WRONG. This is normal and should cease after a short period. Slight odour or small amount of smoke when grill / oven used first time Nothing Works If you find that the timer display is blank, then it is likely that there is no electricity supply to your oven.
If something goes wrong... Grilling is uneven Ensure that Grill pan has been positioned as stated in the Grilling section of this book. Oven lamp does not work The oven lamp is not covered by the guarantee. The part is easily changed (see the section on oven lamp replacement) A new lamp may be obtained from Genuine Parts & Accessories (see Back Page). Condensation on the wall at the rear of the cooker.
Hotpoint Service Cover Satisfaction Guaranteed or Your Money Back Hotpoint gives you a unique ‘Satisfaction Guaranteed’ promise – valid for ninety days after you have purchased your Hotpoint product. If there is a technical problem with your Hotpoint appliance, just call Hotpoint Service (see back page). If necessary we will arrange for an engineer to call. If the technical problem is not resolved under this Guarantee, Hotpoint will replace your appliance or, if you prefer, give you your money back.
Key Contacts Service Hotpoint has the largest appliance manufacturer’s service team in Europe, trained specialists directly employed by us to ensure your complete confidence. Repair Service UK: 08709 066 066 Republic of Ireland: 1850 302 200 You will be asked for the following information:Name, address and postcode.