
Instruction for Use


8
THE DIFFERENT FUNCTIONS OF THE COOKER
The various functions featured with the oven are controlled using
the knobs and buttons on the control panel..
THE OVEN KNOB AND GAS GRIL
L
In some models you will fi nd a knob for the ignition of the gas oven
(I) and a knob for the ignition of the gas grill (O) (drawing 1).
While on other models only one knob (P) exists which starts
either the gas oven or the gas grill (drawing 2). In this case by
pressing and turning the knob towards the left the oven gas will
start and by pressing and turning the knob towards the right the
gas grill will start. The knobs are the devices which permit you to
select the different functions of the oven and of the gas grill and
to chose the cooking temperatures most suitable for the foods
between the ones indicated on the knobs (included between
min
and
max
). To turn on the oven burner, approach the hole “F” with
a fl ame or a lighter (see drawing below). Press down and turn
the oven knob counterclockwise until the max position.
F
To turn on the gas grill burner it is necessary to approach a
match to the burner. Press down and turn the grill knob counter-
clockwise until the
max
position. The use of the gas grill permits
to golden the foods such as sausages, roasts, chops,etc.
.
Since the cooker is equipped with a safety device on oven
burner, the knob must be kept pressed in for about 6
seconds to activate the fl ame failure device.( For the models
provided with electronic lighting see the relative paragraph).
The cooking temperature is selected by matching the desidered
temperature with the permanent reference on the panel; the
complete range of temperatures is shown below. The selected
temperature is reached automatically and it is kept constant by
the knob-controlled thermostat.
Min • 165 180 190 210 240 Max
Min.= 130°C.
Max.= 250°C.
Important: should the burner fl ames accidentally go out,
turn off the control knob and wait at least 1 minute before
trying to re-light.
Attention
: before using the oven and grill for the fi rst time, turn
the oven on for approximately one half hour. Make sure that
the oven is empty, the thermostat on high, the door open, and
the room properly ventilated. The odor which can be detected
at times is due to the evaporation off the substances used to
protect the oven and the grill during the period between the time
of production and installation of the appliance.
WARNING:
Do not use grill burner and oven burner together.
Due to technical and security reasons the use grill and oven
burner
at same time is forbidden
.
Usage of both together can lead
to breakage of oven glass for which manufacturer or distributor
will not be responsible.
ELECTRONIC IGNITION OF THE OVEN BURNER
(present only in a few models)
To
light the oven burne
r, press the button marked with the
symbol
and, at the same time, turn the oven control knob
in the anticlockwise direction to the
Max
setting.
Once the burner lights, release the button but keep the knob
pressed in for about 6 seconds in order to allow the gas to
pass freely
.
In the event of a power outage, the oven can be
lighted manually following the instructions provided in the section
entitled “
The Oven and Grill Gas Knob
.” The electronic lighting
device for the oven burner must not be activated for more than
15 seconds. If after 15 seconds the burner has not been lighted,
release the button, open the oven door and wait for at least one
minute before trying to light the burner again.
HOW TO USE THE ROASTER
(present only in a few models)
•
Insert the meat on the spit and place it in between the two
forks;
•
Insert the end of the spit on the wheel hub situated on the
frame;
•
Deprive the spit from its handle
•
Place the spit frame support along the central running of the
oven while inserting contemporarily the shaft ( in the frame)
in the motor hub.
•
Place the drip tray on a lower runner in the oven and pour
some water in the pan.
•
Turn on the grill burner selecting the grill function and by
pressing the (
);
•
Slowly close the door;
•
Start the motor by pressing the (M) button placed on the
control panel;
•
Baste the meat from time to time. When the meat is cooked,
withdraw the frame from the hub of the motor and retighten the
handle on the hub of the spit.
WARNING:
The forks of the spit can have sharp ends. Please
handle with caution.
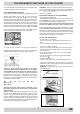
Correct positioning
of the oven wire shelf