
Instruction for Use


5
bottom);
- ignite the oven burner, turning the knob pointer to the maximum
setting;
- shut the oven door;
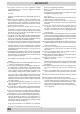
- access the thermostat or tap by-pass (see fi g. 10);
- back off the thermostat by-pass by about 3 turns;
- after 5 or 6 minutes, turn the knob pointer to the minimum set-
ting;
- slowly re-tighten the by-pass, watching the fl ame decrease
in size through the window in the closed oven door until the
tongue of the fl ame is about 4 mm long. Never keep the fl ame
too low. It must be stable even when the oven door is opened
or closed quickly;
- turn off the burner and replace the oven bottom.
10
BY PASS
BY PASS
E
)
REGULATING THE PRIMARY AIR OF THE BURNERS
The primary air of the burners does not need to be regu-
lated.
F
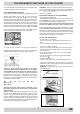
) REPLACING THE OVEN BURNER INJECTOR
•
Loose the screw securing the oven bottom;
•
remove the oven bottom (push back and raise);
•
remove the oven burner, after taking out its fi xing screw (a) ;
•
remove the oven burner;
• replace the injector using a 7 mm socket wrench.
a
a
G
) MINIMUM REGULATION OF THE GAS OVEN BURNER
•
light the burner as described in the paragraph “the oven
knob”of the instruction booklet.
•
turn the knob to Max for about 10 minutes and then turn the
knob to the Min setting;
•
remove the knob;
•
regulate the screw positioned outside the tap pin until the fl ame
is small but steady.
N.B.
: in the case of liquid gas, the regulation screw must be
screwed in to the bottom.
•
check that the burner does not turn off
when you turn the
knob from Max to Min
and and when you open and close
the oven door quickly.
Note:
When disassembling the oven burner it is not necessary to
disconnect the support which fi xes the ignition plug (if present)
to the burner , being careful not to fold the thermocouple and
ignition plug connection (if present).
H
) REGULATING THE PRIMARY AIR OF THE BURNERS
The primary air of the burners does not need to be regulated.
Important
On completion of this operation, replace the old rating sticker with
one indicating the new type of gas used. This sticker is available
from our Service Centres.
Note.Should the pressure of the gas used be different (or vary)
from the recommended pressure, it is necessary to fi t a suitable
pressure regulator onto the inlet pipe in compliance with cur-
rent National Regulations relative to “regulators for channelled
gas”.
I
) REPLACING THE GRILL BURNER GAS INJECTOR
•
Remove the burner after taking out the two screws which
secure it (b) ;
•
replace the injector using a 7 mm. socket wrench.
IMPORTANT RECOMMENDATIONS:
•
Do not screw the injectors with exaggeration.
•
When the component has been replaced, verify the gas seals
of all the injectors with a leak fi nder product. If air bubbles appear
with the open valve and clogged injectors it means that there is
a gas leakage.
b
b