CONTENTS QUICK REFERENCE GUIDE PROGRAMME CHART PREPARING THE LAUNDRY SELECTING A PROGRAMME AND OPTIONS STARTING AND COMPLETING A PROGRAMME CHANGING A PROGRAMME INTERRUPTING A PROGRAMME DAILY MAINTENANCE AND CLEANING INSTRUCTIONS FOR USE BOOKLET SAFETY ADVICES BEFORE USING THE DRYER / CONNECTIONS PAGE 4 SAFETY ADVICES AND GENERAL RECOMMENDATIONS PAGE 5 DESCRIPTION OF THE DRYER PAGE 7 VENT CONNECTION PAGE 8 DOOR REVERSIBILITY PAGE 9 TROUBLESHOOTING GUIDE / AFTER-SALES SERVICE PAGE 10 3
SAFETY ADVICES BEFORE USING THE DRYER / CONNECTIONS 1. Removing the packaging and check • After unpacking, make sure that the dryer is undamaged. If in doubt, do not use the dryer. Contact After-Sales Service or your local retailer. • Keep the packaging materials (plastic bags, polystyrene parts, etc.) out of reach of children, as they are potentially dangerous. 2.
SAFETY ADVICES AND GENERAL RECOMMENDATIONS 1. Packing The packing box may be fully recycled as confirmed by the recycling symbol. 2. Energy saving tips • Always dry a full load: depending on the type of laundry and the programme/drying time. • By preference use the maximum spin speed allowed by your washing machine, since draining the water mechanically requires less energy. • Do not overdry the laundry. • Clean the lint filter after every drying cycle.
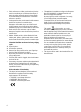
• Fabric softeners or similar products should not be used in a tumble dryer to eliminate the effects of static electricity unless this practice is specifically recommended by the manufacturer of the fabric softener or product. • Undergarments that contain metal reinforcements should not be placed in a tumble dryer. Damage to the tumble dryer can result if metal reinforcements come loose during drying. When available a drying rack could be used for such items.
DESCRIPTION OF THE DRYER A. Work top B. Contact pin C. Door To open the door: pull the handle To close the door: push gently until closed. D. Filter A B D C Reminder - Maintenance and Cleaning Clean the lint filter at the end of every drying cycle: Open the door. Pull the filter upwards. Remove lint using a soft brush or your fingertips.
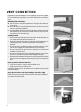
VENT CONNECTION Normally the hose and adaptor are not supplied; the accessory AMH 577 kit, available at your dealer or our After Sales Service, should be used. Installing the vent hose A. Place a towel or the packing material on the right-hand side next to the dryer. B. Place the dryer on its right-hand side (seen from the front) on the towel or the packing material. C. Push the adapter into the hose (see illustration).
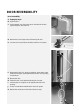
DOOR REVERSIBILITY Door Reversibility A. Unplug the dryer. C B. Open the door. C. Using a spanner, turn the contact pin on the inside of the door (top) through 90° and remove it. D. Remove the 2 door hinge screws, followed by the door. E. Unscrew the 2 screws above and below the door lock system. C D F. Removing the door lock: using a screwdriver, press down on the small rib in the upper opening and extract the door lock by pulling it towards you. G. Reverse the door: H.
TROUBLESHOOTING GUIDE / AFTER-SALES SERVICE Troubleshooting Guide If a fault occurs, before contacting our AfterSales Service, make the following checks to try and remedy the problem: Drying takes too long / laundry is not dry enough: After-Sales Service If, after carrying out the above checks the malfunction persists or appears again, turn the dryer off and call our After-Sales Service (refer to guarantee).