Instructions for installation and use WASHING MACHINE Contents EN English,1 I Italiano,13 EN Installation, 2-3 Unpacking and levelling Connecting the electricity and water supplies Technical data Care and maintenance, 4 Cutting off the water and electricity supplies Cleaning the machine Cleaning the detergent dispenser drawer Caring for your appliance drum Cleaning the pump Checking the water inlet hose Precautions and advice, 5 General safety Disposal Opening the porthole door manually Description
Installation EN ! This instruction manual should be kept in a safe place for future reference. If the washing machine is sold, given away or moved, please ensure the manual is kept with the machine, so that the new owner may benefit from the advice contained within it. ! Read these instructions carefully: they contain vital information relating to the safe installation and operation of the appliance.
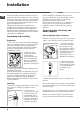
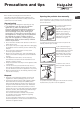
Connecting the drain hose 65 - 100 cm Connect the drain hose to drain duct piping or a wall drain located between 65 and 100 cm above the floor, making sure it is not bent at all. Alternatively, rest the drain hose on the side of a washbasin or bathtub, fastening the duct supplied to the tap (see figure). The free end of the hose should not be underwater.
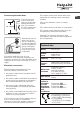
Care and maintenance EN Cutting off the water and electricity supplies • Turn off the water tap after every wash cycle. This will limit wear on the hydraulic system in the machine and help to prevent leaks. • Unplug the appliance when cleaning it and during all maintenance work. To access the pre-chamber: 1 2 Cleaning the machine The outer parts and rubber components of the appliance can be cleaned using a soft cloth soaked in lukewarm soapy water. Do not use solvents or abrasives.
Precautions and tips ! The machine was designed and constructed in accordance with international safety regulations. The following information is provided for safety reasons and must therefore be read carefully. General safety • This appliance was designed for domestic use only.
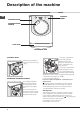
Description of the machine EN CONTROL PANEL PORTHOLE DOOR PORTHOLE DOOR HANDLE KICK STRIP ADJUSTABLE FEET PORTHOLE DOOR A Always use the handle to open the porthole door (see figure). 3 1 210 180 150 120 90 60 B 2 1. pre-wash compartment: use powder detergent. ! Before pouring in the detergent, make sure that extra compartment 3 has been removed. 2. main wash compartment: If liquid detergent is used, it is recommended that the removable plastic partition A (supplied) be used for proper dosage.
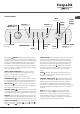
Control panel EN ECO indicator light WASH CYCLE SELECTOR knob Button with ON/OFF indicator light OPTION buttons with indicator lights TEMPERATURE OPTION buttons with indicator lights button SPIN button Button with ON/OFF indicator light: press this briefly to switch the machine on or off. The green indicator light indicates that the machine is switched on.
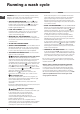
Running a wash cycle EN WARNING: before you use the washing machine for the first time, run a wash cycle with detergent and no laundry, using the 90° cottons cycle without pre-wash. 1. SWITCH THE MACHINE ON. Press the button. All the indicator lights will illuminate for 1 second; the indicator light corresponding to the button will then remain lit in a fixed manner and the START/PAUSE indicator light will flash slowly. 2. LOAD THE LAUNDRY. Open the porthole door.
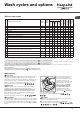
Wash cycles and options Table of wash cycles Wash Bleach Fabric softener Max. load (kg) 60° 800 4 45 1,16 65 120’ Synthetics (4) 40° 800 4 45 0,74 64 100’ Whites 60° 1000 - 5 - - - 200’ Coloureds 40° 1000 5 - - - 110’ Darks Shirts 800 600 1000 - Duvets: for down-stuffed garments. 30° 40° 30° - 5 2 3,5 - - - 80’ 75’ 105’ Bed&Bath for bedlinen and towels.
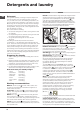
Detergents and laundry EN Detergent The type and quantity of detergent required depend on the type of fabric you are washing (cotton, wool, silk, etc.), as well as its colour, the washing temperature, the level of soiling and the hardness of the water in the area. Measuring out the detergent carefully will avoid wastage and help to protect the environment: although they are biodegradable, detergents still contain ingredients which alter the balance of nature.
Trouble shooting Your washing machine could occasionally fail to work. Before contacting the Technical Assistance Centre (see “Assistance”), make sure that the problem cannot be solved easily using the following list. Problem: Possible causes / Solutions: The washing machine does not switch on. • The appliance is not plugged into the socket fully, or not enough to make contact. • There is no power in the house. The wash cycle does not start. • • • • The door is not closed properly.
Assistance EN Before calling for Assistance: • Check whether you can solve the problem by yourself (see “Trouble shooting”); • Restart the wash cycle to check whether the problem has been solved; • If it has not, contact the Authorised Technical Assistance Service. ! If the washing machine has been installed or used incorrectly, you will have to pay for the call-out service. ! Always request the assistance of authorised technicians.
Istruzioni per l’installazione e l’uso LAVABIANCHERIA Sommario I Italiano I Installazione, 14-15 Disimballo e livellamento Collegamenti idraulici ed elettrici Dati tecnici Manutenzione e cura, 16 Escludere acqua e corrente elettrica Pulire la macchina Pulire il cassetto dei detersivi Curare il cestello Pulire la pompa Controllare il tubo di alimentazione dell’acqua Precauzioni e consigli, 17 AQUALTIS AQ72L 09 S Sicurezza generale Smaltimento Apertura manuale della porta oblò Descrizione della macch
Installazione I ! E’ importante conservare questo libretto per poterlo consultare in ogni momento. In caso di vendita, di cessione o di trasloco, assicurarsi che resti insieme alla lavabiancheria. ! Leggere attentamente le istruzioni: ci sono importanti informazioni sull’installazione, sull’uso e sulla sicurezza. ! Nella busta contenente questo libretto troverete, oltre alla garanzia, dei particolari che serviranno per l’installazione. Disimballo e livellamento Disimballo 1.
Collegamento del tubo di scarico 65 - 100 cm immersa nell’acqua. Collegare il tubo di scarico a una conduttura di scarico o a uno scarico a muro posti tra 65 e 100 cm da terra evitando assolutamente di piegarlo. In alternativa, appoggiare il tubo di scarico al bordo di un lavandino o di una vasca, legando la guida in dotazione al rubinetto (vedi figura).
Manutenzione e cura I Escludere acqua e corrente elettrica • Chiudere il rubinetto dell’acqua dopo ogni lavaggio. Si limita così l’usura dell’impianto idraulico della macchina e si elimina il pericolo di perdite. • Staccare la spina della corrente quando si pulisce la macchina e durante i lavori di manutenzione. Pulire la macchina La parte esterna e le parti in gomma possono essere puliti con un panno imbevuto di acqua tiepida e sapone. Non usare solventi o abrasivi.
Precauzioni e consigli ! La macchina è stata progettata e costruita in conformità alle norme internazionali di sicurezza. Queste avvertenze sono fornite per ragioni di sicurezza e devono essere lette attentamente. Sicurezza generale • Questo apparecchio è stato concepito esclusivamente per un uso di tipo domestico.
Descrizione della macchina I PANNELLO COMANDI PORTA OBLÒ MANIGLIA PORTA OBLÒ ZOCCOLO PIEDINI REGOLABILI PORTA OBLO’ A Per aprire la porta oblò utilizzare sempre l’apposita maniglia (vedi figura). 1 210 180 150 120 90 60 B CASSETTO DETERSIVI Il cassetto detersivi si trova all’interno della macchina e vi si accede aprendo la porta. Per il dosaggio dei detersivi vedi il capitolo “Detersivi e biancheria”. 18 3 2 1. vaschetta per il prelavaggio: usare detersivo in polvere.
Pannello comandi Spie Spie CENTRIFUGA Spie PROGRAMMI Pulsante con spia ON/OFF Pulsanti e Spie Pulsanti con Spie OPZIONI OPZIONI Icone Pulsante TEMPERATURA Manopola I PARTENZA RITARDATA Spia ECO FASI DI LAVAGGIO START/ PAUSE con spia Pulsante PARTENZA RITARDATA Pulsante TEMPERATURA Pulsante CENTRIFUGA Pulsante con spia ON/OFF: premere brevemente il pulsante per accendere o spegnere la macchina. La spia verde indica che la macchina è accesa.
Come effettuare un ciclo di lavaggio NOTA: la prima volta che si utilizza la lavabiancheria, effettuare un ciclo di lavaggio senza biancheria ma con detersivo impostando il programma cotone 90° senza prelavaggio. I 1. ACCENDERE LA MACCHINA. Premere il pulsante . Tutte le spie si accenderanno per 1 secondo dopo il quale rimarrà accesa fissa la spia del pulsante , la spiaSTART/PAUSE lampeggerà lentamente. 2. CARICARE LA BIANCHERIA. Aprire la porta oblò.
Programmi e opzioni Durata ciclo Acqua totale lt Velocità max. (giri al minuto) Ammorbidente Consumo energia kWh Temp. max. (°C) Candeggina Carico max.
Detersivi e biancheria I Detersivo La scelta e la quantità del detersivo dipendono dal tipo di tessuto (cotone, lana, seta...), dal colore, dalla temperatura di lavaggio, dal grado di sporco e dalla durezza dell’acqua. Dosare bene il detersivo evita sprechi e protegge l’ambiente: pur biodegradabili, i detersivi contengono elementi che alterano l’equilibrio della natura. Si consiglia di: • usare detersivi in polvere per capi in cotone bianchi e per il prelavaggio.
Anomalie e rimedi Può accadere che la macchina non funzioni. Prima di telefonare all’Assistenza (vedi “Assistenza”), controllare che non si tratti di un problema facilmente risolvibile aiutandosi con il seguente elenco. Anomalie: Possibili cause / Soluzione: La macchina non si accende. • La spina non è inserita nella presa della corrente, o non abbastanza da fare contatto. • In casa non c’è corrente. Il ciclo di lavaggio non inizia. • • • • La porta oblò non è ben chiusa.
Assistenza 195139937.00 11/2015 I Prima di contattare l’Assistenza: • Verificare se l’anomalia può essere risolta da soli (vedi “Anomalie e rimedi”); • Riavviare il programma per controllare se l’inconveniente è stato ovviato; • In caso negativo, contattare il Numero Unico 199.199.199*. ! In caso di errata installazione o uso non corretto della lavabiancheria l’intervento di assistenza sarà a pagamento. ! Non ricorrere mai a tecnici non autorizzati.