
Instruction for Use


60
INSTALLATION
Technical information for the installer
•
It is important that all installation procedures be performed by a qualified technician.
•
After unpacking the oven to connect it, rest it on its base without damaging it.
•
Do not attempt to lift the oven by the handle. Lift at the sides.
•
Do not lift the oven by the gas connection.
•
Check that the appliance has not been damaged in transit.
•
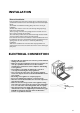
Oven and kitchen unit dimensions are shown in the figure at the foot of the page.
•
Kitchen units in contact with the oven must be heat resistant (100° C min).
•
House the oven in the unit cavity, lifting it at the sides and making sure that the supply cable is not trapped.
•
For correct ventilation, make sure there are the ventilation openings shown in the figure (at least 560 x 90 mm at
the oven base. If installing in a column unit, ensure there is also an opening of at least 500 x 50 mm at the top of
the column).
•
Secure the oven to the housing unit with the screws.
•
The oven can also be fitted under a cooktop that we manufacture.
NOTE:
To allow for proper ventilation, we recommend that you leave an opening for air circulation (in addition to
the one made in the oven support surface) of at least 560 x 30 mm or an equivalent area in the lower section of the
housing (as shown in detail
“a”
in the figure).
An additional opening of 5mm is required between the oven top rim and the cooktop lower rim: This gap must never
be closed by strips or unit reinforcing pieces.
When the oven is installed, make sure that the sides do not touch the front edges of the unit or the adjacent drawers
and doors.
No Contacts
a
a