A6IMPA1 AUS GB English Operating Instructions COOKER AND OVEN Contents Operating Instructions,1 Warnings.
Warning GB WARNING: The appliance and its accessible parts become hot during use. Care should be taken to avoid touching heating elements. Children less than 8 years of age shall be kept away unless continuously supervised.
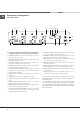
Description of the appliance Description of the appliance 1 GB Overall view 1.Glass ceramic hob 2.Control panel 3.Sliding grill rack 4.DRIPPING pan 5.Adjustable foot 6.GUIDE RAILS for the sliding racks 7.position 5 8.position 4 9.position 3 10.position 2 11.position 1 6 2 7 8 9 10 11 3 4 5 5 6 1 Description of the appliance Control Panel 2 3 1.DISPLAY 2.FAST CLEAN button 3.TIMER button 4.TIME SETTING button 5 SELECTOR knob 6.
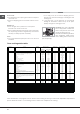
GB Description of the appliance Hob control panel 6 18 17 Max 19 14 Max Booster 15 2 16 10 11 7 8 Booster 13 4 5 The control panel described in this manual is only a representative example: it may not exactly match the panelon your appliance. 1 INCREASE TIME button increases the time value set on the timer (see Start-up and use). 2 DECREASE TIME button decreases the time value set on the timer (see Start-up and use).
Installation The legs* fit into the slots on the underside of the base of the cooker. ! Before operating your new appliance please read this instruction booklet carefully. It contains important information concerning the safe installation and operation of the appliance. ! Please keep these operating instructions for future reference. Make sure that the instructions are kept with the appliance if it is sold, given away or moved.
GB •the power supply system has an efficient earthing connection which complies with the provisions of current regulations and the law; •there is easy access to the socket or the omnipolar circuit-breaker once the cooker has been installed. ! Do not use reducers, adapters or shunts as these could cause heating or burning.
Start-up and use ! Before operating the product, remove all plastic film from the sides of the appliance. Setting the clock ! The clock may be set when the oven is switched off or when it is switched on, provided that a the end time of a cooking cycle has not been programmed previously. button several times until the icon and 1. Press the the first two digits on the display start to flash. 2. Turn the TIMER KNOB towards “+” and “-” to adjust the hour value. button again until the other two digits on 3.
GB Manual cooking modes Automatic cooking modes ! All cooking modes have a default cooking temperature which may be adjusted manually between 40°C and 250°C as desired. In the BARBECUE mode, the default power level value is indicated as a percentage (%) and may also be adjusted manually. ! The temperature and cooking duration are preset values, guaranteeing a perfect result every time automatically. These values cannot be adjusted and use the C.O.P.® (Programmed Optimal Cooking) system.
• Leavening at room temperature: 1 hour. • Place inside hot or cold oven. • Start the PIZZA cooking mode. BREAD mode To obtain the best results, we recommend that you carefully observe the instructions below: • Follow the recipe. • Do not exceed the maximum weight of the dripping pan. • Remember to pour 100 ml of cold water into the baking tray in position 5. • The dough must be left to rise at room temperature for 1 – 1 ½ hours (depending on the room temperature) or until the dough has doubled in size.
GB MULTILEVEL • Use positions 2 and 4, placing the food which requires more heat on 2. • Place the dripping pan on the bottom and the rack on top. For a crispy crust, do not use the dripping pan as it prevents the crust from forming by extending the total cooking time. • If the pizza has a lot of toppings, we recommend adding the mozzarella cheese on top of the pizza halfway through the cooking process. BARBECUE • Place the grill rack in position 3 or 4 and place the food in the centre of the rack.
Start-up and use of cooking zone ! The glue applied on the gaskets leaves traces of grease on the glass. Before using the appliance, we recommend you remove these with a special non-abrasive cleaning product. During the first few hours of use there may be a smell of rubber which will disappear very quickly. ! A few seconds after the hob is connected to the electricity supply, a buzzer will sound. The hob may now be switched on.
GB 4. Set the cooking duration using the - + and buttons. button or automatic 5. Confirm by pressing the selection occurs after 10 seconds. The timer begins counting down immediately. A buzzer sounds for approximately 1 minute and the cooking zone switches off when the set programme has finished. Repeat the above procedure for each hotplate you wish to programme. Using multiple programmes and the display button. 3. Confirm by pressing the The timer begins counting down immediately.
The FlexiZONE mode Practical advice on using the appliance The FLEXI Zone can be used to set the power of two „interconnected” hotplates to the same level. It can be activated if the two hotplates are OFF, by pressing the FLEXI ZONE button The FLEXI ZONE can be activated while the hob is on by pressing the FLEXI ZONE button once; the LEDs corresponding to both linked hotplates light up.
Overheating protection GB If the electronic elements overheat, the hob switches off F Technical description of the models appears on the display, followed by automatically and a flashing number. When the temperature has reached a suitable level, this message disappears and the hob may be used again. The induction system is the quickest existing way of cooking.
Very low-flame cooking Low-flame cooking Medium-flame cooking High-flame cooking Very high-flame cooking Practical cooking advice ª • • ¶ ¶ § § S S ¢ ¢ £ ™ ™ ¡ GB Pressure cooking Pressure cooker Frying Grilling Boiling Crêpes Cooking on a high flame and browning (roasts, steaks, escalopes, fish fillets, fried eggs) Fast thickening (liquid juices) Boiling water (pasta, rice, vegetables) Milk Slow thickening (dense juices) Bain-marie cooking Low-flame cooking (stews) Chocolate sauce Pressu
Precautions and tips GB ! This appliance has been designed and manufactured in compliance with international safety standards. The following warnings are provided for safety reasons and must be read carefully. General safety • The appliance was designed for domestic use inside the home and is not intended for commercial or industrial use. • The appliance must not be installed outdoors, even in covered areas. It is extremely dangerous to leave the appliance exposed to rain and storms.
GB Disposal • When disposing of packaging material: observe local legislation so that the packaging may be reused. • The European Directive 2002/96/EC relating to Waste Electrical and Electronic Equipment (WEEE) states that household appliances should not be disposed of using the normal solid urban waste cycle.
Care and maintenance GB Switching the appliance off Inspecting the oven seals Disconnect your appliance from the electricity supply before carrying out any work on it. Check the door seals around the oven regularly. If the seals are damaged, please contact your nearest Authorised After-sales Service Centre. We recommend that the oven is not used until the seals have been replaced. Cleaning the appliance ! Never use steam cleaners or pressure cleaners on the appliance.
Automatic cleaning using the FAST CLEAN function With the FAST CLEAN mode, the internal temperature of the oven reaches 500°C. The pyrolytic cycle is activated, burning away food and grime residues. Dirt is literally incinerated. Keep children away from the appliance during the automatic cleaning cycle as surfaces may become very hot. Particles may ignite inside the oven due to the combustion process. There is no cause for concern: this process is both normal and hazard-free.
04/2014- 195122117.