Instructions for Installation and Use 6kg Washer Dryer Ultima To the Installer: Before installation, fill in the product details on the back cover of this book. The information can be found on the rating plate. To the User: You must read these instructions prior to installing and using the appliance and then retain them for future reference.
Description GB Dispenser drawer Control panel (● Varies by Model) ● Please record the Model number and Serial number of your machine on the back cover of this book for future reference. - The Serial number can be found on the inside door trim. Interlocking door and release lever.
Contents WASHER DRYER GB Description Description, 2 Wash Labels Explained, 4 Installation, 5-8 Contents Unpacking Remove the transit fixings Location Levelling Water connection Drainage connection Electrical connection Before you start using your machine Wash Labels Explained Control Panel Features, 9 Installation Programmes and Option Modifiers, 10-16 Control Panel Features Starting a wash and dry programme Drying Programme table Special features Option modifiers Detergents and Laundry, 17 Deter
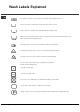
Wash Labels Explained GB The number inside the wash tub shows the maximum water temperature, in ˚C. If there are no bars, the garment can be spun and rinsed as normal. One bar indicates a reduced spin speed programme should be used. Two bars mean the clothes need a mild wash action, but can be spun and rinsed normally. Such items should not be wrung out by hand. If the tub contains a hand, wash the item on a Hand Wash programme.
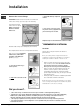
Installation 4. Remove the polystyrene base. GB Description ! Read these instructions carefully: the following pages contain important information on installation and suggestions on how the appliance works. Unpacking Installation ! IMPORTANT check when unpacking your machine: ! This is a part of the polystyrene base and should have stayed intact when you removed the base. ! If it has broken off and is still in the machine... remove it... while the machine is still laying on its side on the top cap.
Installation GB Remove the transit fixings 3. Hold, slide sideways and pull to remove. IMPORTANT: Follow these instructions to remove the TWO transit fixings (see Description for location). ! Situated one either side of the rear panel, BOTH transit bolts MUST be removed before use. 4. For safety, insert one of the the plastic covers (supplied with your machine) over the hole. ! Repeat steps 1 to 4 to remove the second transit bolt. Location of transit bolts.
Installation Levelling Benefits of cold fill ● ● ● COLD WATER SUPPLY ‘Y’ piece connector Cold water fill hose (Blue Connectors) ● Programmes Something Detergents Precautions Care and and Option Wrong and Laundry Maintenance and Advice Troubleshooting Modifiers Connecting the cold water inlet hoses with the ‘Y’ piece connector. ! Remember: please use the new hoses supplied, fitted to the machine. Old hoses may cause leaks due to worn out washers or may be split due to water pressure.
Installation GB Drainage Connection Electrical connections ! Although you may need to move the hooked end support along the grey drainage hose, DO NOT remove it. Before plugging the appliance into the mains socket, make sure that: ● the socket is earthed and in compliance with the applicable law. ● the socket is able to sustain the appliances maximum power load indicated in the Technical Details table (see page 20).
Control Panel Features Ultima GB On/Off light Description LCD display Status indicator lights ON/OFF Pause button Contents START/CANCEL button Programme selector buttons Installation Option buttons Wash Labels Explained Detergent dispenser drawer Control Panel Features Ultima control panel features Option buttons: To select the options available (see Programme Table and Option Modifiers).
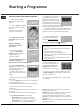
Starting a Programme GB Starting a typical wash and dry programme 1. Switch the machine on by pressing the ON/OFF Pause button. 2. Sort your laundry into groups by washcare labels. Load the machine. Close the machine door by pushing it until it clicks. 3. Add detergent and fabric conditioner to the dispenser drawer. 9.
Drying Setting drying programmes GB 1. 4. 5. *for smaller loads reduce the drying time accordingly. Programme Dry Weight load Heat setting Cottons Synthetics Time Setting* (approx) B,C,D,E & F 5kg max. High Heat max. 3 hours G&K 3kg max. Low Heat max. 2 hours Control Panel Features Fabric Installation Drying table Wash Labels Explained 6. Remove the wet laundry and in drum dosing ball (if used) until the correct ‘Drying Weight Load’ (see Drying table, below) is left in the drum.
Drying GB Important information Operating the machine ! To improve the life expectancy of your machine, it is recommended that you do not stop or cancel your programme during the drying cycle. ! It is recommended that you allow the programme to complete its full cycle, which includes completing the ‘cool tumble’. ! A 20 minute ‘cool tumble’ is included at the end of drying, allowing fabrics to cool down, minimising creasing - The load may still be warm when removed from the machine.
THREE TIMES 60 60 40 50 - 40 40 - 40 - - 30 - 30 H - - - - 3 4 5 6 7 8 9 10 11 R&S R&S FS SS For hard wearing heat resistant cotton and linen. An intensive cleaning programme for heavily soiled hard wearing fabrics. An intensive cleaning, energy efficient cycle using the maximum load capacity. A fast cycle for lightly soiled heat resistant cotton and linen fabrics. A less energy efficient intensive 40˚C cycle for more stubborn soiling.
Option Modifiers and Special Features GB Special features ! Not all special features can be used on all programmes - (see Programme Table for option availability). ● Fast Wash: The Fast Wash programmes are designed for lightly soiled loads delivering quick results for smaller loads, using less energy. For loads with stains or increased soil levels which require deeper cleaning, use the standard or intensive wash cycles.
Option Modifiers and Special Features Option modifiers GB Description ! Not all options can be used on all programmes - (see Programme Table for option availability). ● Mini Load: Use this option for smaller loads less than the capacity listed for the material and programme type (see Programme Table). This option reduces water consumption and washing time, saving energy when washing smaller loads. ● Time Delay: Use this option to delay the programme start by up to 24 hours.
Option Modifiers and Special Features GB Option modifiers ● Drying Heat: - This control option can be used to select High Heat for drying. High heat (for drying cottons) can be selected by pressing the ‘Drying Heat’ button. The display window will show High Heat or Low Heat. If high heat is not selected the programme will default to a low heat setting. ● Timed Drying: - This control option can be used to select a time for drying.
Detergents and Laundry Detergent dispenser Washcare Tips ● Grate Drawer release catch ● Fabric conditioner compartment. Maximum: 120ml Adding fabric conditioner Pour the recommended amount of fabric conditioner into the compartment. Do not exceed the maximum fill line. Pre-Wash When selecting prewash, add detergent to both the pre-wash and the main wash compartments. Do not use the machine if the item to be washed does not have a wash label.
Care and maintenance GB Moulded plug Cleaning ! The plug must not be used without the fuse cover in place. ! Unplug your machine when cleaning it and before all maintenance operations. ! Do not clean any part of the machine with abrasive cleaners, scouring agents, acids, any bleach or metal polish as they may cause damage. ● Use a damp cloth or silicon polish to clean the exterior surfaces of the appliance. ● Clean the internal surface of the door bowl regularly with a soft cloth.
Precautions and advice General safety ● ● ● ● ● ● ● ● ● Saving energy and respecting the environment Environmentally-friendly technology If you only see a little water through your appliance door, this is because thanks to the latest Hotpoint technology, your machine only needs less than half the amount of water to get the best results: an objective reached to respect the environment.
Precautions and advice GB Safety advice ! This machine was designed and built in compliance with the applicable international safety regulations. The following information is provided for your safety and should be read carefully. ● ● ● ● ● ● ● ● ● ● ● ● ● ● ● ● ● ● 20 This machine is designed for domestic use only. Before using your machine make sure that the TWO transit bolts, TWO rubber grommets and TWO spacers have been removed (see page 5).
Something Wrong? - Troubleshooting If your machine seems not to be working, GO through the following troubleshooting suggestions BEFORE you call your Service Centre (see Service). GB Problem: The machine won’t start: (Nothing lights up on the control panel). Possible causes / Solution: ● ● ● ● ● ● ● ● The machine fails to fill with water. ● ● ● ● ● The machine does not drain or spin (although it has drained/spun during previous wash cycles).
Something Wrong? - Troubleshooting GB There is too much foam in the drum during the wash cycle. ● ● ● Check that the detergent you have used is suitable for ‘Automatic’ machines. Refer to the detergent manufacturers recommendations to ensure that you have not used too much detergent. If you have used the wrong type of detergent (or too much), select a Rinse programme to flush out your machine. Steam is coming from the dispenser drawer.
Something Wrong? - Troubleshooting Section 2: All Ultima Models - Problems with the Drying cycle? Description The laundry is not dry after using the drying programme. GB Your machine uses cold water to condense the moisture extracted from the load. Check that: ● Both of the cold water inlet hoses are connected to the cold water supply tap, using the ‘Y’ piece connector. ● The inlet hoses are not kinked. ● The cold water supply tap is turned on.
Service 195057721.00 06/2006 - SIMLEX . Four Ashes, Wolverhampton GB Before calling the Service Centre: ● ● Spare Parts Use the troubleshooting guide to see if you can solve the problem yourself (see Troubleshooting). If not, turn off the machine and call the Service Centre closest to you. ! You will be charged for a service engineers visit if a problem with your machine is caused by incorrect installation or misuse. This is a complex machine.