
Instruction for Use


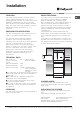


6
GB
PLEASE PHONE US TO REGISTER YOUR APPLIANCE AND ACTIVATE YOUR PARTS GUARANTEE ON 08448 24 24 24
Installation
Prior to installation, ensure that the local distribution
conditions (nature of the gas and gas pressure) and
the adjustment conditions are compatible. The
adjustment conditions for this appliance are stated
on the data badge which is fitted on the back panel.
This appliance is not designed to be connected to a
combustion products evacuation device. It must be
installed and connected in accordance with current
installation regulations. particular attention should be
given to the relevant requirements regarding
ventilation.
MODEL NUMBERS
HUG61P,HUG61K,HUG61G,HUG61X,HAG
60S,HAG60K,HAG60X,62DGWS,62DGG,60HGP,
DSG60S,HAG60G,HAG60P
Category II2H3+ (GB)
These models are set to burn NATURAL GAS (G20)
at 20 mbar but can be converted for use on BUTANE
(G30) at 28-30mbar with the use of the LPG
conversion kit that can be obtained free of charge, if
you contact our Genuine Parts and Accessories
department (see Key Contacts, back page).
GAS SAFETY (INSTALLATION & USE)
REGULATIONS
It is the law that all gas appliances are installed by
competent persons in accordance with the current
edition of the above regulations. It is in your interest
and that of safety to ensure compliance with the law.
In the UK, gas safe registered installers work to safe
standards of practice. The cooker must also be
installed in accordance with BS 6172. Failure to
install the cooker correctly could invalidate the
warranty liability claims and could lead to
prosecution.
Adapting to different types of gas
(main and top oven)
In order to adapt the oven to a different type of gas
with respect to the gas for which it was
manufactured (indicated on the label), follow these
simple steps:
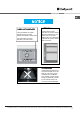
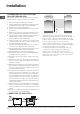
a) Replacing the oven burner nozzle
• open the oven door fully
• pull out the sliding oven bottom
V
V
Z
• Pry the fixing tab "V" and remove the oven burner
• Unscrew the oven burner nozzle using the socket
spanner for the nozzles "Z", or a 7 mm socket
spanner, and replace it with a nozzle suited to the
new type of gas (see Table). Take particular care
handling the spark plug wires and the thermocouple
pipes.
• Replace all the parts, following the steps described
above in the reverse order.
G20 at 20mbar
G30 at 28-30mbar
G31 at 37mbar
Burner
Heat Input Injector Heat Input Injector
Hotplate
Front Left and Rear Right
3.0 kW 116 3.0 kW (220g/h) 86
Hotplate
Front Right and Rear Left
2.0 kW 103 2.0 kW (145g/h) 70
Grill 3.7 kW 150 (X) 3.4 kW (246g/h) 91
Main Oven 2.5 kW 115 2.3 kW (166g/h) 71
Top Oven 1.9 kW 100 1.9 kW (136g/h) 66
62DGBK
unscrew the two screws and take off the shield
protecting the burner (in main oven burner only).