Instructions for Installation and Use Ultima FDW80 & FDW85 60cm free standing Dishwasher Troubleshooting inside
D ISHWASHER 2
D ISHWASHER Contents Electrical Connection For Your Safety Installation Before Using your Dishwasher Loading your Dishwasher What Can I Wash Getting to know your Dishwasher How to use your Dishwasher Programme Chart Care and Cleaning Troubleshooting Information for Test Labs After Sales Service Hotpoint Guarantee Key Contacts 4 5 6-7 8-9 10 10 11 12 13 14 15-20 21 22 23 Back Cover Retention of this Instruction Book This Instruction Book must be kept handy for reference as it contains important details on
Electrical Connection WARNING: This appliance must be earthed. Fuses Safety Information Your appliance comes fitted with a plug and a 13A fuse. If you need to replace the fuse, only those rated at 13A and ASTA approved to BS1362 should be used. If you lose the fuse cover, a replacement may be obtained from your local authorised Service Centre or Electrical company. Correct replacement is identified by colour coding or the marking on base of plug. At the time of delivery...
For your Safety This manual forms an integral part of the appliance. It must always be kept handy for reference. Read through all the instructions contained in this manual before using the dishwasher. Installation must be performed by a qualified technician, in compliance with the regulations in force, including the prevention and elimination of radio frequency interference. The dishwasher is designed for washing and drying dishes, any other use shall be considered improper.
Installation Choose where you want to install your dishwasher, you can place it so that its sides or back panel are side by side with furniture or up against the wall. The dishwasher is provided with water supply and drain hoses, which can be directed towards the left or right to facilitate appropriate installation. Levelling. Once the appliance is positioned, adjust the feet by screwing them in or out depending on how high you want it and to level it so that it is horizontal.
1 2 4 3 min.820 600 60 0 5 600 INSTRUCTIONS FOR INSTALLING THE DISHWASHER IN FULLY-FITTED KITCHENS. Your free standing dishwasher can be installed in modern kitchens as follows: l to stand next to furniture units or other electric household appliances (Please read the chapter on “Installation” in the instruction manual.) l to insert or built-in under the one worktop.
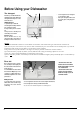
Before Using your Dishwasher The detergent B C D Each time you load the dishwasher, add detergergent. Pour dishwasher detergent into thedispenser on the inside of the door. Adding detergent To open lid A, press button B. The detergent should be put into the two containers C and D. If using a tablet, put it in container "D". Now you can close the lid: press it down until you hear it click. If it won't close Check whether there is any detergent residue on the edges of the dispenser. Remove the excess.
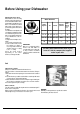
Before Using your Dishwasher To prevent rust from forming, load the salt just before beginning a wash cycle. Adjusting the water softener. Water hardness varies according to where you live. If the water in your home is hard, without water softening, incrustations would form on your dishes. Your dishwasher is fitted with a water softener which uses special salt to get rid of limescale in the water. Your dishwasher can adjust its salt consumption according to the hardness of the water in your home.
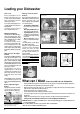
Loading your Dishwasher First of all. Before placing dishes in the baskets, remove all course food remains. This avoids blocking the filter, which would reduce the efficiency of the wash. If saucepans and frying pans are very dirty, allow them to soak before being washed. To make it easier to load your dishes, pull the baskets out. Multisystem baskets The dishwasher is fitted with upper, lower and cutlery baskets.
Getting to know your Dishwasher 4 1. Basket height adjuster 5. Top spray arm 2. Salt container cap 6. Lower basket 3. Bottom spray arm 7. Washing filter 4. Upper basket 8. Detergent and rinse aid dispenser 1 5 2 6 7 3 The Controls M B I 8 H E A F G D N T U S A. ON-OFF display button Press this button to turn the display on. B. Display Displays the functions in progress. D. Start/Reset button With Start, the wash cycle begins, whereas all the settings are cleared with Reset. E.
How to use your Dishwasher First of all. Indicator lights. Cycle phase indicator lights "M" keep you informed. Each will light - Turn on the water supply tap up to show you which cycle phase completely. is in progress: Pre-Wash, Wash, - Add the correct amount of Rinse or Drying. detergent. - Plug in and switch on. - Load the baskets correctly. - Check that the spray arms rotate freely. - Close the door securely. - Press the Stand-by button "A".
Programme Chart Select the most suitable programme for the type of dishes and how dirty they are. To select the wash programme see the chart below: Salt, rinse aid, the right amount of detergent and the correct wash cycle. This is the formula to get the best results and to keep your dishwasher in shape.
Care and Cleaning Unplug the appliance. Cleaning the spray arms. Before carrying out any cleaning or maintenance on the dishwasher, always remove the plug from the electricity socket. Food residue may become encrusted onto the spray arms and block the holes where water comes out. Check the spray arms regularly and clean them once in a while. After every wash. When the wash cycle has ended, always remember to turn off the water supply tap and to leave the appliance door ajar.
Troubleshooting In the unlikely event that you have problems with your machine, the following guide will enable you to resolve many problems without having to call out a service engineer. Fault Area The Dishwasher Will Not Start Issue Possible Installation/Electrical Supply Fault (Particularly if the machine is being used for the first time) Cause/How to resolve… ● Check - Is the dishwasher plugged in and switched on? - Is there a power failure, check to see if other appliances working.
Fault Area Messages In The Display Issue Cause/How to resolve… Your dishwasher is designed so that if a fault occurs, an error message will be illuminated in the display, these can consist of words or numbers. - In many cases you can rectify these error codes by following instructions in this section.- If however the error code displayed on your machine is not listed, you will need to contact your Service Centre for assistance. See “Key Contacts” on the back page of the instruction book.
Fault Area Messages In The Display Issue Cause/How to resolve… -DEMO Lit in Display - Demonstration mode actived “Demo” will slide across the display when the Demonstration mode has been accidentally activated. Follow the instructions below to cancel “Demo” mode: On/off Button Step 1: Press & hold simultaneously the “On/Off button” and “Start/Reset button”, until “D of” is illuminated in the display.
Fault Area Poor Wash Results Issue Tablet not dissolving Cause/How to resolve… - Wherever possible the following should be positioned away from dispenser, to ensure that they can not come into contact with the Dispenser - Cutlery / Cutlery Basket - Crockery - Casseroles Dishes/Pans Etc Spray arm Obstruction Upper Basket Upper Spry Arm - Prior to starting the programme ensure the spray wash jet holes are not blocked and also that the spray arms can rotate freely. Spry wash jet holes 21cm. 26 cm.
Fault Area Poor Drying Results Issue Quick Wash Programme Selected Cause/How to resolve… -There is no drying cycle on the Quick Wash Programme, unless you have selected the “Extra Dry” option. Follow instructions below on how to select “Extra Dry” Step 1: Press button marked “M” until the “Extra Dry” cycle indicator is highlighted & “OFF” is illuminated in the display. Step 2: Activate the “Extra Dry” option by pressing the button marked “S” until “ON” is illuminated in display.
D ISHWASHER Fault Area Cause/How to resolve… Issue Poor Drying Results Possible Installation Fault - Check (Particularly if the machine is being used for the first time) - Is the drain hose kinked? The Dishwasher Will Not Drain - Is the sink trap blocked? (If this is the case you will experience problems with your sink drainage). - Ensure the blanking plug/closed end connection has been removed if connected to a sink trap (this is the most common fault when installing a dishwasher).
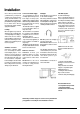
INFORMATION FOR TEST LABS Load for 12 Standard Settings tests (upper rack at top position) Loading the detergent The cleaning detergent should be introduced into the two containers “Comp.2” and “Comp.3”. "(see table at the end of the page). Loading the Rinse Aid The amount of rinse aid used for each cycle can be regulated by turning the dose adjuster ‘F’ which you will find under lid ‘C’.There are 6 different settings; the normal dosage is setting 5. D Comp.
After Sales Service "No company is better positioned to offer an after sales service on a Hotpoint appliance than us - the manufacturer" As part of our commitment to you, all Hotpoint appliances have the added benefit of a fully inclusive parts and labour guarantee for the first 12 months. In addition to this you also have the advantage of free replacement parts for the first 5 years when fitted by a Hotpoint engineer.
Guarantee All Hotpoint appliances carry a fully inclusive 12 month parts and labour guarantee as well as free replacement parts for the first 5 years (except microwaves, selected integrated appliances and cooker hoods, which have a one year guarantee) provided that they are fitted by a Hotpoint engineer.
Key Contacts After Sales Service Over 900 trained specialists, directly employed by us, ensure that you can have complete confidence in both the appliances and services we offer. Repair Service and Information Desk UK: 08709 066 066 (Open 8 to 8 Mon - Fri, 8 to 6 Sat, 10 to 4 Sun & Bank Holidays) www.theservicecentre.co.