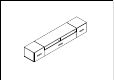
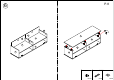
P.2 1 6 8 7 5 2 A B C 8*40 7*50 E 3.5*14 F 3.
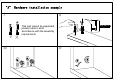
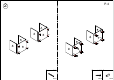
"A" Hardware installation example Ⅰ Ⅱ √× Ⅲ This part cannot be separated, please install in strict accordance with the assembly requirements Ⅳ
P.
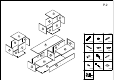
P.4 2 6 5 D D 6 3 D D 2 F G 2 D F 5 4 G D 4 F F G F G G 2 G D 3 F 2 G D F G F D 7*50 8PCS F 3.
P.
4 P.6 E E H E E C 1 5 2 C 15 I J 12 C 13 C 7 B C B J 14 1 4 11 3 B C B 7 J I E 3.
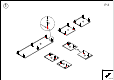
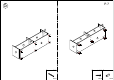
P.7 5 12 G 12 15 D 13 G 15 14 13 D F 2 F G D 2 F G 14 F 11 D 11 D G F D D 7*50 6PCS F 3.
P.
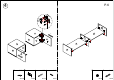
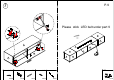
7 P.9 E K E Please stick LED belt under part 9 E E E E 1 H 8 9 9 17 1 J 17 16 LED J 6 11 8 I E 3.
P.10 LED Light If you can’t let the lights work successfully, please check the following: 1. Please check the direction of the connect, try it in the opposite direction, according to the following picture. 2. Please check the remote control, it needs you to tear down the plastic septum before use it. LED Light 3. Don’t let the remote control too far from the receiver, make sure there is no obstruction between them. 4.