
User's Manual


5
GSYS-2000
DUAL 8” BLUETOOTH PARTY SYSTEM
shows the word “FM”. This is
RADIO mode. Be sure to also
extend the antenna on the
back of the unit to increase the
reception.
SCANNING FOR STATIONS
At first, there won’t be any
stations stored in the unit. To
begin a station scan, press and
hold the PLAY button. This will begin the scanning
process. When the GSYS-2000 finds a strong station,
it will store it as a preset.
Once the scan is complete, you can pick between the
available stored preset by pressing the I<< and >>I
buttons. The preset number and station frequency
will appear in the display.
USB AND SD CARD PLAYBACK
It is possible to play music from either a USB Flash
drive or an SD card without the need for an external
device (like a phone or computer). Please note that
supported file types are “.mp3” and “.wma”.
Turn the GSYS-2000 on and insert either a USB or
SD card with compatible music on it.
If the GSYS-2000 does not automatically switch to
USB mode, press the MODE button until the display
shows the word “USB” or “SD”.
You will now be able to play music from your USB or
SD device. Basic controls (for instance play/ pause,
next, and previous track) allow you to change songs,
etc. You can use the REC PLAY button on the remote
to play back any previous recordings stored on the
USB or SD card.
USING THE AUX AND GUITAR INPUTS
The GSYS-2000 lets you perform for an audience
with the ability to mix external sources. Turn the
GSYS-2000 on and make sure the volumes are all
down. Insert the included Mic and/
or a Guitar into the inputs and
make sure they are switched on.
Press the MODE button until the
display shows the word “AUX”.
You will now be able to play live
audio from external devices like a microphone
and guitar. Full control over volume is available
with the left platter (Mic Volume) and top left knob
(Guitar Volume). You may also use the Echo knob to
add in an echo eect.
USB RECORDING
The Gemini GSYS-2000 can record your live
performance. Please note that recording is only
enabled when a USB drive and mic are attached.
To begin recording, unit can be in either AUX, USB, or
FM mode.
• In AUX mode, audio from mic and AUX input will be
recorded.
• In USB mode, mic input
will be recorded.
• In FM mode, FM radio
audio will be recorded.
Insert your USB drive. The GSYS-2000 will create
a directory called “RECORD” that it will put your
recordings.
Press the RECORD button to begin recording. You will
see the display change to a time readout (starting at
00:01) showing elapsed recording time.
You may now begin your recording. When you are
finished recording, press the RECORD button again
to stop. Please note that while unit is in recording
mode, audio through the speakers is muted. You can
use the included remote control to access your new
recordings, or you can remove your USB drive and
play them on any computer. REC PLAY lets you play
back recordings you’ve created, R.DEL allows you to
delete the currently selected recording.
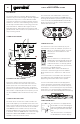
CONTROLLING THE LIGHTING
There are 2 buttons on the remote that
control the GSYS-2000 lighting. The LIGHT
button turns the lights on or o. The RGB
button allows you to change the lighting
color, cycling through RED, GREEN, and
BLUE. Please note that pressing the LIGHT
button is how you return the lights to their
normal multi-color, sound active mode.
Lighting will change on the speakers shown
in the diagram. Other lighting on the unit
(for instance, the display color, button
backlighting, etc.) will not change.
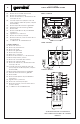
MUSIC
VOLUME
-+
SD CARDUSB