
Installation instructions


10
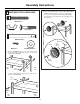
1. Insert the pointed support of the front banner into
the slot behind the front leg at the base.
2. Snap the upper support button into the hole in the
back of the leg. Use a rubber mallet, if needed.
Repeat on the opposite side.
INSTALL THE FRONT BANNER
12
Assembly Instructions
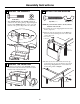
1. Under the left shelf, insert the small bolt from the
inside through the square hole in the side support.
2. Attach the LP tank bracket to the side support with
the small washer and a wing nut.
ATTACH THE LP TANK BRACKET
13
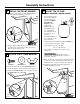
• Your grill is designed
to be used with an LP
gas tank equipped
with the new QCC-1
Quick Closing
Coupling system
and the new
OPD handwheel.
• The QCC-1 system
is recognizable by
the external threads
on the inlet port of
the valve.
• The OPD handwheel
is recognizable by its
shape as shown.
• The LP gas tank used with this grill must NOT have
a capacity larger than 20 lbs. (9kg).
• Approximately:18″ (46 cm) high
12″ (31 cm) diameter
• These tanks are available from your local gas
grill dealer.
• WARNING:Make sure that the
cylinder valve on the LP tank is closed. Close
by turning clockwise.
1. Place the LP tank on the grill base with the LP tank
connector facing to the front of the grill. Slide the
LP tank bracket over the inner rim of the LP tank.
2. Tighten the wing nut on the LP tank bracket to
lock the LP tank in position.
MOUNT THE LP TANK
(not included—obtain locally)
14
LP Tank
Bracket
Wing Nut
and Small
Washer
Small Bolt
Wing Nut (1)
Small Bolt (1)
Small Washer (1)
QCC1
¤
NEW OPD
HANDWHEEL
O
P
E
N
C
L
O
S
E
L
P
-
G
A
S
O
P
D
LP tank
valve