P3PC-4562-02ENZ0 TOP Contents Index fi-65F Operator's Guide Thank you for purchasing our image scanner. This manual explains about the basic operations and handling of the scanner. For information on scanner installation, connection and software installation, refer to "Getting Started". Introduction Explains the names and functions of parts and basic scanner operation. Scanner Overview Explains how to place documents on the scanner.
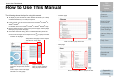
TOP Contents Index How to Use This Manual How to Use This Manual The following shows the tips for using this manual. Introduction Scanner Overview - Contents page z To display or print this manual, either Adobe® Acrobat® (7.0 or later) or Adobe® Reader® (7.0 or later) is required. How to Scan Documents z In this manual, you can use the Search tool of Adobe® Acrobat® or Adobe® Reader®. For details, refer to the Adobe® Acrobat® or Adobe® Reader® Help.
TOP Contents Index Introduction Introduction Thank you for purchasing our Color Image Scanner fi Series. About This Product Manuals The following manuals are included for this product. Read them as needed. Safety Precautions (paper, PDF) Getting Started (PDF) Manual Help (application) This scanner is equipped with a flatbed that allows you to scan thick documents, such as a book or plastic cards, and thin paper.
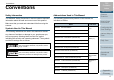
TOP Contents Index Conventions Conventions Introduction Scanner Overview Safety Information Abbreviations Used in This Manual The attached "Safety Precautions" manual contains important information about the safe and correct use of this product. Make sure that you read and understand it before using the scanner. The operating systems and products in this manual are indicated as follows.
Conventions Name Indication Windows Server® 2012 Standard (64-bit) Windows Server 2012 (*1) Windows Server® 2012 R2 Standard (64-bit) Windows Server 2012 R2 (*1) ® Windows 8 (32-bit/64-bit) Windows 8 (*1) Windows® 8 Pro (32-bit/64-bit) Windows® 8 Enterprise (32-bit/64-bit) Windows® 8.1 (32-bit/64-bit) Windows 8.1 (*1) Windows® 8.1 Pro (32-bit/64-bit) Windows® 8.
Contents Contents How to Use This Manual ................................................................................................................................... 2 Introduction ........................................................................................................................................................ 3 Conventions .......................................................................................................................................................
Contents [Delete Profile] button..................................................................................................................................................... 25 [Option] button................................................................................................................................................................ 26 [Initialize] button ...............................................................................................................................
Contents Chapter 6 Troubleshooting ......................................................................................................................... 38 6.1 6.2 6.3 Troubleshooting .......................................................................................................................................................... 39 Scanner cannot be powered ON. ...................................................................................................................................
Contents 7.3 7.4 7.5 Resetting the Password ................................................................................................................................................. 63 Configuration Items .................................................................................................................................................... 64 Device Setting ..................................................................................................................................
Chapter 1 Scanner Overview This chapter explains about the names and functions of the scanner components, as well as the methods for basic operations. 1.1 Main Features............................................................................................................................................. 11 1.2 Parts and Functions....................................................................................................................................12 1.3 Turning the Power ON/OFF.............
Chapter 1 Scanner Overview 1.1 Main Features This section explains about the main features of this product. The scanner is equipped with the following features: High speed scanning The following scanning speed is achieved: z Power cable connection: 1 second per sheet (*1) z USB bus power cable connection: 2 seconds per sheet (*1) In addition, the scanner can be ready to scan only in 0.5 second.
TOP Contents Index Chapter 1 Scanner Overview 1.2 Parts and Functions Introduction This section shows the names of the scanner parts. Scanner Overview Front Flatbed Place a document on the glass section when you scan thick documents, such as a book or plastic cards, and thin paper. How to Scan Documents Operator panel Configuring the Scan Settings Consists of the [Scan] button and power LED. Can be used to operate the scanner or check the status.
TOP Contents Index Chapter 1 Scanner Overview Inside Document cover Close it to hold the document in place. Introduction Scanner Overview How to Scan Documents Document pad Holds the document down against the document bed. Configuring the Scan Settings Various Ways to Scan Daily Care Troubleshooting Document bed Place a document on the glass section.
Chapter 1 Scanner Overview Back Security cable slot Used to connect an anti-theft security cable (commercially available). Transport lock switch Locks the carrier unit (which is inside the flatbed) to prevent damage during transportation. Power connector TOP Contents Index Introduction Scanner Overview How to Scan Documents Used to connect the power cable or USB bus power cable. Configuring the Scan Settings USB connector Various Ways to Scan Used to connect a USB cable.
TOP Contents Index Chapter 1 Scanner Overview 1.3 Turning the Power ON/OFF This section explains how to power on/off the scanner. How to Turn the Power ON Normally, when the following cables are connected, the scanner is turned on/off in sync with the computer's power. Introduction ATTENTION z If the scanner is not turned on when the computer is turned on, press the [Power] or [Scan] button to turn on the scanner.
Chapter 1 Scanner Overview How to Turn the Power OFF HINT Normally, when the following cables are connected, the scanner is turned on/off in sync with the computer's power. The scanner can be turned off also by performing one of the following: z Press the [Power] button for more than two seconds. z USB cable z Power cable or USB bus power cable Introduction Scanner Overview When the computer is turned off, the scanner is turned off and the power LED goes off.
Chapter 1 Scanner Overview 1.4 Opening/Closing the Document Cover This section describes how to open and close the document cover. How to Close the Document Cover How to Open the Document Cover 1 1 Open the document cover. Document cover Gently close the document cover. TOP Contents Index Introduction Scanner Overview How to Scan Documents Configuring the Scan Settings Various Ways to Scan Daily Care ATTENTION If the document cover is opened too wide, it may come off.
TOP Contents Index Chapter 1 Scanner Overview 1.5 Power Saving Mode Power saving mode keeps the power consumption low when the scanner has not been used for a certain period of time. If the scanner is left powered on for 15 minutes without being used, it automatically enters power saving mode. When the scanner enters power saving mode, the power LED remains green. To resume from power saving mode, perform one of the following: z Press the [Power] or [Scan] button.
Chapter 2 How to Scan Documents This chapter explains how to scan documents with the scanner. TOP Contents Index Introduction Scanner Overview How to Scan Documents 2.1 Scanning Documents .................................................................................................................................
TOP Contents Index Chapter 2 How to Scan Documents 2.1 Scanning Documents This section explains about the basic flow of performing a scan. In order to perform a scan, you need a scanner driver and an image scanning application that supports the scanner driver. The following scanner drivers and image scanning applications are bundled with the scanner: For details, refer to "1.3 Turning the Power ON/OFF" (page 15). - PaperStream IP (TWAIN x64) driver Conforms to the TWAIN standard.
Chapter 2 How to Scan Documents 6 7 Select a scanner driver. For some image scanning applications, selection of a scanner driver may not be needed. Select a scanner. Make sure to select the scanner model that is connected to the computer. For some image scanning applications, selection of a scanner may not be needed. 8 In the scanner driver's setup dialog box, configure the scan settings. For some image scanning applications, the scanner driver's setup dialog box may not appear.
Chapter 3 Configuring the Scan Settings This chapter explains about the scan parameters of the scanner drivers. TOP Contents Index Introduction Scanner Overview How to Scan Documents 3.1 Setup Dialog Box for PaperStream IP Driver..............................................................................................23 3.2 Setting Items for PaperStream IP Driver ....................................................................................................
Chapter 3 Configuring the Scan Settings 3.1 Setup Dialog Box for PaperStream IP Driver The PaperStream IP driver is a scanner driver that conforms to the TWAIN/ISIS standard. There are three types of PaperStream IP drivers. z PaperStream IP (TWAIN) driver Conforms to the TWAIN standard. Used when you operate the scanner using TWAIN-compliant 32-bit applications. z PaperStream IP (TWAIN x64) driver Conforms to the TWAIN standard. Used when you operate the scanner using TWAIN-compliant 64-bit applications.
Chapter 3 Configuring the Scan Settings z Simple dialog This is a simplified dialog box that only includes functions specifically for scanning. Select a profile, and perform scanning according to the settings of the profile from this dialog box. This dialog box is displayed when you select [Simple dialog] as [Default dialog] in the [Configuration] dialog box of the PaperStream IP driver.
Chapter 3 Configuring the Scan Settings 3.2 Setting Items for PaperStream IP Driver This section explains the main setting items in the normal dialog for the PaperStream IP driver. [Profile] list From the list that appears when you click [▼], select a profile for scanning. When the profile name is selected in the [Profile] list, the corresponding scan settings are displayed. When you change a setting in the menu after selecting the profile, it switches to [000: Current Setting].
Chapter 3 Configuring the Scan Settings [Option] button Settings menu buttons TOP Contents Index Introduction Specifies whether or not to apply separate scan settings for front and back sides. Note that the [Option] button is disabled for this product. Scanner Overview [Initialize] button How to Scan Documents Restores the current settings to initial settings. Configuring the Scan Settings [Switch Dialog] button Switches to the simple dialog.
Chapter 3 Configuring the Scan Settings Buttons at the bottom of the dialog box [Cancel] button Different buttons are displayed at the bottom of the dialog box depending on the purpose of invoking the dialog box from the application. Discards the changes made on the dialog box and closes the dialog box. z When scanning a document from the TWAIN-enabled application [Preview] button Performs a test-scan with the current settings and displays the result in the Preview.
Chapter 4 Various Ways to Scan This chapter explains how to configure scanner settings and scan different types of documents with the image scanning application. 4.1 Summary ....................................................................................................................................................29 4.2 Scanning Documents of Different Types and Sizes....................................................................................30 4.3 Customizing the Scanner Settings ............
Chapter 4 Various Ways to Scan 4.1 Summary The following lists the main ways of scanning documents. Scanning documents of different types and sizes TOP Contents Index Introduction Scanner Overview z "Scanning a Book" (page 30) Customizing the scanner settings z "Using a Button on the Scanner to Start Scanning" (page 32) For information on other ways of scanning, refer to the scanner driver's Help.
TOP Contents Index Chapter 4 Various Ways to Scan 4.2 Scanning Documents of Different Types and Sizes Scanning a Book 1 2 3 Place a document on the document bed. Place the document face-down to align its top left-hand corner with the reference point. Open the document cover. Introduction Scanner Overview Reference point For details, refer to "1.4 Opening/Closing the Document Cover" (page 17). How to Scan Documents Remove the document cover by pulling it out in the direction of the arrow.
Chapter 4 Various Ways to Scan 5 Scan the document with the image scanning application. For details, refer to the image scanning application manual. TOP Contents Index Introduction Do not look directly into the light source. ATTENTION Do not move the document during scanning. 6 Attach the document cover. 7 Close the document cover. For details, refer to "1.4 Opening/Closing the Document Cover" (page 17).
TOP Contents Index Chapter 4 Various Ways to Scan 4.3 Customizing the Scanner Settings Using a Button on the Scanner to Start Scanning The [Scan] button on the operator panel can be configured to perform scanning by pressing the button. To configure this setting, you first need to assign an application to be launched from the [Scan] button. Computer setup 1 Confirm that the scanner is connected to the computer, then turn on the scanner.
TOP Contents Index Chapter 4 Various Ways to Scan 6 Select an action and an application to be launched by the scanner button event. Click [Start this program] under [Actions], and select an application from the drop-down list on the right. Scanner setup [Scan] button No additional setting is required to use the [Scan] button. When the [Scan] button is pressed, the specified application is launched.
Chapter 5 Daily Care This chapter describes how to clean the scanner. Do not use aerosol spray or spray that contains alcohol. Paper dust blown up by strong air from the spray may enter inside the scanner which may cause the scanner to fail or malfunction. Also note that sparks generated by static electricity may cause a fire. TOP Contents Index Introduction Scanner Overview How to Scan Documents Configuring the Scan Settings Various Ways to Scan 5.1 Cleaning Materials and Locations that Require Cleaning.
TOP Contents Index Chapter 5 Daily Care 5.1 Cleaning Materials and Locations that Require Cleaning Cleaning Materials Name Cleaner F1 Cleaning Wipe Dry cloth Introduction Location and Frequency Part No. PA039500352 PA039500419 Location Notes 100 ml Moisten a cloth or Cleaning Paper with this liquid to wipe the scanner clean. It may take a long time to dry if an excessive amount of Cleaner F1 is used. Use it in small quantity. Wipe off the cleaner completely to leave no residue on the cleaned parts.
Chapter 5 Daily Care 5.2 Cleaning the Outside The outside of the scanner should be cleaned with either a piece of dry cloth, a cloth moistened with Cleaner F1/mild detergent, or a sheet of Cleaning Wipe. ATTENTION z To avoid deformation and discoloration, never use paint thinner or any other organic solvents. z Be careful not to let any moisture or water inside the scanner during cleaning. z It may take a long time to dry if an excessive amount of Cleaner F1/ mild detergent is used.
TOP Contents Index Chapter 5 Daily Care 5.3 Cleaning the Inside The inside of the scanner should be cleaned with a piece of cloth moistened with Cleaner F1, or a sheet of Cleaning Wipe. 2 Clean the following locations with a cloth moistened with Cleaner F1 or a sheet of Cleaning Wipe. ATTENTION z To avoid deformation and discoloration, never use paint thinner or any other organic solvents. z Be careful not to let any moisture or water inside the scanner during cleaning.
Chapter 6 Troubleshooting This chapter explains about the countermeasures against troubles, items to check before contacting your scanner service provider, and how to read the product labels on the scanner. ATTENTION For details about other errors/troubles that are not covered in this chapter, refer to the scanner driver's Help. 6.1 Troubleshooting ..........................................................................................................................................
TOP Contents Index Chapter 6 Troubleshooting 6.1 Troubleshooting This section describes the resolutions for troubles that may occur while using the scanner. Please check the following items before you request a repair. If the problem persists, check each item in "6.2 Before You Contact the Scanner Service Provider" (page 52), and then contact your FUJITSU scanner dealer or an authorized FUJITSU scanner service provider. The following are some examples of troubles that you may experience.
TOP Contents Index Chapter 6 Troubleshooting Scanner cannot be powered ON. Are the following cables connected properly? z USB cable z Power cable or USB bus power cable No Connect the following cables properly. z USB cable z Power cable or USB bus power cable For details, refer to "Connecting the Cables" in Getting Started. Yes Is the computer turned on? Yes Turn on the computer. No Is the power LED off? Press the [Power] or [Scan] button.
TOP Contents Index Chapter 6 Troubleshooting The power LED goes off. Has the scanner been left out of operation for a long time after being powered on? Yes The scanner has entered power saving mode or has been automatically turned off. z When the scanner has entered power saving mode The power LED remains green. Resume from power saving mode by one of the following methods: - Press the [Power] or [Scan] button. Do not press the [Power] button for more than two seconds. Doing so turns off the scanner.
TOP Contents Index Chapter 6 Troubleshooting Scanning does not start. Did you unlock the transport lock switch? No Turn off the scanner, and unlock the transport lock switch. For details about how to turn off the scanner, refer to "1.3 Turning the Power ON/ OFF" (page 15). For details, refer to "Installing the Scanner" in Getting Started. Introduction Scanner Overview Yes Is the USB cable connected properly? No Connect the USB cable properly.
TOP Contents Index Chapter 6 Troubleshooting Scanning takes a long time. Does your computer meet the recommended requirements? No Use a computer that meets the recommended CPU, memory, and other requirements. For details, refer to "System Requirements" in Getting Started. Yes Is the USB cable connected to the USB 1.
TOP Contents Index Chapter 6 Troubleshooting Image quality is poor when scanning pictures/ photos in black & white. Did you perform a scan with grayscale or other scan settings that do not simply "binarize" (output in black & white)? No Use a scanner driver to configure grayscale or other scan settings that do not simply "binarize" (output in black & white), and then perform a scan.(*1) Introduction Scanner Overview Yes Are the document pad and the document bed clean? No Yes Perform cleaning.
Chapter 6 Troubleshooting Quality of scanned text or lines is unsatisfactory. Are the document pad and the document bed clean? No Perform cleaning. For details, refer to "Chapter 5 Daily Care" (page 34). Yes Is the resolution appropriate? Yes Did you select the scan settings that simply "binarize" (output in black & white)? Specify a higher resolution in the scanner driver. No No In the scanner driver, select the scan settings that simply "binarize" (output in black & white).
TOP Contents Index Chapter 6 Troubleshooting Images are distorted or not clear. Are the document pad and the document bed clean? No Perform cleaning. For details, refer to "Chapter 5 Daily Care" (page 34). Yes Is a scan performed on a place that is unstable or vibrates? Perform a scan on a place that is stable and does not vibrate. Yes No Either place the scanner on a flat and level surface, or attach the rubber pads on the bottom of the scanner.
TOP Contents Index Chapter 6 Troubleshooting Vertical streaks appear on the scanned image. Do the streaks always appear in the same location? Yes Clean the document pad and the document bed. For details, refer to "Chapter 5 Daily Care" (page 34). No Does the vertical streak disappear when you set a lower resolution? Specify a lower resolution. Yes No Yes Scanner Overview How to Scan Documents No Is there any foreign matter (e.g.
TOP Contents Index Chapter 6 Troubleshooting The power LED flashes after power-on. Did you unlock the transport lock switch? No Turn off the scanner, and unlock the transport lock switch. For details about how to turn off the scanner, refer to "1.3 Turning the Power ON/ OFF" (page 15). For details, refer to "Installing the Scanner" in Getting Started. Introduction Scanner Overview Yes Does the power LED flash after turning the power off then back on? Yes The scanner is operating correctly.
Chapter 6 Troubleshooting A shadow appears at the top or the bottom of the scanned image. Did you use the Page Edge Filler function to fill out the shadow around the edge? Yes No In the scanner driver, use the Page Edge Filler function to fill out the shadow around the edge. If the problem persists, check the items in "6.2 Before You Contact the Scanner Service Provider" (page 52) first, then contact your FUJITSU scanner dealer or an authorized FUJITSU scanner service provider.
Chapter 6 Troubleshooting Images scanned in black & white (or in grayscale or color) are dark. Are the document pad and the document bed clean? No Perform cleaning. For details, refer to "Chapter 5 Daily Care" (page 34). Yes Have you adjusted the brightness or threshold? Yes In the scanner driver, adjust the brightness or threshold. No Are you using a thin translucent document? Introduction Scanner Overview How to Scan Documents Scan the document with a white sheet placed on the back of the document.
TOP Contents Index Chapter 6 Troubleshooting Automatic page size detection fails. Are the document pad and the document bed clean? No Perform cleaning. For details, refer to "Chapter 5 Daily Care" (page 34). Yes Did you scan with the document cover closed? Yes Close the document cover before scanning. No Is the shape of the document a rectangle? No If the shape of the document is not a rectangle, automatic page size detection does not work correctly.
Chapter 6 Troubleshooting 6.2 Before You Contact the Scanner Service Provider Please check the following items before contacting your FUJITSU scanner dealer or an authorized FUJITSU scanner service provider. General Item Scanner model name Findings Example: fi-65F For details, refer to "6.3 Checking the Product Labels" (page 54). Serial No. Example: XXXX000001 For details, refer to "6.3 Checking the Product Labels" (page 54).
Chapter 6 Troubleshooting ■Other Error Status ■Computer connection issues Item Findings Operating system (Windows) Error message Item Can you send the output image and a photo that shows the paper condition by e-mail? Findings TOP Contents Index Introduction Scanner Overview How to Scan Documents Interface Example: USB interface Configuring the Scan Settings Interface controller ■Image quality issues Item Findings Scanner driver and version Various Ways to Scan Daily Care Interface controller
TOP Contents Index Chapter 6 Troubleshooting 6.3 Checking the Product Labels This section explains about the product labels on the scanner. Location The labels are on the bottom of the scanner. The location of the label is shown below. Label (example): Shows the scanner information.
Chapter 7 Operational Settings This chapter explains how to use the Software Operation Panel to configure the scanner settings. TOP Contents Index Introduction Scanner Overview How to Scan Documents 7.1 Starting Up the Software Operation Panel..................................................................................................56 7.2 Password Setting........................................................................................................................................58 7.
Chapter 7 Operational Settings 7.1 Starting Up the Software Operation Panel The Software Operation Panel is installed together with the PaperStream IP (TWAIN) driver, the PaperStream IP (TWAIN x64) driver, or the PaperStream IP (ISIS) driver. This application allows you to check the scanner information and configure various settings such as the operation of the scanner. ATTENTION z Do not start up the Software Operation Panel when the scanner is scanning or the scanner driver's setup dialog box is open.
Chapter 7 Operational Settings The Software Operation Panel icon is displayed in the menu that appears when you click in the notification area. To have the Software Operation Panel icon always displayed in the notification area, drag the icon and drop it onto the notification area. The notification area is located at the far right of the taskbar.
TOP Contents Index Chapter 7 Operational Settings 7.2 Password Setting By setting a password, the Software Operation Panel can run in [View Only mode] which allows users to only view the scanner settings. The scanner settings can be configured if no password is set. In order to prevent unnecessary changes to the settings, a password can be used to restrict user operations. 2 Enter a new password then again to confirm, and click the [OK] button. Up to 32 characters can be used for the password.
Chapter 7 Operational Settings Setting [View Only mode] HINT Set the Software Operation Panel to [View Only mode] in the following procedure. In [View Only mode], a check mark appears next to [View Only mode] in the menu that is displayed by right-clicking the Software Operation Panel icon in the notification area. 1 Set a password. 2 Right-click the Software Operation Panel icon in the notification area, and select [View Only mode] from the menu.
Chapter 7 Operational Settings Clearing [View Only mode] [View Only mode] is cleared, and the scanner settings can now be changed. Clear [View Only mode] in the following procedure. 1 TOP Contents Index Introduction Right-click the Software Operation Panel icon in the notification area, and select [View Only mode] from the menu. Scanner Overview How to Scan Documents Configuring the Scan Settings Various Ways to Scan 2 The [Password setting] dialog box appears.
Chapter 7 Operational Settings Changing the Password 3 Change the password in the following procedure. 1 Enter a new password then again to confirm, and click the [OK] button. Up to 32 characters can be used for the password. Note that only alphanumeric characters (a to z, A to Z, 0 to 9) are allowed. Right-click the Software Operation Panel icon in the notification area, and select [Password Setting] from the menu.
Chapter 7 Operational Settings Clearing the Password 3 Leave both fields blank and click the [OK] button. Clear the password in the following procedure. 1 TOP Contents Index Introduction Right-click the Software Operation Panel icon in the notification area, and select [Password Setting] from the menu. Scanner Overview How to Scan Documents A confirmation message appears. 4 Click the [OK] button. The password is cleared.
Chapter 7 Operational Settings Resetting the Password 3 In case you forgot your password, it can be reset in the following procedure. 1 Enter a new password then again to confirm, and click the [OK] button. Up to 32 characters can be used for the password. Note that only alphanumeric characters (a to z, A to Z, 0 to 9) are allowed. Right-click the Software Operation Panel icon in the notification area, and select [Password Setting] from the menu.
Chapter 7 Operational Settings 7.3 Configuration Items The Software Operation Panel allows the configuration of the following settings for the scanner that is connected to the computer. Device Setting 1 Start up the Software Operation Panel. 2 From the listing on the left, select [Device Setting]. For details, refer to "7.1 Starting Up the Software Operation Panel" (page 56).
Chapter 7 Operational Settings Item Description Parameter/Value Factory Default Count (page 66) Displays the approximate total number of sheets scanned on the flatbed. Total Page Count (FB) 0 Power saving (page 67) Specify the waiting time before entering power saving mode. Range: 5 to 235 min. (in increments of 5) 15 min.
Chapter 7 Operational Settings 7.4 Settings Related to Sheet Counters Checking the Sheet Counters [Count] The approximate total number of sheets scanned on the flatbed can be checked. 1 2 Start up the Software Operation Panel. For details, refer to "7.1 Starting Up the Software Operation Panel" (page 56). From the listing on the left, select [Device Setting].
TOP Contents Index Chapter 7 Operational Settings 7.5 Settings Related to Waiting Time Waiting Time to Enter Power Saving Mode [Power saving] 3 The value can range from 5 to 235 minutes (in increments of 5). The waiting time for the scanner to enter power saving mode can be specified. 1 2 Use the slider to specify the waiting time before entering power saving mode. ATTENTION For details, refer to "7.1 Starting Up the Software Operation Panel" (page 56).
Appendix This appendix provides the following information. A.1 Basic Specification .....................................................................................................................................69 A.2 Installation Specification.............................................................................................................................71 A.3 Outer Dimensions ..................................................................................................................
TOP Contents Index Appendix A.1 Basic Specification Introduction Item Specification Notes Scanner type Flatbed - Image sensor CMOS IC - Light source LED (red, green, blue) - 148 × 105 (mm) / 5.83 × 4.13 (in.) A6 Binary (black & white) 1.0 second 200 dpi, A6 Grayscale 1.0 second Color 1.7 seconds Binary (black & white) 1.0 second Grayscale 1.0 second Color 2.5 seconds Binary (black & white) 2.0 seconds Grayscale 2.0 seconds Color 2.0 seconds Binary (black & white) 2.
Appendix Item Output resolution Binary (black & white) Specification 50 to 600, 1200 dpi Grayscale Notes 50 to 600 dpi: configurable in 1 dpi increments TOP Contents Index Introduction Scanner Overview Color Grayscale level 8-bit for each color 16-bit during internal processing Interface USB 2.0/1.1 (*2) (*3) B Type *1: Note that this is the hardware limitation, and the software's processing time such as data transfer time is added to the actual time of scanning. *2: Connection with USB 2.
TOP Contents Index Appendix A.2 Installation Specification Introduction Item Specification Outer dimensions (W × D × H) (*1) 145 × 234 × 40 (mm) / 5.71 x 9.21 × 1.57 (in.) Installation space (W × D × H) (*2) 145 × 281 × 257 (mm) / 5.71 × 11.06 × 10.12 (in.) Weight 0.9 kg (1.
Appendix Item Calorific value Shipping weight (*3) Specification When the power cable is connected Operating : 6.88 kcal/Hr or less Power saving : 2.15 kcal/Hr or less Power OFF : 0.43 kcal/Hr or less When the USB bus power cable is connected Operating : 4.30 kcal/Hr or less Power saving : 2.15 kcal/Hr or less Power OFF : 0.43 kcal/Hr or less 2.0 kg (4.41 lb) *1: The depth and height exclude protruding parts.
TOP Contents Index Appendix A.3 Outer Dimensions Introduction The outer dimensions are as follows: Scanner Overview How to Scan Documents Configuring the Scan Settings 234 (9.21) Various Ways to Scan Daily Care Troubleshooting 40 (1.57) Operational Settings Appendix 145 (5.71) Unit: mm (in.
TOP Contents Index Appendix A.4 Uninstalling the Software Introduction 1 Turn on the computer and log onto Windows as a user with administrator privileges. 6 Click the [Uninstall] button or the [Uninstall/Change] button. 2 Exit all running software. 7 If a confirmation message appears, click [OK] or [Yes]. 3 Display the [Control Panel] dialog box. z Windows XP/Windows Vista/Windows Server 2008/Windows 7 Click [Start] menu [Control Panel].
TOP Contents Index Glossary Glossary Introduction A E N A4 size Edge Extract Noise removal A5 size Edge Processing O A6 size Energy Star A7 size Error diffusion OCR (Optical Character Recognition) A8 size F Automatic size/skew detection FCC B Filter Brightness Flatbed C G Canadian DOC Gamma CCD (Charge-Coupled Device) Image Sensor Grayscale Color balance Halftone H D I Default setting Image processing Density Interface Device error Inversion Dither ISIS dpi (dots
Glossary A A4 size A standard paper size which is 210 × 297 mm (8.27 × 11.7 in.). A5 size A standard paper size which is 148 × 210 mm (5.83 × 8.27 in.). A6 size A standard paper size which is 105 × 148 mm (4.13 × 5.83 in.). A7 size A standard paper size which is 74 × 105 mm (2.91 × 4.13 in.). A8 size A standard paper size which is 52 × 74 mm (2.05 × 2.91 in.). Automatic size/skew detection Automatic page size detection: Detects the paper size and outputs the image data in the same size.
Glossary D Default setting (Hardware) Preset values from the factory. (Software) Values set upon installation of software. Density Refers to the deepness of a color in an image. Device error An error that requires troubleshooting by a service engineer. TOP Contents Index Introduction Scanner Overview How to Scan Documents Configuring the Scan Settings Dither The process by which a group of dots is arranged to reproduce the density of grayscale.
Glossary Energy Star ENERGY STAR is an international standard for energy-efficient electronic equipment which was established by the US Environmental Protection Agency (EPA) in 1992. The standard program has now been adopted by countries around the world. Error diffusion Method of halftone (pseudo-grayscale) image processing which is based on black & white pixel binarization.
Glossary G Gamma A unit which indicates the changes in the brightness of an image. It is expressed as a function of the electric input power to devices (e.g. scanner, display) and the brightness of the image. If the gamma rate is 1 or larger, the brightness of an image increases and vice versa. Normally, the gamma rate is set to 1 when reproducing the same brightness as the original.
Glossary L Letter size A standard paper size used in the United States and other countries (8.5 × 11 in.). TOP Contents Index Introduction M Scanner Overview Moire patterns Recurrent patterns on scanned images caused by incorrect settings of angles. How to Scan Documents N Noise removal A function which improves the quality of an image by removing isolated noise that appear as black dots in a white area (or vice versa).
Glossary R Resolution A measurement to indicate the quality (fineness) of an image. Resolution is displayed by the number of pixels within an inch. Since image data is a collection of small dots (pixels), if the same image contains different amount of pixels, the one with more pixels can express greater details. Therefore, the higher the resolution, the finer the image becomes.
Glossary U USB USB (Universal Serial Bus) is a standard for interfaces used to connect devices such as keyboards and scanners. Up to 127 devices can be connected by this interface. It can be connected and disconnected without powering off the devices. For USB 2.0, the data transfer rate is 1.5 Mbps at Low-speed, 12 Mbps at Full-speed, and a maximum of 480 Mbps at Hispeed. For USB 1.1, the data transfer rate is 1.5 Mbps at Low-speed and 12 Mbps at Full-speed.
TOP Contents Index Index Index B Introduction L before you contact the scanner service provider............ 52 C locations that require cleaning........................................ 35 M cleaning inside.......................................................................... 37 outside........................................................................ 36 cleaning materials........................................................... 35 cleaning the inside.......................................
Index Software Operation Panel password .............................. 58 specifications .................................................................. 69 TOP Contents Index Introduction T troubleshooting ........................................................ 38, 39 Scanner Overview uninstalling software ....................................................... 74 How to Scan Documents various ways to scan ......................................................
TOP Contents Index Introduction Scanner Overview How to Scan Documents Configuring the Scan Settings Various Ways to Scan fi-65F Image Scanner Operator's Guide P3PC-4562-02ENZ0 Issue date: December 2014 Issued by: PFU LIMITED Daily Care Troubleshooting Operational Settings z The contents of this manual are subject to change without notice. z PFU LIMITED assumes no liability for incidental or consequential damages arising from the use of this product, and any claims by a third party.