EHF3320FOK NL EN FR DE KOOKPLAAT HOB TABLE DE CUISSON KOCHFELD GEBRUIKSAANWIJZING USER MANUAL NOTICE D'UTILISATION BENUTZERINFORMATION 2 17 31 46
www.electrolux.com INHOUDSOPGAVE 1. VEILIGHEIDSINFORMATIE...................................................................................3 2. VEILIGHEIDSVOORSCHRIFTEN.......................................................................... 4 3. BESCHRIJVING VAN HET PRODUCT................................................................. 6 4. DAGELIJKS GEBRUIK......................................................................................... 8 5. AANWIJZINGEN EN TIPS............................
NEDERLANDS 1. VEILIGHEIDSINFORMATIE Lees zorgvuldig de meegeleverde instructies voor installatie en gebruik van het apparaat. De fabrikant is niet verantwoordelijk voor letsel en schade veroorzaakt door een foutieve installatie. Bewaar de instructies van het apparaat voor toekomstig gebruik. 1.
www.electrolux.com • • • • • • Probeer brand nooit met water te blussen, maar schakel in plaats daarvan het apparaat uit en bedek de vlam, d.w.z. met een deksel of blusdeken. Bewaar geen voorwerpen op de kookplaten. Metalen voorwerpen, zoals messen, vorken, lepels en deksels mogen niet op de kookplaat worden geplaatst, aangezien ze heet kunnen worden. Gebruik geen stoomreiniger om het apparaat schoon te maken.
NEDERLANDS • • • • • • • • • • • • • • stroomvoorziening. Zo niet, neem dan contact op met een elektromonteur. Zorg ervoor dat het apparaat correct is geïnstalleerd. Losse en onjuiste stroomkabels of stekkers (indien van toepassing) kunnen ervoor zorgen dat de contactklem te heet wordt. Gebruik de juiste stroomkabel. Voorkom dat de stroomkabels verstrikt raken. Zorg ervoor dat er een schokbescherming wordt geïnstalleerd. Gebruik het klem om spanning op het snoer te voorkomen.
www.electrolux.com WAARSCHUWING! Risico op schade aan het apparaat. • Zet geen heet kookgerei op het bedieningspaneel. • Laat kookgerei niet droogkoken. • Laat geen voorwerpen of kookgerei op het apparaat vallen. Het oppervlak kan beschadigen. • Activeer de kookzones niet met lege pannen of zonder pannen erop. • Geen aluminiumfolie op het apparaat leggen. • Pannen van gietijzer, aluminium of met beschadigde bodems kunnen krassen veroorzaken in het glas / glaskeramiek.
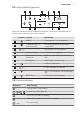
NEDERLANDS 3.2 Indeling Bedieningspaneel 1 2 10 3 4 9 5 6 8 7 Gebruik de tiptoetsen om het apparaat te bedienen. De displays, indicatielampjes en geluiden tonen welke functies worden gebruikt. Tiptoets -functie Opmerking 1 AAN/UIT De kookplaat in- en uitschakelen. 2 Toetsblokkering / De kinderbeveiliging Het bedieningspaneel vergrendelen/ ontgrendelen. 3 / - Het instellen van de kookstand. 4 - Kookstanddisplay De kookstand weergeven.
www.electrolux.com Weergave Omschrijving Er is nog een kookzone heet (restwarmte). Toetsblokkering / De kinderbeveiliging functie is in werking. Automatisch uitschakelen -functie is in werking. 3.4 Restwarmte-indicatie WAARSCHUWING! Er bestaat verbrandingsgevaar door restwarmte. 4. DAGELIJKS GEBRUIK WAARSCHUWING! Raadpleeg de hoofdstukken Veiligheid. 4.1 In- en uitschakelen Raak 1 seconde aan om de kookplaat in– of uit te schakelen. 4.
NEDERLANDS warmte-instelling gaat branden. Na 3 seconden gaat branden. Om de functie uit te schakelen: Raak aan. verstreken is, klinkt er een geluidssignaal en knippert 00. Het geluidssignaal stopzetten: Raak aan. De functie heeft geen invloed op de werking van de kookzones. 4.6 Timer Timer met aftelfunctie U kunt deze functie gebruiken om in te stellen hoe lang de kookzone op dat moment wordt gebruikt. Stel eerst de kookzone in en dan de functie.
www.electrolux.com kookstand in. Raak 4 seconden aan. gaat aan. Zet de kookplaat uit met . Het opheffen van de functie voor maar één kooktijd: zet de kookplaat aan met . gaat aan. Raak aan. Stel de kookstand in binnen 10 seconden. U kunt het kooktoestel bedienen. Als u de kookplaat met uitzet werkt de functie weer. 4 seconden 5. AANWIJZINGEN EN TIPS WAARSCHUWING! Raadpleeg de hoofdstukken Veiligheid. 5.1 Kookgerei De bodem van het kookgerei moet zo dik en vlak mogelijk zijn.
NEDERLANDS Tijd (min) 11 Temperatuurinstelling Te gebruiken voor: Tips 4. - 5. Bereiden van grotere hoeveel- 60 heden voedsel, stoofschotels 150 en soepen Tot 3 l vloeistof plus ingrediënten. 5. - 7 Lichtjes braden: kalfsoester, cordon bleu van kalfsvlees, koteletten, rissoles, worstjes, lever, roux, eieren, pannenkoeken, donuts. zoals nodig Halverwege de bereidingstijd omdraaien.
www.electrolux.com 7.1 Problemen oplossen Probleem Mogelijke oorzaak U kunt de kookplaat niet in- De kookplaat is niet aanschakelen of bedienen gesloten op een stopcontact of is niet goed geïnstalleerd. De zekering is doorgebrand. Oplossing Controleer of de kookplaat goed is aangesloten op het lichtnet. Raadpleeg het aansluitdiagram. Controleer of de zekering de oorzaak van de storing is. Als de zekeringen keer op keer doorslaan, neemt u contact op met een erkende installateur.
NEDERLANDS Probleem Mogelijke oorzaak U kunt de buitenste ring niet inschakelen. Er is een donker deel op de meervoudige zone. De tiptoetsen worden warm. 13 Oplossing Schakel eerst de binnenring in. Het is normaal dat er een donker deel is op de meervoudige zone. Het kookgerei is te groot of staat te dicht bij het bedieningspaneel. Plaats groter kookgerei op de achterste kookzones indien nodig. gaat branden. Automatisch uitschakelen is Schakel de kookplaat uit en in werking. weer in. gaat branden.
www.electrolux.com 7.3 Labels meegeleverd in de zak met accessoires Bevestig de stickers zoals hieronder weergegeven: A B MOD. MOD. PROD.NO. PROD.NO. SER.NO SER.NO DATA DATA C MOD. PROD.NO. SER.NO. 0049 TYPE 230V-50Hz IP20 03 IT MADE IN ITALY A) Plak het op de garantiekaart en verstuur dit deel (indien van toepassing). B) Plak het op de garantiekaart en bewaar dit deel (indien van toepassing). C) Plak het op het instructieboekje. 8.
NEDERLANDS daarbij niet uit. Zorg dat de uiteinden van de afdichtstrip zich in het midden van een van de zijden van de kookplaat bevinden. 3. Tel een paar mm bij de af te knippen lengte van de afdichtstrip. 4. Duw de twee uiteinden van de afdichtstrip samen. 8.5 Montage min. 500mm R 5mm min. 50mm min. 55mm 490+1mm 270+1mm min. 12 mm min. 28 mm min.
www.electrolux.com 9. TECHNISCHE INFORMATIE 9.1 Specificatie kookzones Kookzone Nominaal vermogen (max warmte-instelling) [W] Diameter van de kookzone [mm] Middenvoor 1200 145 Middenachter 700 / 1700 120 / 180 Gebruik voor optimale kookresultaten alleen kookgerei met een diameter niet groter dan de kookzone. 10. MILIEUBESCHERMING Recycle de materialen met het symbool . Gooi de verpakking in een geschikte verzamelcontainer om het te recyclen.
ENGLISH 17 CONTENTS 1. SAFETY INFORMATION.................................................................................... 18 2. SAFETY INSTRUCTIONS...................................................................................19 3. PRODUCT DESCRIPTION................................................................................. 21 4. DAILY USE........................................................................................................ 22 5. HINTS AND TIPS.............................
1. www.electrolux.com SAFETY INFORMATION Before the installation and use of the appliance, carefully read the supplied instructions. The manufacturer is not responsible if an incorrect installation and use causes injuries and damages. Always keep the instructions with the appliance for future reference. 1.
ENGLISH • • • • 19 Metallic objects such as knives, forks, spoons and lids should not be placed on the hob surface since they can get hot. Do not use a steam cleaner to clean the appliance. If the glass ceramic surface / glass surface is cracked, switch off the appliance to avoid the possibility of electric shock. If the supply cord is damaged, it must be replaced by the manufacturer, an authorized Service or similarly qualified persons in order to avoid a hazard. 2. SAFETY INSTRUCTIONS 2.
www.electrolux.com • • • • • • Service Centre or an electrician to change a damaged mains cable. The shock protection of live and insulated parts must be fastened in such a way that it cannot be removed without tools. Connect the mains plug to the mains socket only at the end of the installation. Make sure that there is access to the mains plug after the installation. If the mains socket is loose, do not connect the mains plug. Do not pull the mains cable to disconnect the appliance.
ENGLISH • Clean the appliance with a moist soft cloth. Only use neutral detergents. Do not use abrasive products, abrasive cleaning pads, solvents or metal objects. • Contact your municipal authority for information on how to discard the appliance correctly. • Disconnect the appliance from the mains supply. • Cut off the mains cable and discard it. 2.5 Disposal WARNING! Risk of injury or suffocation. 3. PRODUCT DESCRIPTION 3.
www.electrolux.com Sensor field Function Comment 3 / - To set a heat setting. 4 - Heat setting display To show the heat setting. - Timer indicators of cook- To show for which zone you set the time. ing zones - Timer display To show the time in minutes. - To select the cooking zone. - To increase or decrease the time. 9 - To activate and deactivate the outer ring. 10 STOP+GO To activate and deactivate the function. 5 6 7 8 / 3.
ENGLISH 4.2 Automatic Switch Off The function deactivates the hob automatically if: • All cooking zones are deactivated. • You do not set the heat setting after you activate the hob. • You spill something or put something on the control panel for more than 10 seconds (a pan, a cloth, etc.). An acoustic signal sounds and the hob deactivates. Remove the object or clean the control panel. • You do not deactivate a cooking zone or change the heat setting. After some time comes on and the hob deactivates.
www.electrolux.com time. When the time comes to an end, the sound operates and 00 flashes. To stop the sound: touch To deactivate the function: touch The previous heat setting comes on. . When you deactivate the hob, you also deactivate this function. The function has no effect on the operation of the cooking zones. 4.9 The Child Safety Device 4.7 STOP+GO This function sets all cooking zones that operate to the lowest heat setting. This function prevents an accidental operation of the hob.
ENGLISH Heat setting 25 Use to: Time (min) Hints Keep cooked food warm. as necessary Put a lid on the cookware. 1 - 2. Hollandaise sauce, melt: butter, chocolate, gelatine. 5 - 25 Mix from time to time. 1 - 2. Solidify: fluffy omelettes, baked eggs. 10 - 40 Cook with a lid on. 2. - 3. Simmer rice and milkbased dishes, heating up readycooked meals. 25 - 50 Add the minimum twice as much liquid as rice, mix milk dishes part procedure through. 3. - 4. Steam vegetables, fish, meat.
www.electrolux.com 7. TROUBLESHOOTING WARNING! Refer to Safety chapters. 7.1 What to do if... Problem Possible cause Remedy You cannot activate or operate the hob. The hob is not connected to an electrical supply or it is connected incorrectly. Check if the hob is correctly connected to the electrical supply. Refer to the connection diagram. The fuse is released. Make sure that the fuse is the cause of the malfunction. If the fuse releases again and again, contact a qualified electrician.
ENGLISH Problem Possible cause Remedy You decreased the heat Start from and only increase the heat setting. setting to . You cannot activate the outer ring. There is a dark area on the multiple zone. The sensor fields become hot. 27 Activate the inner ring first. It is normal that there is a dark area on the multiple zone. The cookware is too large or you put it too near to the controls. Put large cookware on the rear zones if possible. comes on. Automatic Switch Off operates.
www.electrolux.com 7.3 Labels supplied with the accessories bag Stick the adhesive labels as indicated below: A B MOD. MOD. PROD.NO. PROD.NO. SER.NO SER.NO DATA DATA C MOD. PROD.NO. SER.NO. 0049 TYPE 230V-50Hz IP20 03 IT MADE IN ITALY A) Stick it on Guarantee Card and send this part (if applicable). B) Stick it on Guarantee Card and keep this part (if applicable). C) Stick it on instruction booklet. 8. INSTALLATION WARNING! Refer to Safety chapters. 8.
ENGLISH 8.5 Assembly min. 500mm R 5mm min. 50mm min. 55mm 490+1mm 270+1mm min. 12 mm min. 28 mm min.
www.electrolux.com 9. TECHNICAL INFORMATION 9.1 Cooking zones specification Cooking zone Nominal Power (Max heat setting) [W] Cooking zone diameter [mm] Middle front 1200 145 Middle rear 700 / 1700 120 / 180 For optimal cooking results use cookware not larger than the diameter of the cooking zone. 10. ENVIRONMENTAL CONCERNS Recycle the materials with the symbol . Put the packaging in applicable containers to recycle it.
FRANÇAIS 31 TABLE DES MATIÈRES 1. CONSIGNES DE SÉCURITÉ.............................................................................. 32 2. INSTRUCTIONS DE SÉCURITÉ......................................................................... 33 3. DESCRIPTION DE L'APPAREIL......................................................................... 35 4. UTILISATION QUOTIDIENNE............................................................................. 37 5. CONSEILS..............................................
1. www.electrolux.com CONSIGNES DE SÉCURITÉ Avant d'installer et d'utiliser cet appareil, lisez soigneusement les instructions fournies. Le fabricant ne peut être tenu pour responsable des dommages et blessures liés à une mauvaise installation ou utilisation. Conservez toujours cette notice avec votre appareil pour vous y référer ultérieurement. 1.
FRANÇAIS • • • • • • • 33 Il peut être dangereux de laisser chauffer de la graisse ou de l'huile sans surveillance sur une table de cuisson car cela pourrait provoquer un incendie. N'essayez jamais d'éteindre un feu avec de l'eau. Éteignez l'appareil puis couvrez les flammes, par exemple avec un couvercle ou une couverture ignifuge. N'entreposez rien sur les surfaces de cuisson.
www.electrolux.com • • • • • • • • • • • • • • correspondent à celles de votre réseau. Si ce n'est pas le cas, contactez un électricien. Assurez-vous que l'appareil est bien installé. Un câble d'alimentation lâche et inapproprié ou une fiche (si présente) non serrée peuvent être à l'origine d'une surchauffe des bornes. Utilisez le câble d'alimentation électrique approprié. Ne laissez pas le câble d'alimentation s'emmêler. Assurez-vous qu'une protection antiélectrocution est installée.
FRANÇAIS incendie à température plus faible que l'huile n'ayant jamais servi. • Ne placez pas de produits inflammables ou d'éléments imbibés de produits inflammables à l'intérieur ou à proximité de l'appareil, ni sur celui-ci. AVERTISSEMENT! Risque d'endommagement de l'appareil. • Ne laissez pas de récipients chauds sur le bandeau de commande. • Ne laissez pas le contenu des récipients de cuisson s'évaporer complètement. • Prenez soin de ne pas laisser tomber d'objets ou de récipients sur l'appareil.
www.electrolux.com 3.2 Description du bandeau de commande 1 2 10 3 4 9 5 8 6 7 Les touches sensitives permettent de faire fonctionner l'appareil. Les affichages, les voyants et les signaux sonores indiquent les fonctions activées. Touche sensitive Fonction Commentaire MARCHE/ARRÊT Pour allumer et éteindre la table de cuisson. Verrouillage / Dispositif de sécurité enfants Pour verrouiller ou déverrouiller le bandeau de commande. / - Pour sélectionner un niveau de cuisson.
FRANÇAIS Affichage 37 Description du La fonction Démarrage automatique de la cuisson est activée. + chiffre Une anomalie de fonctionnement s'est produite. Une zone de cuisson est encore chaude (chaleur résiduelle). La fonction Verrouillage /Dispositif de sécurité enfants est activée. La fonction Arrêt automatique est activée. 3.4 Voyant de chaleur résiduelle AVERTISSEMENT! Il y a risque de brûlures par la chaleur résiduelle. 4.
www.electrolux.com 4.5 Démarrage automatique de la cuisson Cette fonction vous permet d'atteindre le niveau de cuisson sélectionné en un temps plus court. Cette fonction active le niveau de cuisson le plus élevé pendant un certain temps puis redescend au niveau sélectionné. Pour activer la fonction, la zone de cuisson doit être froide Pour activer la fonction pour une zone de cuisson : appuyez immédiatement sur jusqu'à ce que le niveau de cuisson réglé s'affiche. Au bout de 3 secondes, s'allume.
FRANÇAIS 39 une modification accidentelle du réglage du niveau de cuisson. sélectionnez pas de réglage de niveau de Réglez d'abord le niveau de cuisson. 4 secondes. Pour activer la fonction : appuyez sur de cuisson en appuyant sur . s'affiche pendant 4 secondes.Le minuteur reste activé. Pour désactiver la fonction : allumez la cuisson. Appuyez sur pendant s'allume. Éteignez la table . Pour désactiver la fonction : appuyez table de cuisson en appuyant sur .
www.electrolux.com Niveau de cuisson Utilisation : Durée (min) Conseils Conserver les aliments cuits au chaud. au besoin Placez un couvercle sur le récipient. 1 - 2. Sauce hollandaise, faire fondre : beurre, chocolat, gélatine. 5 - 25 Mélangez de temps en temps. 1 - 2. Solidifier : omelettes, œufs cocotte. 10 - 40 Couvrez pendant la cuisson. 2. - 3. Faire mijoter des plats à base de riz et de laitage, réchauffer des plats cuisinés.
FRANÇAIS cuisson. Tenez le racloir spécial incliné sur la surface vitrée et faites glisser la lame du racloir pour enlever les salissures. • Une fois que la table de cuisson a suffisamment refroidi, enlevez : traces de calcaire et d'eau, projections 41 de graisse, décolorations métalliques luisantes. Nettoyez la table de cuisson à l'aide d'un chiffon humide et d'un peu de détergent. Après le nettoyage, séchez l'appareil à l'aide d'un chiffon doux. 7.
www.electrolux.com Problème Cause probable Solution La table de cuisson est désactivée. Vous avez posé quelque chose sur la touche sensi- Retirez l'objet de la touche sensitive. tive . Voyant de chaleur résiduelle La zone de cuisson n'est ne s'affiche pas. pas chaude parce qu'elle n'a fonctionné que peu de temps. Si la zone a eu assez de temps pour chauffer, faites appel à votre service aprèsvente. La fonction Démarrage automatique de la cuisson ne fonctionne pas.
FRANÇAIS (située dans un des coins de la surface en verre) et le message d'erreur qui s'affiche. Assurez-vous d'utiliser correctement la table de cuisson. En cas d'erreur de manipulation de la part de l'utilisateur, le déplacement du technicien du service après-vente ou du vendeur pourra être facturé, même en cours de garantie. Les instructions relatives au service après- A vente et aux conditions de garantie figurent dans le livret de garantie. 7.
www.electrolux.com 8.4 Installation du joint 1. Nettoyez la zone de découpe du plan de travail. 2. Placez le joint fourni sur le bord inférieur de la table de cuisson, le long du bord externe de la surface vitrocéramique. N’étirez pas le joint. Assurez-vous que les extrémités du joint se trouvent au milieu d'un bord latéral de la table de cuisson. 3. Lorsque vous découpez le joint, ajoutez quelques millimètres de longueur. 4. Rassemblez les deux extrémités du joint. 8.5 Montage min.
FRANÇAIS 45 9. CARACTÉRISTIQUES TECHNIQUES 9.1 Caractéristiques des zones de cuisson Zone de cuisson Puissance nominale (niveau de cuisson max.) [W] Diamètre de la zone de cuisson [mm] Avant centrale 1200 145 Arrière centrale 700 / 1700 120 / 180 Pour des résultats de cuisson optimaux, utilisez des récipients qui ne dépassent pas le diamètre de la zone de cuisson. 10. EN MATIÈRE DE PROTECTION DE L'ENVIRONNEMENT Recyclez les matériaux portant le symbole .
www.electrolux.com INHALTSVERZEICHNIS 1. SICHERHEITSINFORMATIONEN....................................................................... 47 2. SICHERHEITSANWEISUNGEN..........................................................................48 3. GERÄTEBESCHREIBUNG................................................................................. 51 4. TÄGLICHER GEBRAUCH.................................................................................. 52 5. TIPPS UND HINWEISE...............................
DEUTSCH 1. 47 SICHERHEITSINFORMATIONEN Lesen Sie vor der Montage und dem Gebrauch des Geräts zuerst die Gebrauchsanleitung. Der Hersteller übernimmt keine Verantwortung für Verletzungen und Beschädigungen durch unsachgemäße Montage. Bewahren Sie die Gebrauchsanleitung griffbereit auf. 1.
www.electrolux.com • • • • • • • Kochen mit Fett oder Öl auf einem unbeaufsichtigten Kochfeld ist gefährlich und kann zu einem Brand führen. Versuchen Sie nicht einen Brand mit Wasser zu löschen, sondern schalten Sie das Gerät aus und bedecken Sie die Flamme mit einem Deckel oder einer Feuerlöschdecke. Legen Sie keine Gegenstände auf dem Kochfeld ab. Legen Sie keine Metallgegenstände wie Messer, Gabeln, Löffel oder Topfdeckel auf die Oberfläche des Kochfelds, da diese heiß werden können.
DEUTSCH 2.2 Elektrischer Anschluss WARNUNG! Brand- und Stromschlaggefahr. • Alle elektrischen Anschlüsse sind von einem geprüften Elektriker vorzunehmen. • Das Gerät muss geerdet sein. • Vor der Durchführung jeglicher Arbeiten muss das Gerät von der elektrischen Stromversorgung getrennt werden. • Stellen Sie sicher, dass die elektrischen Daten auf dem Typenschild den Daten Ihrer Stromversorgung entsprechen. Wenden Sie sich andernfalls an eine Elektrofachkraft.
www.electrolux.com • Hat die Geräteoberfläche einen Sprung, trennen Sie das Gerät umgehend von der Spannungsversorgung. Dies dient zur Vermeidung eines Stromschlags. • Wenn Sie Nahrungsmittel in heißes Öl geben, kann dieses spritzen. WARNUNG! Brand- und Explosionsgefahr! • Erhitzte Öle und Fette können brennbare Dämpfe freisetzen. Halten Sie Flammen und erhitzte Gegenstände beim Kochen mit Fetten und Ölen von diesen fern.
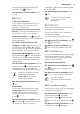
DEUTSCH 3. GERÄTEBESCHREIBUNG 3.1 Kochfeldanordnung 1 Kochzone 2 Bedienfeld 1 120/180 mm 1 145 mm 2 3.2 Bedienfeldanordnung 1 2 10 3 9 4 5 8 6 7 Bedienen Sie das Gerät über die Sensorfelder. Die Anzeigen, Kontrolllampen und akustischen Signale informieren Sie über die aktiven Funktionen. Sensor- Funktion feld Anmerkung 1 EIN/AUS Ein- und Ausschalten des Kochfeldes. 2 Tastensperre / Kindersicherung Verriegeln/Entriegeln des Bedienfelds. 3 / - Einstellen der Kochstufe.
www.electrolux.com Sensor- Funktion feld 9 10 Anmerkung - Ein- und Ausschalten des äußeren Kreises. STOP+GO Ein- und Ausschalten der Funktion. 3.3 Anzeigen der Kochstufen Display Beschreibung Die Kochzone ist ausgeschaltet. - / - Die Kochzone ist eingeschaltet. Die Funktion STOP+GO ist in Betrieb. Die Funktion Ankochautomatik ist in Betrieb. + Zahl Eine Störung ist aufgetreten. Eine Kochzone ist noch heiß (Restwärme). Die Funktion Tastensperre / Kindersicherung ist in Betrieb.
DEUTSCH Verhältnis zwischen der Kochstufe und den Zeiten der Funktion: • , 1 - 2 - 6 Stunden • 3 - 4 - 5 Stunden • 5 - 4 Stunden • 6 - 9 - 1,5 Stunden 4.3 Einstellen der Kochstufe Berühren Sie , um die Kochstufeneinstellung zu erhöhen. Berühren Sie , um die Kochstufeneinstellung zu verringern. Berühren Sie zum Ausschalten der Kochzone und gleichzeitig. 4.4 Ein- und Ausschalten der äußeren Heizkreise Die Kochflächen können an die Größe des Kochgeschirrs angepasst werden.
www.electrolux.com Ausschalten des Signaltons: Berühren Sie Die Funktion hat keine Auswirkung auf den Kochzonenbetrieb. 4.7 STOP+GO Mit dieser Funktion werden alle eingeschalteten Kochzonen auf die niedrigste Kochstufe geschaltet. Ist die Funktion eingeschaltet, lässt sich die Kochstufe nicht ändern. Die Funktion unterbricht nicht die Uhrfunktionen. Einschalten der Funktion: Berühren Sie . Diese Funktion wird auch ausgeschaltet, sobald das Kochfeld ausgeschaltet wird. . leuchtet. 4.
DEUTSCH • Setzen Sie das Kochgeschirr vor dem Einschalten der Kochzone auf. • Nutzen Sie die Restwärme, um die Speisen warm zu halten oder zu schmelzen. • Kochgeschirrboden und Kochzone sollten gleich groß sein. Kochstufe 55 5.3 Anwendungsbeispiele zum Kochen Bei den Angaben in der folgenden Tabelle handelt es sich um Richtwerte. Verwendung: Dauer (Min.) Hinweise Warmhalten von gegarten Speisen. Nach Bedarf Legen Sie einen Deckel auf das Kochgeschirr. 1 - 2.
www.electrolux.com • Kratzer oder dunkle Flecken auf der Oberfläche beeinträchtigen die Funktionsfähigkeit des Kochfelds nicht. • Verwenden Sie einen Spezialreiniger zur Reinigung der Kochfeldoberfläche. • Verwenden Sie einen speziellen Reinigungsschaber für Glas. 6.2 Reinigen des Kochfelds • Folgendes muss sofort entfernt werden: geschmolzener Kunststoff, Plastikfolie, zuckerhaltige Lebensmittel. Andernfalls können die Verschmutzungen das Kochfeld beschädigen.
DEUTSCH 57 Problem Mögliche Ursache Abhilfe Ein akustisches Signal ertönt und das Kochfeld schaltet ab. Wenn das Kochfeld ausgeschaltet wird, ertönt ein akustisches Signal. Mindestens ein Sensorfeld wurde bedeckt. Entfernen Sie den Gegenstand von den Sensorfeldern. Das Kochfeld wird ausgeschaltet. Sie haben etwas auf das Entfernen Sie den Gegenstand vom Sensorfeld. Restwärmeanzeige erscheint nicht.
www.electrolux.com Problem Mögliche Ursache Abhilfe und eine Zahl werden angezeigt. Es ist ein Fehler aufgetreten. Trennen Sie das Kochfeld eine Zeit lang vom Stromnetz. Schalten Sie die Sicherung im Sicherungskasten der Hausinstallation aus. Schalten Sie die Sicherung wieder ein. Wenn erneut aufleuchtet, wenden Sie sich an den autorisierten Kundendienst. 7.2 Wenn Sie das Problem nicht lösen können... haben.
DEUTSCH 59 8. MONTAGE • Ersetzen Sie ein defektes Netzkabel durch ein Netzkabel des folgenden oder eines höheren Typs: H05BB-F Tmax 90°C. Wenden Sie sich an den Kundendienst. WARNUNG! Siehe Kapitel Sicherheitshinweise. 8.1 Vor der Montage Notieren Sie vor der Montage des Kochfelds folgende Daten, die Sie auf dem Typenschild finden. Das Typenschild ist auf dem Boden des Kochfelds angebracht. Modell ........................... Produktnummer (PNC) ........................................ Seriennummer ....
www.electrolux.com min. 12 mm min. 28 mm min. 20 mm 9. TECHNISCHE DATEN 9.1 Technische Daten der Kochzonen Nennleistung (höchste Kochstufe) [W] Kochzone Durchmesser der Kochzone [mm] Vorne Mitte 1200 145 Hinten Mitte 700 / 1700 120 / 180 Verwenden Sie für optimale Kochergebnisse kein Kochgeschirr dessen Durchmesser größer als der der Kochzone ist. 10. UMWELTTIPPS Recyceln Sie Materialien mit dem Symbol . Entsorgen Sie die Verpackung in den entsprechenden Recyclingbehältern.
DEUTSCH Ihrer örtlichen Sammelstelle oder wenden Sie sich an Ihr Gemeindeamt.
www.electrolux.
DEUTSCH 63
867301090-B-192014 www.electrolux.