a Finding Information Please Read And Save This Guide Thank you for choosing Electrolyte, our new premium brand in home appliances. This Use & Care Guide is part of aur commitment to customer satisfaction and product quality throughout the service life of your new appliance.
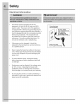
Safety 3 Important Safety Instructions Safety Precautions Do not attempt to install or operate your unit until you have read the safely precautions in this manual, Safety items throughout this manual are labeled with a Danger, Warning, or Caution based on the risk type. Definitions A This is the safety alert symbol. iris used to alert you to potential personal injury hazards. Obey ali safety messages that follow this symbol to avoid possible injury or death. /\ DANGER DANGER | indies an imminently hazardous
Safety Electrical information Leanness You must inflow these guidelines to alienate that your refrigerators safely mechanize are operating correctly. The freezer must be plugged info its own dedicated 115 Volt, 60 Hz, AC-only non-GUCCI electric outlet. The power cord of the appliance is equipped with a three-prong grounding plug for your protection against electrical shack hazards, It must be plugged directly into a properly grounded three-prong receptacle.
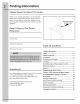
Feature Overview Understanding Features and Terms Your Electrolyte freezer is designed for optimal convenience and storage flexibility. The illustration below is provided fo assist you with familiarizing yourself with product features and terminology.
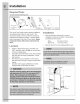
installation Required Tools You will need the following tools: Tools Necessary: #hilltops” Head or #2 Square Dive Head wench Set This Use & Care Guide provides general installation and operating instructions for your model. We recommend using a service or kitchen contracting professional to install your freezer. Use the freezer only as instructed in this Use & Care Guide. Before starting the freezer, follow these important first steps.
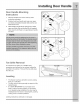
Installing Door Handle 7 Door Handle Mounting instructions 1. Remove handles from carton and any other protective packaging. 2. Position fresh food handle end caps over upper and lower preinstalled shoulder bolts (A) that are fastened into door. 3. While holding handle firmly against door, fasten upper and lower Allen set screws (B)} with supplied Allen wrench until thees is no gap between handle and door. = NOTE All set screws should be tightened so the straw = below lhe surface of the handle.
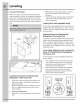
Leveling To Level The Freezer: While unit is lying on its back for wood skid removal, ante the location of the four {4) leg levelers installed at each corner. These leg levelers will be used fo level the freezer and to adjust the height. Use a carpenters level to level the freezer from front to back and side to side.
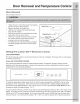
Door Removal and Temperature Control & Door Removal If door must be removed: NATION : Door ea Benny commendation tie be people to veniremen of replace the door assembly from the cabinet. + Unplug the unit or switch the breaker that supplies " power to the unit to the off position. Hinge Cover—_ * Remove the plastic top hinge cover. + Hold the door in place while removing the top hinge from the cabinet. » Remove the two 3/8" hex head bolts from the top hinge with a 3/8" wrench or socket.
Electronic Control Adjust UP Key Air Filter Reset Key Temp Mode Key Alarm Off Key Electrolyte | CON -10 °F Sot a z dof Jock 4 LS Adjust DOWN Key Door Ajar —7 Co Replace Air Filter ! Indicator Power Fail Indicator Indicator Control Lock Key Custom Set™ Electronic Control Features Replace Air Filter When the “REPLACE AIR FILTER” LED is illuminated yellow, the air filter needs to be replaced. The control will signal for air filter replacement after 3600 hours of refrigerator operation.
Alarms i Alarms There are four possible conditions that will cause the alarm tone to sound. High Temp Alarm if the temperature inside the cabinet has exceeded 23°F for 1 hour or more of normal operation, the Hi TEMP LED will illuminate, the HIGH TEMP Alarm will sound and the cabinet temperature is shown in the display. The LED and temperature alarm will remain active until the cabinet temperature is below 23°F The audible alarm can be turned off by pressing ALARM OFF key.
Sabbath Mode and Air Filter Sabbath Mode The Sabbath Mode is a feature that disables portions of the freezer and its controls in accordance with the observance of the weekly Sabbath and religious holidays within the Orthodox Jewish community. To initiate or cancel Sabbath Mode, press the CONTROL LOCK and TEMP MODE keys at the same time and hold for three (3) seconds. The display will now show “Sb” and the confirmation phone will sound.
Theater™ Lighting and Water Supply 13 Theater™ LED Lighting The interior cabinet lighting features LED lights that gradually ramp up in intensity after the door is opened, 1. WARNING Unplug he unit or Wile the Breaker Thai supplies power 10 the unit to the off position before changing an LED light To replace an LED: 1. Unplug the electrical cord or switch OFF the power supply breaker. 2. Push down on the LED cover and then pull away from the cabinet interior. 3.
EMOTE : Sack with your focal biding authorized ior recommendations on water lines and associated centennials prior bo installing your new fever Depending on your socialite building cores. Electrical omniscient for homes with existing : valves is Smart Choine® water line kil 5805513409 Cs withhold an existing valve Elective recommends ite Swi f Choice water ine Jit S058 10064 (pith a 20 ft Cooper Atoll Line with sellotaping saddle valve): Please refer fo wow electrification com for more information.
lce Service 15. ice Service i your freezer has an automatic ice maker, it will provide a sufficient supply of ice for normal use. During the initial startup of your freezer, however, tio ice will be produced during the first 24 hours of operation. Automatic ice makers are also optional accessories that may be installed in some models at any time. Call your cola! dealer for information. Turning Your lce Maker On After the plumbing connections have been completed, the water supply valve must be opened.
Storage Components Storage Custom Design™ Glass Shelving Multi-position adjustable slide out glass shelves can be moved to any position for larger or smaller packages. The shipping spacers that stabilize the shelves for shipping may be removed and discarded. To Adjust The Shelves » Lift front edge up. » Pull shelf out. + Replace the shelf by inserting the hooks at rear of the shelf into the wall bracket. Lower the shelf into the desired slots and lock into position.
Storage Components 17 Adjustable Door Bins This model is equipped with adjustable door bins that can be moved to suit individual needs. To Move Door Bins: » Lift the bin straight up. + Remove the bin, » Place the bin in desired position, * Lower the bin onto supports until locked in place. Soft Freeze Tilt Out Bin The soft freeze tilt out bin is designed to be warmer than the freezer compartment. It is ideal for keeping ice cream and frozen yogurt ready to serve.
Energy Saving ideas » Locate the freezer in the coolest part of the room, out of direct sunlight, and away from heating ducts or registers. Do not place the freezer next to heat-producing appliances such as a range, oven, or dishwasher. Hf this is not possible, a section of cabinetry or an added layer of insulation between the two appliances will help the freezer operate more efficiently. + Level freezer so that the door closes tightly.
Care & Cleaning 19 caution «© Tums ng the freezer ‘temperature control 10 oF (See Page 9) turns off the compressor but does not disconnect electrical power in the LED lights or cor electrics com opponents. np Tg the unit ar switch the Breaker that supplies power to the uni to the oft position. | + Do not use razor blades of other sharp instructs which ean scratch the appliance suttee a removing adhesive labels.
2{} Warranty Information FREEZER WARRANTY Your freezer is protected by this warranty WARRANTY THROUGH QUR AUTHORIZED SERVICES, “THE CONSUMER WILL BE PERIOD WE WILL: RESPONSIBLE FOR: FULL ONE-YEAR | One ear from Pay all costs for repairing or replacing any pacts of tis Lost of service calls hat are tied under WARRANTY original purchase | appliance winch prove to be defective in materials or NORMAL RESPONSIBILITIES OF THE date. workmanship. Exclusions original and emplacement loa & Water | CONSUMER.
Solutions To Common Problems 21 Troubleshooting Guide Before calling for service, review this fist. it may save you time and expense. This list includes common occurrences that are not the result of defective workmanship or materials in this Freezer, Problem Cause Correction Freezer Operation Freezer does not run. * Freezer is plugged into a circuit that has a ground fault interrupt. * Temperature control set to “OFF”, * Freezer may not be plugged in, ar plug may be loose.
91 Solutions To Common Problems Problem Cause Correction Bound And Noise (Continued) Popping or cracking sound when Compressor Tomes on. * Metal parts undergo expansion and contraction, as in hot water pipes, “This Is normal. Sound will level off or disappear as Freezer continues to run, Bubbling or gurgling sand. * Freezer (used to cool refrigerator is circulating throughout the system, “This is normal. Vibrating or rattling noise. * Freezer is not level. It mks on the floor when iris moved slightly.