
User Manual


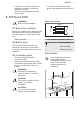

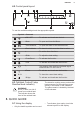
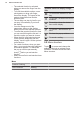
Table Of Contents
- CONTENTS
- 1. SAFETY INFORMATION
- 2. SAFETY INSTRUCTIONS
- 3. INSTALLATION
- 4. PRODUCT DESCRIPTION
- 5. QUICK GUIDE
- 6. BEFORE FIRST USE
- 7. DAILY USE
- 7.1 Activating and deactivating
- 7.2 Automatic Switch Off
- 7.3 Using the cooking zones
- 7.4 Heat setting
- 7.5 PowerBoost
- 7.6 Power limitation
- 7.7 Power Management
- 7.8 Bridge function
- 7.9 Timer
- 7.10 Pause
- 7.11 Lock
- 7.12 Child Lock
- 7.13 Language
- 7.14 Key Tones / Buzzer Volume
- 7.15 Display Brightness
- 7.16 Assisted Cooking
- 7.17 Melting
- 7.18 Hob²Hood
- 8. HINTS AND TIPS
- 9. CARE AND CLEANING
- 10. TROUBLESHOOTING
- 11. TECHNICAL DATA
- 12. ENERGY EFFICIENCY
- 목차
- 1. 안전 정보
- 2. 안전 지침
- 3. 설치
- 4. 제품 설명
- 5. 빠른 가이드
- 6. 처음 사용하기 전에
- 7. 일상적 사용
- 8. 유용한 정보
- 9. 관리 및 청소
- 10. 문제 해결
- 11. 기술 정보
- 12. 에너지 효율성

• The selected function is activated
when you remove the finger from the
display.
• To scroll the available options, use a
quick gesture or drag your finger
across the display. The speed of the
gesture determines how fast the
screen moves.
• The scrolling can stop by itself or you
can stop it immediately if you touch
the display.
• You can change most of the
parameters shown on the display
when you touch the relevant symbols.
• To select the required function or time
you can scroll through the list and / or
touch the option you want to choose.
• When the hob is activated and some
of the symbols disappear from the
display, touch it again. All the symbols
come back on.
• For certain functions, when you start
them, a pop-up window with additional
information appears. To deactivate
the pop-up window permanently,
check before you activate the
function.
• Select a zone first to activate the timer
functions.
Symbols useful for display naviga‐
tion
To confirm the selection or set‐
ting.
To go back / forwards one level in
the Menu.
To scroll up / down the instruc‐
tions on the display.
To activate / deactivate the op‐
tions.
To close the pop-up window.
To cancel a setting.
5.2 Menu structure
Touch to access and change the
settings of the hob or activate some
functions. The table shows the basic
Menu structure.
Menu
Assisted Cooking
Hob Functions Melting
www.electrolux.com10