EN REFRIGERATOR FR RÉFRIGÉRATEUR ES REFRIGERADOR USE AND CARE GUIDE GUIDE D’UTILISATION ET D’ENTRETIEN GUIA DE USO Y CUIDADO A01061201 August 2014
Finding Information Please read and save this guide Thank you for choosing Electrolux, our new premium brand in home appliances. This Use & Care Guide is part of our commitment to customer satisfaction and product quality throughout the service life of your new appliance. Keep a record for quick reference Purchase date Table of contents Finding Information............................... 2 Safety..................................................... 3 Feature Overview...................................
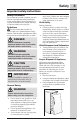
Safety Important safety instructions Safety Precautions Do not attempt to install or operate your unit until you have read the safety precautions in this manual. Safety items throughout this manual are labeled with a Danger, Warning, or Caution based on the risk type. Definitions This is the safety alert symbol. It is used to alert you to potential personal injury hazards. Obey all safety messages that follow this symbol to avoid possible injury or death.
Safety Electrical information WARNING You must follow these guidelines to ensure that your appliance’s safety mechanisms are operating correctly. • The unit must be plugged into its own dedicated 115 Volt, 60 Hz, AC-only non-GFCI electric outlet. The power cord of the appliance is equipped with a three-prong grounding plug for your protection against electrical shock hazards. It must be plugged directly into a properly grounded three-prong receptacle.
Feature Overview Understanding features and terms Your Electrolux appliance is designed for optimal convenience and storage flexibility. The illustration below is provided to assist you with familiarizing yourself with product features and terminology. NOTE *Features may vary according to model.
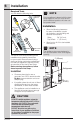
Installation Required Tools NOTE You will need the following tools: Tools Necessary: Adjustable Wrench (OR) Phillips Head or #2 Square Drive Head Socket Wrench Set Socket Wrench Set Installation and OR or OR • Allow the following clearances for ease of installation, proper air circulation, and plumbing and electrical connections: Sides ⅜” (9.5 mm) Top & Back 1” (25.4 mm) • Allow for trim kit if it to be installed with the unit.
Installing Door Handle Door Handle Mounting Instructions 1. 2. 3. 4. Remove handle from carton and any other protective packaging.
Leveling To Level The Refrigerator: While unit is lying on its back, note the location of the 4 leg levelers installed at each corner. These leg levelers will be used to level the refrigerator and to adjust the height. Use a carpenter’s level to level the refrigerator from front to back and side to side. Adjust the plastic leveling feet in front, ½ bubble higher, so that the door closes easily when left halfway open.
Door Removal & Temperature Control Door Removal If door must be removed: CAUTION Doors are heavy. It is recommended to have two people remove or replace the door assembly from the cabinet. • Unplug the unit or switch the breaker that supplies power to the unit to the off position. • Remove the plastic top hinge cover. • Hold the door in place while removing the top hinge from the cabinet. • Remove the two ⅜” hex head bolts from the top hinge with a ⅜” wrench or socket.
Electronic Control & Alarms IQ Touch™ Electronic Control Features Replace Air Filter When the “REPLACE AIR FILTER” LED is illuminated yellow, the air filter needs to be replaced. The control will signal for air filter replacement after 3600 hours of operation. After replacing the air filter, reset the air filter timer by pressing the AIR FILTER key for 3 seconds. The “REPLACE AIR FILTER” LED will be illuminated green for 3 seconds, confirming a timer reset.
Alarms & Sabbath Mode 11 hold to reset press & hold °F air filter door ajar power fail temp mode alarm off control lock replace air filter Door Ajar Alarm This alarm will sound to alert you that the door has been open for 5 minutes or more. The DOOR AJAR LED will illuminate and the audible alarm will sound until the door is closed. The audible alarm can be turned off by pressing the ALARM OFF key or by closing the door. If the door is ajar for 15 minutes, the interior light will turn off.
Air Filter & Luxury DesignTM Lighting Pure Advantage™ Air Filter Your new Pure AdvantageTM air filter is located inside one of the 2 Liter Door Bins. The air filter cover is located on the upper right side of the control box. In general, you should change the air filter with Part Number “EAFCBF” every six months to ensure optimal filtering of appliance odors. The replacement air filter can be purchased on the Electrolux website (http://www.electroluxappliances.com) or call toll free in the U.S.
Storage Components 13 Luxury Design™ Glass Shelves Multi-position adjustable slide out glass shelves can be moved to any position for larger or smaller packages. The shipping spacers that stabilize the shelves for shipping may be removed and discarded. Insert into slots To Adjust The Shelves • Lift front edge up. • Pull shelf out. • Replace the shelf by inserting the hooks at rear of the shelf into the wall bracket. Lower the shelf into the desired slots and lock into position.
Storage Components Adjustable 2-Liter Door Bins This model is equipped with adjustable door bins that can be moved to suit individual needs. To Move Door Bins: • • • • Lift the bin straight up. Remove the bin. Place the bin in desired position. Lower the bin onto supports until locked in place. Adjustable Dairy Bin Use the dairy compartment, at the top of the fresh food compartment door, for short term storage of cheese, spreads, or butter.
Storing Food & Saving Energy 15 Ideas For Storing Foods Vacation And Moving Tips Fresh Food Storage Short Vacations: • Keep the fresh food compartment between 34° F and 40° F with an optimum temperature of 37° F. • Avoid overcrowding the appliance shelves, which reduces air circulation and causes uneven cooling. Fruits and Vegetables Store fruits and vegetables in crisper drawers, where trapped moisture helps preserve food quality for longer time periods.
Care & Cleaning NOTE CAUTION • Turning the temperature control to “OFF” (See IQ TouchTM Electronic Control) turns off the compressor, but does not disconnect electrical power to the LED lights or other electrical components. Unplug the unit or switch the breaker that supplies power to the unit to the off position. • Do not use razor blades or other sharp instruments which can scratch the appliance surface when removing adhesive labels.
Solutions to Common Problems 17 Troubleshooting Guide Before calling for service, review this list. It may save you time and expense. This list includes common occurrences that are not the result of defective workmanship or materials in this appliance. Concern Potential Cause Appliance Operation Appliance does • Appliance is plugged not run. into a circuit that has a ground fault interrupt. • Temperature control set to “OFF”. • Appliance may not be plugged in, or plug may be loose.
Solutions to Common Problems Concern “E7”, “E8”, “E9” is displayed on control. Potential Cause Common Solution • The control has • For toll-free telephone support registered an error code. in the U.S. and Canada: 1-877-4ELECTROLUX (1-877435-3287) “Sb” is displayed • The control is in • Pressing the CONTROL LOCK on control. Sabbath Mode. and TEMP MODE keys to exit Sabbath Mode. Sound & Noise Louder sound • Modern appliances • This is normal.
Solutions to Common Problems 19 Concern Potential Cause Common Solution Lighting Problems Light bulb is not on. • The LED or light bulb is • Follow directions under “Luxury burned out. Design™ Lighting” in the “Air Filter and Luxury Design™ Lighting” section. • No electric current is • See “APPLIANCE DOES NOT RUN”. reaching the appliance. • Control is in Sabbath • Depress TEMP MODE key and mode (Sb is displayed CONTROL LOCK key for on control) 3 seconds.
Major Appliance Warranty Information Your appliance is covered by a one year limited warranty. For one year from your original date of purchase, Electrolux will repair or replace any parts of this appliance that prove to be defective in materials or workmanship when such appliance is installed, used, and maintained in accordance with the provided instructions.