
Installation Guide
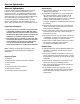

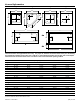


Table Of Contents
- Swan-Shower-Pan-Installation-Guide-20031410M_updated 1
- Swan-Shower-Pan-Installation-Guide-20031410M_updated 3
- Swan-Shower-Pan-Installation-Guide-20031410M_updated 4
- Swan-Shower-Pan-Installation-Guide-20031410M_updated 5
- Swan-Shower-Pan-Installation-Guide-20031410M_updated 6
- Swan-Shower-Pan-Installation-Guide-20031410M_updated 7
- Swan-Shower-Pan-Installation-Guide-20031410M_updated 8
- Swan-Shower-Pan-Installation-Guide-20031410M_updated 9
- Swan-Shower-Pan-Installation-Guide-20031410M_updated 10
- Swan-Shower-Pan-Installation-Guide-20031410M_updated 11
- Swan-Shower-Pan-Installation-Guide-20031410M_updated 12
- Swan-Shower-Pan-Installation-Guide-20031410M_updated 13
- Swan-Shower-Pan-Installation-Guide-20031410M_updated 14
- Swan-Shower-Pan-Installation-Guide-20031410M_updated 15
- Swan-Shower-Pan-Installation-Guide-20031410M_updated 16
- Swan-Shower-Pan-Installation-Guide-20031410M_updated 17
- Swan-Shower-Pan-Installation-Guide-20031410M_updated 18
- Swan-Shower-Pan-Installation-Guide-20031410M_updated 19
- Swan-Shower-Pan-Installation-Guide-20031410M_updated 20

3. The DreamStone or alternate shower wall material will
be installed over the 1/2” moisture-resistant wall
board and shower floor flange, as shown in the
illustration below.
Example 2
If the shower floor is to be installed in conjunction with a
DreamStone Alcove Wall Kit, the following procedures
must be followed.
1. Install the shower floor following the appropriate
instructions in the Standard Shower Floor Installation
or Barrier-Free Shower Floor and Ramp Installation
section in this manual. The illustration below shows
the ideal shower floor flange to frame work gap of
3/16”.
2. After shower floor installation is complete, refer to
the alcove wall kit manual for more information on
installing alcove wall kits. Follow those instructions
to install the DreamStone Alcove Wall Kit directly to
the stud wall framework.
Example 3
If the shower floor is to be installed in conjunction with
existing moisture-resistant wall board, the following
procedures must be followed.
1. Install the shower floor following the appropriate
instructions in the Standard Shower Floor Installation
or Barrier-Free Shower Floor and Ramp Installation
section in this manual. The illustration below shows
the ideal shower floor flange to existing wall surface
gap of 3/16”.
BK-SB-003
3/16"
1/2"
Existing
Wall
Surface
Shower
Floor
ABS-028a
Side
Panel
Multiple Studs
A
B
Top View
Looking Down
3/4” Filler Board for
Shower Door Installation
BK-SB-003
3/16"
1/2"
DreamStone
Wall Panel
Moisture
Resistant
Wallboard
(866) 731-2244
11
DreamLine – DreamStone
Installation Procedure